Thanks so much for the kind words @Shanner22Great attention to detail.
I bought some collections of Stainless Steel FENDER Washers and O-Rings for... well custom fit the Motocorse Titanium Frame Bolt Cap


But why?
Well, Motocorse Japan made a 3 pieces kit of Titanium Frame Bolt Caps for the Ducati 998. However, they did not make the 2 pieces for the swing arm axle bolt, so they look unfinished.
I decided to purchase the Motocorse Japan Titanium Frame Bolt cap kit for the 1199 Panigale, and use the 2 larger Frame Cap but of course, they would not fit flush, meaning they would poke out... which is unacceptable...
2 pictures below show they came from Motocorse Japan:


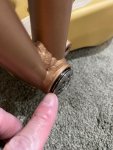
And the left picture below shows all the washers, oring, and serrated nut that I stack, and the right picture show how they are stacked together. As you can see they are now "thinner overall"


VOILA:

And now all the frame bolt are CAPS with Motocorse Titanium Frame Bolt Caps


Next just add some ProTi bolts to the unused threaded holes of the Ohlins shocks:


Also replace the 2 bolts holding the bearing behind the water pump impeller with ProTi Titanium bolts:

Replace the black plastic air stem valve with AELLA Titanium:


and of course more ProTi for the Motocorse Ohlins Steering Damper bracket:


I am now waiting for 2 Custom Machined TITANIUM Steering Lock mechanisms and Steering Damper Mounting Spacer, no that is not a typo, it will be a TITANIUM chunk of nicely machined metal coming soon

Once these 2 TITANIUM parts arrived then I can install the Ohlins Steering Damper with this Motocorse Bracket.
Attachments
-
 131.4 KB Views: 3


 ,
,


 :
:


 :
:


