I'm sorry, please tell me the address of this site.
DUCATI Panigale V4 25° Anniversario 916 BUILD Thread
- Thread starter BMW Alpina
- Start date
Hi Laid,I'm sorry, please tell me the address of this site.
You might need to ask member ggok for that exact website,
but if you just need the download a catalog of V4 Superleggera, you can go do Ducati official website for downloading spare parts catalog by clicking the link below and enter the model:
Ducati Original Spare Parts | Services and Maintenance
Once you find out the part# from the catalog above, then you can ordered it from your local Ducati store or find online Ducati spare parts reseller.
Hey Howard, I am looking to find the triple clamp carbon cover. When I search that part number I get nothing?? I am looking through the parts manual and do not see the schematic for it. Wandering if you could help with my search?Few important parts arrived today:
First, the ORIGINAL Termignoni Rivets from the US Importer of Termignoni @Brock @BrocksPerf who is also our forum official vendor arrived today !. Thanks @Brock @BrocksPerf for shipping them so fast to me:
I also purchase some extra exhaust springs and Termignoni logo:
View attachment 3435
Then, more Ducati Panigale V4 SUPERLEGGERA (and V4R) CARBON Fiber parts arrived:
First, the Panigale V4 SUPERLEGGERA CARBON Fiber Radiator Frame:
View attachment 3436View attachment 3437
View attachment 3438View attachment 3439
They look amazing, unfortunately, one of the lower mounting stud that hold the oil cooler broke during shipment. Judging from the way they were attached, I am guessing there will be a lot of complain from V4 SUPERLEGGERA owner who track their bike,
because I have a feeling the strong vibration from track use will crack and broke this mounting stud eventually. They are not firmly attached to the carbon fiber fabric (not anchored deep enough).
However, since this is DUCATImodifed.com, we don't complain, but channel our energy in finding solution
So, I am purchasing some carbon fiber fabric and will do some reinforcement along the base of the STUD. More details about this soon.
View attachment 3440View attachment 3441
It suppose to look like this below:
View attachment 3442
Now, this is the V4 SUPERLEGGERA Lower Triple Clamp CARBON Fiber cover:
View attachment 3443View attachment 3444
and last, this is the V4R, Lower Subframe CARBON Fiber cover, again this is the V4R version. I need this version because there will be some more surprise modification to the rear suspension
Notice that at one end, it was painted silver... I am guessing this is the location where it got very close to the Exhaust Manifold and the Silver Paint also function as extra heat shield/protection:
View attachment 3445View attachment 3446

Hi Apuca,Hey Howard, I am looking to find the triple clamp carbon cover. When I search that part number I get nothing?? I am looking through the parts manual and do not see the schematic for it. Wandering if you could help with my search?
it is on page 110 of the Superleggera V4 spare part catalog, screenshot below. I bet you insert lower capital "L" instead of Upper Capital "I" on the part number
, that is why it wasn't came up when you enter the search using part number.
Sunday evening update  :
:
I continue installing the radiator assembly back onto the bike. It took me about half a day because I need to find old pictures to figure out how to run the original wiring and hoses, and the place to tie lock it (I want to make sure it is exactly how the wiring/hose was routed and tie-lock) from the factory.
The service manual that I had was for 2018 bike with the steel frame radiator fan, and the wiring and hoses were routed differently than on my bike with the plastic radiator fan, but luckily I have plenty of old pictures so I figure out everything.


Of course, all the bolt is now Gold Color ProTi Titanium for maximum contrast with either black plastic or black carbon fiber :
:

I also make sure all the Samco hoses and it's clamp are routed properly:


And here is how the Superleggera V4 Carbon Fiber Frame with AELLA protector on both the radiator and oil cooler look:


Next, I installed the ABS module holder (smaller module without place for the exhaust servo), optional ABS module holder for Superleggera V4 and also replace the banjo bolt that hold the Oil sensor to the clutch cover with Titanium Bolt from MCET, Germany.
First, install the Ducati factory heatshield specific for this smaller ABS module holder

Then installed it using ProTi bolts of course:


Below is comparison of ProTi Banjo bolts (shortest) vs original Ducati banjo bolt (25mm long) vs. MCET Titanium Banjo Bolt (bluish and 25mm long);

Because the single ProTi banjo bolt above was too short, I was considering using the double ProTi Titanium banjo bolt, comparison pictures below (but turn out the double banjo bolt is so slightly too long. the thread bottom up):

So I finally decide to use the MCET titanium bolt:


Below is before and after MCET picture:


Now time for polishing and painting :
:
I polish the Superleggera (V2 and V4) rear caliper bracket, so it will have maximum shiny after painted:

Then I painted it anodized red, they look (and the paint literally smell) so sweet

 , imagine this will be used with my dark bronze Brembo Rear Billet Caliper (with red brembo logo) and Gold ProTi Titanium bolts,... yes, I can't wait to install them
  :
:


continue below...
:I continue installing the radiator assembly back onto the bike. It took me about half a day because I need to find old pictures to figure out how to run the original wiring and hoses, and the place to tie lock it (I want to make sure it is exactly how the wiring/hose was routed and tie-lock) from the factory.
The service manual that I had was for 2018 bike with the steel frame radiator fan, and the wiring and hoses were routed differently than on my bike with the plastic radiator fan, but luckily I have plenty of old pictures so I figure out everything.
Of course, all the bolt is now Gold Color ProTi Titanium for maximum contrast with either black plastic or black carbon fiber
:I also make sure all the Samco hoses and it's clamp are routed properly:
And here is how the Superleggera V4 Carbon Fiber Frame with AELLA protector on both the radiator and oil cooler look:
Next, I installed the ABS module holder (smaller module without place for the exhaust servo), optional ABS module holder for Superleggera V4 and also replace the banjo bolt that hold the Oil sensor to the clutch cover with Titanium Bolt from MCET, Germany.
First, install the Ducati factory heatshield specific for this smaller ABS module holder
Then installed it using ProTi bolts of course
:Below is comparison of ProTi Banjo bolts (shortest) vs original Ducati banjo bolt (25mm long) vs. MCET Titanium Banjo Bolt (bluish and 25mm long);
Because the single ProTi banjo bolt above was too short, I was considering using the double ProTi Titanium banjo bolt, comparison pictures below (but turn out the double banjo bolt is so slightly too long. the thread bottom up):
So I finally decide to use the MCET titanium bolt:
Below is before and after MCET picture:
Now time for polishing and painting
:I polish the Superleggera (V2 and V4) rear caliper bracket, so it will have maximum shiny after painted:
Then I painted it anodized red, they look (and the paint literally smell) so sweet
, imagine this will be used with my dark bronze Brembo Rear Billet Caliper (with red brembo logo) and Gold ProTi Titanium bolts,... yes, I can't wait to install them :continue below...
Then time for the Billet Aluminum Thermostat Bypass:
Before painting:

After painting:


I don't like the Silver Paint on the V4"R" Carbon Fiber Heat Guard (on the lower part of the subframe right above the rear shock and rear manifold), so I decided to paint it matte gold.
Yes, they are carbon fiber, but I covered them with blue painters tape, so they do look ugly for now
Below is before and after picture on both the front and back side:


Last, I polish the Stainless Steel custom bracket I made for the lower carbon fiber chain guard last week, and I want to keep it shiny so I decided to cleat coat the Stainless Steel custom bracket to lock the polished look, and below is AFTER clear coat:


And that is my update for this weekend, quite productive weekend I must say
Before painting:
After painting:
I don't like the Silver Paint on the V4"R" Carbon Fiber Heat Guard (on the lower part of the subframe right above the rear shock and rear manifold), so I decided to paint it matte gold.
Yes, they are carbon fiber, but I covered them with blue painters tape, so they do look ugly for now
Below is before and after picture on both the front and back side:
Last, I polish the Stainless Steel custom bracket I made for the lower carbon fiber chain guard last week, and I want to keep it shiny so I decided to cleat coat the Stainless Steel custom bracket to lock the polished look, and below is AFTER clear coat:
And that is my update for this weekend, quite productive weekend I must say
Ahhh there it is. For some reason it was hidden from my view in the diagram. As always very helpful, Howard.Hi Apuca,
it is on page 110 of the Superleggera V4 spare part catalog, screenshot below. I bet you insert lower capital "L" instead of Upper Capital "I" on the part number
View attachment 3815
Apologies Howard I’m getting things a little out of order here once again - I remember a while ago you made a post about the bike sport development handlebar switches you had custom assembled to be all black. I’m curious why you went with those over CNC or WRS?
I mean the BSD would be my choice as well but can’t seem to find a whole lot of comparison info on the others?
I mean the BSD would be my choice as well but can’t seem to find a whole lot of comparison info on the others?
Hi Andy,Apologies Howard I’m getting things a little out of order here once again - I remember a while ago you made a post about the bike sport development handlebar switches you had custom assembled to be all black. I’m curious why you went with those over CNC or WRS?
I mean the BSD would be my choice as well but can’t seem to find a whole lot of comparison info on the others?
Initially, I never want to replace the switches because I just don't like the colorful button because it reminds me of the button on a game console/pinball machine. Nothing wrong with game console/pinball machine but it make the bike look like a toy or sometimes like M&M candy, I mean this is just my personal preference.
Plus those colorful button looks shiny and make the impression of plasticky...
However, when I install the RCS17 Corsa Corta Master Cylinder, there is clearance issue with the stock factory right switch, so I was forced to see the options available for this switches.
I compare all the BSD, CNC, WRS and Jetprime, (and there is some other brands that I forgot), but all of them (except BSD) came in machine aluminum finish that show the "machined surface finish" (grooves from the machining process), and combine with glossy black finish, which I somehow don't like.
Those grooves from the machining process were rough and make it look like the surface have wrinkle skin... combined with the glossy black finish, made them look like GLOSSY WRINKLED Skin
I might like them if the machining grooves are finer like Motocorse machined finish though...
Anyway, only BSD came with SMOOTH aluminum finish plus it's anodized in MATTE black finish which make it look more professional to my eye.
And not only that, but the BSD also mount to the master cylinder which save more space and looks cool, plus I can add more ProTi bolts to contrast it
oh, also BSD Laser Marking also looks very racing professional.
oh, and not I also remember, if you look closely at the actual button, the BSD buttons are finished in matte color which I like, plus the center of their button is FLAT (for more tactile feel), while the other brands have shiny button with full round surface (no flat area on the center).
Then when I contacted BSD, they were willing to produce a switch with all BLACK button which make me even more excited because I just can't stand the colorful M&M candy look...
So all the above was the reason why I choose BSD.
Now, I was thinking of using BSD for the left side switch too, however, BSD does not have offering that include turn signal and horn function, their offering is fully designed for track bike.
Since I want my bike to have turn signal and horn function because I want my bike to look like a street bike, then I can't replace the left side with BSD. I actually ask BSD if they can produce a version for street use and they say the demand is just not enough to justify their development cost.
I repost the pictures below for your reference:


Very detailed answer as usual, much appreciated Howard. My concern, mostly with the left side as the housing is larger, was the clearance to the tank perhaps being an issue. Although the BSD product looks to be a smaller height than CNC (for example) due to relocating the switches. I haven’t yet compared the dimensions of both items.
It’s interesting that they don’t offer a solution for the V4 riders using it on the street. I can’t see the 1299 version needing much adjustment to update its compatibility.

 www.superbikeunlimited.com
It’s interesting that they don’t offer a solution for the V4 riders using it on the street. I can’t see the 1299 version needing much adjustment to update its compatibility.
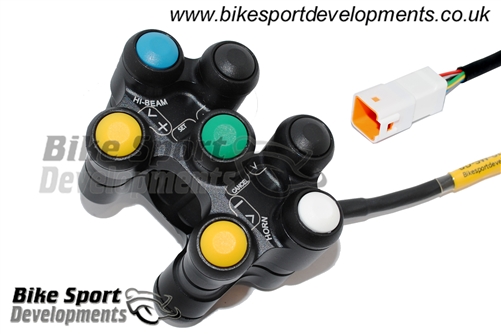
Bike Sport Developments - Plug and Play Road and Track Switch Pod - Ducati Panigale 1199R / 1299 / SuperLeggera (2015+) - BD_SW_8B_03
Bike Sport Developments - Plug and Play Road and Track Switch Pod - Ducati Panigale 1199R (2015+) / 1299 / SuperLeggera
www.superbikeunlimited.com
Hi Andy,Very detailed answer as usual, much appreciated Howard. My concern, mostly with the left side as the housing is larger, was the clearance to the tank perhaps being an issue. Although the BSD product looks to be a smaller height than CNC (for example) due to relocating the switches. I haven’t yet compared the dimensions of both items.
It’s interesting that they don’t offer a solution for the V4 riders using it on the street. I can’t see the 1299 version needing much adjustment to update its compatibility.
View attachment 3852
Bike Sport Developments - Plug and Play Road and Track Switch Pod - Ducati Panigale 1199R / 1299 / SuperLeggera (2015+) - BD_SW_8B_03
Bike Sport Developments - Plug and Play Road and Track Switch Pod - Ducati Panigale 1199R (2015+) / 1299 / SuperLeggera
Coincidentally, today I received a newsletter email from BSD informing about some new products and their latest catalog. So I check the 1299 Left Side Road use switch, and turn out, it have the same number of buttons as the Panigale V4 version so it doesn't have enough buttons for all functions.
I also noticed that this 1299 switch came with a plug-in module to convert the left and right turn signal button into the plus/minus function on the 1299...
This means, if you use this BSD switch on a 1299, you got to choose whether you want the plus/minus function or the left and right turn signal function... this is not practical for road use...
Screenshot below:

However, they now have the aluminum billet housing for the throttle of Kawasaki ZX10R... now if they make one for Panigale V4, I surely will buy it.
Currently the Ducabike aluminum billet housing for throttle also have that glossy coarse machine finish that I don't like...
Screenshot below for the Kawasaki ZX10R


That was my concern for the street, maintaining all the functions of the stock switches including the high beam flash (which although I have never used is a roadworthy requirement)
I’m waiting to hear back from SBU with some questions I sent them about it. So far my understanding was the ^ & v function was enabled once the menu was selected and returned to indicator use once all the settings had been confirmed and the menu exited?
I’m sure the whole functionality works better when the left and right switches are used on each side although toggling buttons while being consistent with the throttle is not ideal...
Those are lovely. I have those in the aluminum configuration. Unfortunately it’s not Ducati by Rizoma.Hi Andy,
Initially, I never want to replace the switches because I just don't like the colorful button because it reminds me of the button on a game console/pinball machine. Nothing wrong with game console/pinball machine but it make the bike look like a toy or sometimes like M&M candy, I mean this is just my personal preference.
Plus those colorful button looks shiny and make the impression of plasticky...
However, when I install the RCS17 Corsa Corta Master Cylinder, there is clearance issue with the stock factory right switch, so I was forced to see the options available for this switches.
I compare all the BSD, CNC, WRS and Jetprime, (and there is some other brands that I forgot), but all of them (except BSD) came in machine aluminum finish that show the "machined surface finish" (grooves from the machining process), and combine with glossy black finish, which I somehow don't like.
Those grooves from the machining process were rough and make it look like the surface have wrinkle skin... combined with the glossy black finish, made them look like GLOSSY WRINKLED Skin
I might like them if the machining grooves are finer like Motocorse machined finish though...
Anyway, only BSD came with SMOOTH aluminum finish plus it's anodized in MATTE black finish which make it look more professional to my eye.
And not only that, but the BSD also mount to the master cylinder which save more space and looks cool, plus I can add more ProTi bolts to contrast it
oh, also BSD Laser Marking also looks very racing professional.
oh, and not I also remember, if you look closely at the actual button, the BSD buttons are finished in matte color which I like, plus the center of their button is FLAT (for more tactile feel), while the other brands have shiny button with full round surface (no flat area on the center).
Then when I contacted BSD, they were willing to produce a switch with all BLACK button which make me even more excited because I just can't stand the colorful M&M candy look...
So all the above was the reason why I choose BSD.
Now, I was thinking of using BSD for the left side switch too, however, BSD does not have offering that include turn signal and horn function, their offering is fully designed for track bike.
Since I want my bike to have turn signal and horn function because I want my bike to look like a street bike, then I can't replace the left side with BSD. I actually ask BSD if they can produce a version for street use and they say the demand is just not enough to justify their development cost.
I repost the pictures below for your reference:
View attachment 3849View attachment 3850
Early Weekend Update :
Mr. Postman deliver something gorgeous today:


Compare to the Silver Anodized version currently on my bike,
please note that this Gold Motocorse Rear Shock bracket will use ProTi Titanium Bolts in TITANIUM SILVER Color for Maximum contrast (instead of the current Gold ProTi bolts on the Silver Motocorse Rear Shock bracket),
also note that the rear Ohlins shock will be replaced with at least the DU486 version


Then in the same package, Bellissimoto gave me some nice Motocorse gift , the Motocorse Smartphone holder, Thank You to Randy and Lyle at Bellissimoto:

and I let my Future Mechanical Engineer assembled it for me :
:

Assembled and ready:


Oh, by the way, a few nights ago I install the Exhaust Servo Bypass Plug from HealTech, just so I can start the motorcycle without triggering error code (before I flash the ECU):


Then tielock all the wiring:

Ok, time to get breakfast and start doing more DUCATImodified activity today
:Mr. Postman deliver something gorgeous today:
Compare to the Silver Anodized version currently on my bike,
please note that this Gold Motocorse Rear Shock bracket will use ProTi Titanium Bolts in TITANIUM SILVER Color for Maximum contrast
(instead of the current Gold ProTi bolts on the Silver Motocorse Rear Shock bracket),also note that the rear Ohlins shock will be replaced with at least the DU486 version
Then in the same package, Bellissimoto gave me some nice Motocorse gift
, the Motocorse Smartphone holder, Thank You to Randy and Lyle at Bellissimoto:and I let my Future Mechanical Engineer assembled it for me
:Assembled and ready
:Oh, by the way, a few nights ago I install the Exhaust Servo Bypass Plug from HealTech, just so I can start the motorcycle without triggering error code (before I flash the ECU):
Then tielock all the wiring:
Ok, time to get breakfast and start doing more DUCATImodified activity today
By the way, this means the SILVER Anodized Motocorse Rear Ohlins Shock Bracket will be for sale, so if any of you thinking of buying one in SILVER Color,
I will sell to you for just $350 shipped to 49 lower states in USA with PayPal as friends and family.
Brand new at Bellissimoto is $504.95: Motocorse Billet Aluminum Rear Shock support for Ducati Panigale / Streetfighter V4 / S / R / Speciale
Please note that there is some blemishes on it that I cover with the YELLOW DOT paint as you can see in the picture below (and maybe some bolt mounting mark, well, please consider it as a used item at great condition and great price) :

I will sell to you for just $350 shipped to 49 lower states in USA with PayPal as friends and family.
Brand new at Bellissimoto is $504.95: Motocorse Billet Aluminum Rear Shock support for Ducati Panigale / Streetfighter V4 / S / R / Speciale
Please note that there is some blemishes on it that I cover with the YELLOW DOT paint as you can see in the picture below (and maybe some bolt mounting mark, well, please consider it as a used item at great condition and great price
) :My custom exhaust.Hi Heroe82,
The ValterMoto stand is a very well made. To bad, they only sell in black color now, used to be Red, Silver and Yellow too (back when I was selling them at my Aprilia distributorship in the early 2000s)
I haven't bought the RCS19 Corsa Corta, but I am open to selling my basically brand new, never been bleed RCS17 Corsa Corta if you are interested , in stock form though, I will take out the ProTi and the Gold pivot that I installed to it but of course cheaper than buying at any online store
Hi Tsaico,
Yes, a good tools make our jobs much easier, I also love good quality tools
Ok, I have quite a few updates
First, I test fit the bracket for Termignoni because the new aluminum spacer and the mounting plate had arrived, I need to test fit again so I can order the correct length ProTi Titanium bolts for this bracket.
The mounting bolts that came with Termignoni silencers is M6 and the mounting plate I bought from Amazon UK (originally for furniture) have M5 holes, so I get my drill and dremel back in action:
View attachment 3532View attachment 3533
and now it fit the M6 bolts perfectly (again, this bolts will all be replaced by ProTi Titanium of course and this M8 Furniture Plate will also be modified with some nice PAINT on it
View attachment 3534
Next, test fit the M8 Plate, (that center threaded hole on the furniture plate is M8) and the 2 upper bolts spacing fit PERFECTLY to the Termignoni bracket, but the bottom does not, so I just going to use 2 M6 bolts, that is more than enough
View attachment 3535View attachment 3536
Here is a spread view of each bolt and washer and spacer and Rizoma bracket for this test fit, note that those shiny large washer are REAL Titanium washers:
View attachment 3559
Then I test mount everything. Please note that the Motocorse Japan silencer washer covered only 2 bolts, and there is one nut that is still nut covered with Motocorse style washer/plug.
View attachment 3537View attachment 3538
I am talking about the left silver nut (came from SC-Project) on the left of this picture below, while the right side already have Motocorse... that make it "unbalanced" and need the Motocorse treatment
View attachment 3539
So, I am so glad that today, my Motocorse Ducati MONSTER frame plug order arrived because I plan to use this frame plug as a NUT. So I will need to drill the center hole then TAP it with M8 tap that I bought a few weeks ago. Below is the Motocorse Frame Plug originally for Ducati MONSTER:
View attachment 3540
Since they just arrived today, I haven't had a chance to drill/tap and test fit, but the pictures below show how they would look:
View attachment 3541
It going to looks so much better, and again don't forget those Bolts will be a Gold Color ProTi Titanium Bolt
View attachment 3542View attachment 3543
This is another view of the bracket from the side during test fit:
View attachment 3544View attachment 3545
View attachment 3546
Today is a Motocorse day, because my Motocorse Frame Plug for STREETFIGHTER V4 Kit arrived... but why I bought another Motocorse Frame Plug, plus a STREETFIGHTER V4 Kit?
Well because the STREETFIGHTER V4 Kit from Motocorse contain more BOLTS, especially the LOWER ENGINE MOUNTING bolts.
The reason is because on a Streetfighter V4, those lower engine mounting bolts were exposed while for our Panigale V4 it is covered...
but I still feel guilty (even I will not be able to see it after the fairing installed back) that I don't have the lower engine mounting bolt covered evenly like the upper engine mounting bolt, I need to be fair whether it is upper or lower engine mounting bolt... I know I am getting crazy
so here is the picture just for illustration (I haven't had time to install them yet):
If you notice on the right picture, the lower engine mounting bolts have "spacers" because they were more recessed then the upper engine mounting bolts:
View attachment 3547View attachment 3548
Left picture, Left side, Right Picture, Right side (currently I already use Titanium Engine mounting bolts from V4EVO but if I can use Motocorse, then why not:
View attachment 3550View attachment 3549
Oh, the Motocorse Frame Plug STREETFIGHTER V4 kit also came with the 2 small M5 bolts for the radiator frame, so it will replace the current ProTi titanium bolts:
View attachment 3551
Am I finish for today... not yet... continue on my next post below
I painted the exhaust cover with matte black for a while from the time of the new car. After that, we replaced it with a carbon cover made of motocomposite, which is no longer available.
Motorcycle Carbon Fiber and Performance Parts - Motocomposites Inc.
High Quality Motorcycle Carbon Fiber Parts for Aprilia, BMW, Ducati, Honda, Kawasaki, KTM, MV Agusta, Suzuki, Triumph and Yamaha
 www.motocomposites.com


DR 106 Coppia cover silenziatori Ducati Streetfighter V4 - Evocomp
DR 106 Coppia silenziatori Ducati Streetfighter V4

However, my preference was that the back end of the exhaust cover should be kept metal. It will soon be three years since I registered my new car and I will have to take the national automobile continuity inspection.
When I replaced it with a genuine OEM exhaust, I tried to realize what I had thought before.


The side stand and bobbin are powder coated.


In my country, once every two years (valid for three years in the case of the first new car registration), you take an automobile continuity inspection and unless you pass it, you are not allowed to drive on public roads.
That is a beautiful carbon fiber cover for your exhaust, it looks like it came from Ducati factory, very niceMy custom exhaust.
I painted the exhaust cover with matte black for a while from the time of the new car. After that, we replaced it with a carbon cover made of motocomposite, which is no longer available.
View attachment 3873Motorcycle Carbon Fiber and Performance Parts - Motocomposites Inc.
High Quality Motorcycle Carbon Fiber Parts for Aprilia, BMW, Ducati, Honda, Kawasaki, KTM, MV Agusta, Suzuki, Triumph and Yamaha
View attachment 3874
View attachment 3876
View attachment 3875DR 106 Coppia cover silenziatori Ducati Streetfighter V4 - Evocomp
DR 106 Coppia silenziatori Ducati Streetfighter V4www.evocomp-composites.it
However, my preference was that the back end of the exhaust cover should be kept metal. It will soon be three years since I registered my new car and I will have to take the national automobile continuity inspection.
When I replaced it with a genuine OEM exhaust, I tried to realize what I had thought before.
View attachment 3878
View attachment 3879
View attachment 3880
View attachment 3881
View attachment 3882
View attachment 3883
The side stand and bobbin are powder coated.
View attachment 3884
View attachment 3885
View attachment 3886
View attachment 3887
View attachment 3888
View attachment 3889
In my country, once every two years (valid for three years in the case of the first new car registration), you take an automobile continuity inspection and unless you pass it, you are not allowed to drive on public roads.
Mid Saturday update  :
:
Before and after gold painting of the Genuine Ducati V4R lower subframe carbon fiber protector:


Today, I paint the V4 Logo on the left and right plastic frame holes (these holes in the frame are for V4R, 2020 Panigale V4 25° Anniversario 916 and 2021 Panigale V4/V4S only to make the frame slightly less rigid for better cornering feel).
I use 3M blue painters tape to paint the small V4 Logo:


Before and AFTER pictures:


Also taking advantage of California Sun Shine as "natural" paint oven :
:

More updates very soon
:Before and after gold painting of the Genuine Ducati V4R lower subframe carbon fiber protector:
Today, I paint the V4 Logo on the left and right plastic frame holes (these holes in the frame are for V4R, 2020 Panigale V4 25° Anniversario 916 and 2021 Panigale V4/V4S only to make the frame slightly less rigid for better cornering feel).
I use 3M blue painters tape to paint the small V4 Logo:
Before and AFTER pictures:
Also taking advantage of California Sun Shine as "natural" paint oven
:More updates very soon
Saturday evening update  :
:
I install the Zircoflex Gold Heat Shield to the back of the SC-Project Carbon Fiber Heat Shield:
Rough measurement and mark using sharpie:


Cut and attached (came with 3M adhesive, just peel the backing paper), apply pressure with roller tools and hand/finger:


Completed, but I still need to make holes on the bolt mounting holes, plus I also going to heat it with Makita heat gun and then apply more pressure using the roller:

After heating with Makita heat gun and more pressure rolling, now everything is good:


don't go away, I still have some more update
:I install the Zircoflex Gold Heat Shield to the back of the SC-Project Carbon Fiber Heat Shield:
Rough measurement and mark using sharpie:
Cut and attached (came with 3M adhesive, just peel the backing paper), apply pressure with roller tools and hand/finger:
Completed, but I still need to make holes on the bolt mounting holes, plus I also going to heat it with Makita heat gun and then apply more pressure using the roller:
After heating with Makita heat gun and more pressure rolling, now everything is good:
don't go away, I still have some more update
Later Saturday Night Update :
As DUCATImodifed.com forum member, I can't let a Superleggera V4 Carbon Fiber Tank Cover remain stock, how could I :
:
So here are the ingredients:

First thing first, I attached the Ducati genuine VELCRO to the Superleggera V4 Carbon Fiber Tank Cavoer just like the stock plastic tank cover that came with my bike:

Then I start by measuring the trapezoid dimension of the honeycomb wire mesh:

Then hold the honeycomb wire mesh by hand to see how it looks, and I love it, sooooo all system go:


I use 3M blue painters tape to hold 2 corner of the honeycomb wire mesh while I apply Epoxy to permanently held the wire mesh to the back side of the Superleggera V4 Carbon Fiber Tank Cover:


I will have to wait until the epoxy dry tomorrow morning before I remove the 3M blue painter's tape and then add more epoxy on the area now covered by the 3M blue painters tape, but here how it looks like right now, which is PERFECT:

:As DUCATImodifed.com forum member, I can't let a Superleggera V4 Carbon Fiber Tank Cover remain stock, how could I
:So here are the ingredients:
First thing first, I attached the Ducati genuine VELCRO to the Superleggera V4 Carbon Fiber Tank Cavoer just like the stock plastic tank cover that came with my bike:
Then I start by measuring the trapezoid dimension of the honeycomb wire mesh:
Then hold the honeycomb wire mesh by hand to see how it looks, and I love it, sooooo all system go
: I use 3M blue painters tape to hold 2 corner of the honeycomb wire mesh while I apply Epoxy to permanently held the wire mesh to the back side of the Superleggera V4 Carbon Fiber Tank Cover:
I will have to wait until the epoxy dry tomorrow morning before I remove the 3M blue painter's tape and then add more epoxy on the area now covered by the 3M blue painters tape, but here how it looks like right now, which is PERFECT
: