DUCATI Panigale V4 25° Anniversario 916 BUILD Thread

BMW Alpina

FOUNDING Member & Administrator
Staff member
The strangest thing happened... but most likely due to lighting...
So when I took out the bolt that hold the 2 halves of the caliper (which is on the opposite side of the mounting bolt), the Light Gold Color actually looks better !!!, and I think the only logical explanation was I did not use a flash light and only use room lighting on this latest pictures. So now, Light Gold ProTi bolts is the winner :p

IMG_8387.JPGIMG_8388.JPG


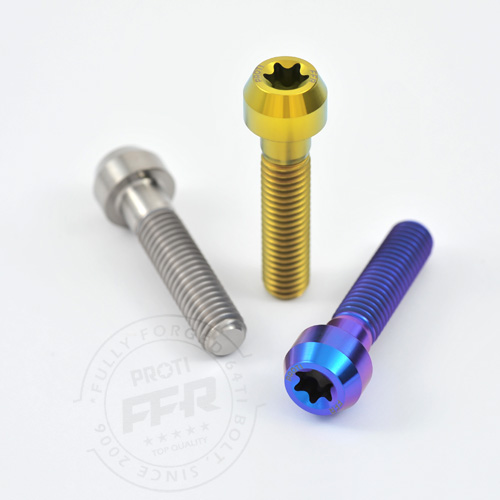
I measured the bolts and they are M8x40mm with 13mm head diameter, and I will choose this part# ProTi Bolts M8L40-OTB01 in Light Gold Color x 2 pieces that hold the 2 halves of the Brembo Caliper (picture below)


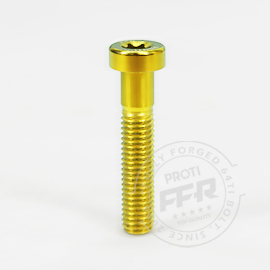
But you can also choose this alternative Part# M8L40-OTB04 if you prefer it to looks like the original Brembo bolt:


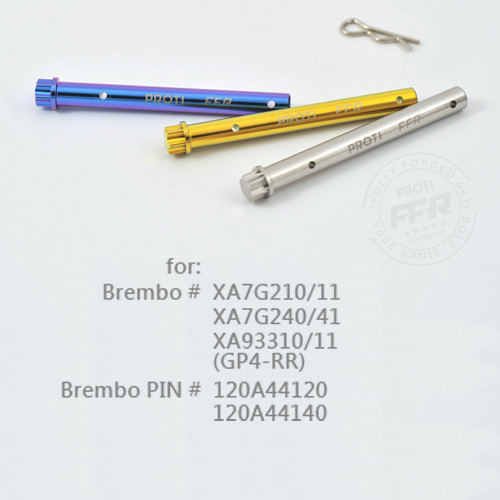
For the Caliper Brake Pad Pins, I choose this one: ProTi B-PIN-P01 Brake Pad Pins for Brembo REAR Billet Caliper in Light Gold Color x 1 pieces


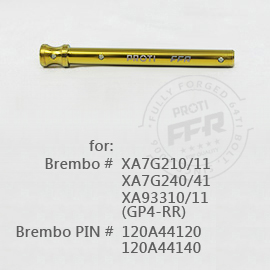
But you can also use this alternative Part#B-PIN-02, picture below:
 

BMW Alpina

FOUNDING Member & Administrator
Staff member
I also had been thinking on how to mount the ChaseBay "F" Brake Hose Distribution Block. That will split the single hose line from ABS to 2 separate Kevlar Braided Goodridge Hoses for the 2 front brake calipers.

Initially, I want to mount it just above the radiator at the same location where the original hard line become braided line, but that area is very hard to reach and it would be hard to tighten the AN hose connection there... so I keep getting back to the 2 extra M5 hole on the lower triple clamp... picture below:

IMG_8392.JPG

then EUREKA... I know the solution, 3D printed bracket by My Younger Son :D
So I brief My Younger Son on the design that I want and he printed a prototype. The left object is the bracket that will hold the ChaseBay "F" distribution block (on the right), while the center flat object is just the base to protect the finish of the lower triple clamp.
IMG_8391.JPG

This is how the bracket tightly held the ChaseBay "F" distribution block:
IMG_8394.JPGIMG_8393.JPG


And this is where it will be (well on top of those two light gold ProTi bolts of course:

IMG_8395.JPG
However, there will need to be some modification to this 3D printed bracket, first the hole for the bolts at 5mm is too tight for an M5 bolt, so next time we will print it in 6mm holes.
Second, we need to cut the "waist" area of the bracket wider to allow for the AN hose to screw into the "F" distribution block 2 ports.
Well, it's only a click on a keyboard and a few mouse move away :p

I will also ask My Younger Son to hand sanding the surface to make it smoother and pain them black then buy M5x35mm ProTi light gold bolts to secure it to the lower triple clamp and it will look AWESOME :D
(Don't forget the 3 set of Goodridge Kevlar Braided Line that goes to this ChaseBay "F" Distribution Block will have a nice sleeve in black with silver Goodridge lettering)

Oh, and that ChaseBay "F" Distribution Block... will also be GOLD ANODIZED ;)
 

BMW Alpina

FOUNDING Member & Administrator
Staff member
Saturday Night Fever Update: :p

That Saturday night, I decided to install the Peter Lieb Lower Carbon Fiber Belly Pan Cover that replace the original plastic material near the Akrapovic Muffler.

Before and After taken apart for Left Fairing:
IMG_8419.JPGIMG_8421.JPG

Before and After taken apart for Right Fairing:
IMG_8423.JPGIMG_8427.JPG

Left and Right fairing back side after taken apart:
IMG_8422.JPGIMG_8426.JPG

After Peter Lieb Carbon Replacement installed:

IMG_8433.JPGIMG_8434.JPG


View from the Bottom
and I must say, I love the Light Gold color of the ProTi Titanium Bolt in front of a Black Paint or Black Matte Carbon Fiber as background, it add the "luxury" touch :cool: :D:


IMG_8432.JPG


Top view:
IMG_8435.JPG

Tomorrow, I will apply the "GLUED/ADHESIVE" that came with this kit but nothing change in term of looks. I LOVE IT :D
 

BMW Alpina

FOUNDING Member & Administrator
Staff member
by the way, I also received this carbon fiber plate in the mail that day... I guess this is really a carbon fiber weekend for me :D
I will cut this carbon fiber plate to make bracket for my PIAA horn. Thanks @PanigalePilot for this idea.:)

The horn is going to be placed at the same place as the current stock horn, just replaced it with a better sounding, and lighter PIAA horn.
The reason for this is because, I already bought the ProTi bolt for the horn bracket, and little did I know (before I buy that single ProTi bolt) it will require me to take out the front lower triple clamp...
but since I already bought the ProTi bolt... well it will be a waste if I don't use it, so I decide to go further with modifying the horn beside it is another good experience with cutting carbon fiber plate.


IMG_8418.JPG
 

BMW Alpina

FOUNDING Member & Administrator
Staff member
I am wrapping the bare plastic parts on the side fairings with some 3M Carbon Fiber wrap left over from my old project. This is every cost effective since my labor cost is free :p.

Note: I checked at 3M website the day before I did this, just to see if their carbon fiber wrap available with different pattern, unfortunately, 3M still only offer 1 pattern, the same pattern as mine (with a new part# though).

3M carbon fiber wrap is proven quality, because I used their 3M WHITE color carbon fiber wrap to wrap my REAL BLACK carbon fiber (vented) engine hood that got quite hot due to the supercharger I installed on my engine for the past 5 years and I had done more than 100,000 miles since I wrap them and the 3M wrap are still good. At one time, I drove my car from Arizona back to California (around June or July 2018) and the outside temperature on the desert was 121 Fahrenheit, that was the hottest weather I have ever experience in my life.
I really need the vent only available on this carbon fiber hood to help pull the heat from the supercharger, and help avoid power sapping heat soak. The 3M WHITE color carbon fiber wrap really make it look nice, with nice to touch carbon fiber pattern and match the rest of the car white paint. Painting a new carbon fiber hood is not a good option because they are still "degassing" when new and the heat from the engine might exacerbate this causing the paint to bubble or peel off (I check with several reputable paint shop). I don't want to wait a few months before I can paint them because I really don't like black carbon fiber hood exposed on my white color car, just can't stand it.

If somehow, this 3M carbon fiber wrap really not match the rest of the fairing (after I install it), I will revert back to the original plastic surface because I actually like the color of that plastic, it give good contrast to the rest of the black painted surface.
however, I don't want to use unproven wrap from other brand unless it is 3M especially in this area of fairings where hot air flow out from the radiator fans. I worry the heat might melt/shrink the wrap or just peel off due to the heat and vertical mounting position plus it might left permanent adhesive residue on the plastic surface when/if I remove them.
So here it is:

Left picture is the before picture and right picture shows how I protect the painted surface with blue painter's tape because I will use X-acto knife to cut the 3M Carbon Fiber wrap, don't want any scratch to the painted surface from that X-acto knife.
IMG_8436.JPGIMG_8437.JPG


Cut a rectangular piece of the 3M Carbon Fiber wrap (left picture) and start applying pressure and heat (from heat gun) to make it conform to the surface (right picture):
IMG_8439.JPGIMG_8440.JPG

Cut the 3M Carbon Fiber wrap using X-acto knife and finished product:
IMG_8443.JPG

Do the same thing with the other side:
IMG_8442.JPG

I can't wait to install all the fairing back (along with all the other carbon fiber panels) to see how it look, however, that is definitely still a few months away...
IMG_8444.JPG
 

BMW Alpina

FOUNDING Member & Administrator
Staff member
The last thing I did that weekend was replacing the windshield bolts with the ProTi bolts in gold color:

Before picture on the left, After picture on the right:
IMG_8445.JPGIMG_8446.JPG


More details picture below, notice that I also oriented the "logo" on the ProTi bolts in the same directions (I did this with the ProTi bolt on the Peter Lieb carbon belly pan too):

IMG_8447.JPGIMG_8448.JPG
 

BMW Alpina

FOUNDING Member & Administrator
Staff member
Some people change their stock Ducati bolts to avoid corrosion.
If corrosion resistant is your priority, then I strongly recommend and you definitely should consider Titanium bolts in your build.
Some stainless steel came in A2 or 304 stainless steel grade which have LESS resistant to corrosion than the A4 or 316 Stainless Steel grade.

However, Titanium has an even BETTER corrosion resistant to even the A4/316 Stainless Steel. Yes, even 316 Stainless Steel can corrode.
This is a link to good article discussing this corrosion resistant issue: https://tantaline.com/DOCs/Technica...ublications_corrosion_sensitive_equipment.pdf

By the way, I also learned it the hard way when I was designing my family water (ultra) purification plant 24 years ago. I initially choose a 316 Stainless Steel sensors (To SAVE COST) for our Resistivity meter but since it was exposed to both NaOH and H2S04 solution (diluted) during the regeneration process, the 316 Stainless Sensor still corrode. Problem solve when I replaced those 316 Stainless Steel sensors with TITANIUM sensors.

Below is the link to Resistivity meter that I was talking about, amazing the company still in business with the same name after more than 2 decades ago
750 Series II Resistivity Monitor/controller
when you scroll down the webpage you will find this paragraph:
RESISTIVITY SENSORS

All 750 Series II Resistivity models require a CS10 series sensor. This reliable sensor features two integral thermistors to ensure accurate and rapid automatic temperature compensation.

The sturdy polypropylene standard bushing is modular for easy, inexpensive replacement.

A PVDF or 316 stainless steel bushing can also be ordered.

The metal portion is available in either 316 stainless steel (standard) or titanium.
 

BMW Alpina

FOUNDING Member & Administrator
Staff member
The EARL'S Professional Flaring Tool Kit Part# 001ERL finally arrived,
UPS just delivered them around 8:30PM that day and again the UPS delivery person is driving his own personal sedan as a reminder that this is a tough period for American !

Earls 001ERL Earls Professional Flaring Tool - 37°, 45°, and DIN Flares w/ Bench Mounting Flange
They cost $494.95, so pretty heavy investment, but hopefully they will last for my live time amateur application :)

Here is the picture:
IMG_8456.JPG

The bad news is, I still need to wait for one more tool (The Tube Straightening Tools) to arrived from EARL'S so... I still cannot start my rigid cooper hardline replacement project...
well, hopefully the Samco hose arrived from Demon-Tweek UK by next week, at least I already have the UPS tracking number for it :D
Oh... and the Motocorse steering stem cover finally ship today and hopefully I can start anodizing those suspension brackets/links and many more next week...
 

BMW Alpina

FOUNDING Member & Administrator
Staff member
By the way, I was initially thinking of buying the SC Project WSBK Full exhaust system
WSBK Full exhaust system
then replace the 2 end muffler with the Akrapovic muffler from the 1299FE, you know so it look as an Akrapovic,...
but it just doesn't feel right... having a Frankenstein system like that... not proper, and what about the tuning... because I want my dashboard to show "Racing EVO" that I believe can only came from official Ducati/Akrapovic Up-Map...
so small things like that stop me from doing the above... plus, I really hate if after I spent money for this Frankenstein system, only to see Ducati/Akrapovic finally offer their official under-seat system....
I mean Akrapovic did have the prototype for the last year Barni's bike... they just have to produce it...
I even try to lobby the Akrapovic US market manager a few months ago :)


BMW Alpina

FOUNDING Member & Administrator
Staff member
I ordered the Samco Hose in Orange Color early July and the lead time for Orange Color supposedly 30 days. After more then 45 days, I asked, and turn out they forgot to ship my order... Luckily I asked...
but the good news is, only took 2 days to ship from UK to my home by UPS... and just arrived half an hour ago. It looks like it's going to be a busy and fun weekend after all :D

Note for the Samco hoses, I was considering several colors... Red, White, Black, Yellow and Orange...

I don't know, but I just cannot make myself to like this shade of Red from Samco... it's not bad, but it's just not click to me...

White,... I worry it will get dirty by the dust and my wife's cooking oil since as you know the living room is right next to the kitchen :p

Black.... the black is shiny and not matte plus it will look the same color as the original... so no differentiation... :D

Yellow... I like Yellow, I use Samco in Yellow color on my current Car Engine Bay but... I want something different for now... maybe I am bored with yellow already...

so... Orange... first because I like this shade of Orange from Samco,
and according to ANSI (American National Standards Institute) on Safety Color Categories/standard, The color orange is used to alert people to the fact that there are dangerous parts of a machine or equipment.
Well, I think our Panigale V4 met the category of "dangerous" machine ;)

Plus, it will have some "CONTRAST" to the surrounding background color (fairings or engine block or radiator)
so Orange it is...

SAMCO Hoses:
IMG_8471.JPGIMG_8473.JPG


Goodridge Fire Proof Sleeve for brake lines:
IMG_8472.JPG
 

BMW Alpina

FOUNDING Member & Administrator
Staff member
First, disconnecting main sockets (including ECU socket, suspension controller, BBS etc.) then cutting a lot of tie locks that hold the wiring to the airbox. I took picture each time I cut a tie lock just to remind me...

IMG_8477.JPGIMG_8482.JPG


Then, after following the Ducati Service Manual, (and also researching on some electrical sockets with weird / unclear way on how to disconnect them,), I manage to take out the upper air box with the upper injector attached to it.
The good things of working in the living room is, I can have Air Condition blasting comfortable cool air, watching TV (NEWS), and sit or kneeling on a comfortable carpet flooring. All while sipping tea or coke :p
IMG_8488.JPG

Here is what it look like after upper airbox cover removed:
IMG_8489.JPG

next step, is to remove all the adjustable intake cone/velocity stack assembly including the motor:
IMG_8492.JPGIMG_8494.JPG


Now, please pay attention on the TORX bit and WRENCH that I used to open all the TORX bolts/screw,
because using this kind of tools setup, allow me to take out every screws (Torx/Hex whatever size) without having any problem.
NONE of the Ducati original screws that I took out have stripped head.

From what I read, several peoples stripped their Ducati screws/bolt head while doing this,
I believe this was because a regular Screwdriver Style Torx tool or the regular L-Shaped simple Torx/Socket tool were used.

The advantage of using the setup like I did below are 2 folds:
First it allow you to really comfortably PUSH from the top into the Torx opening of the bolt/screw to prevent slippage (thus NO stripped heads)
Second, the long racheting wrench also allow extra leverage (plus due to it's thick handle, it was also comfortable to hold),
and despite the crazy loctite used on the thread, I can open all the bolts like they are loose...

The picture below show the throttle body exposed after I remove the adjustable Velocity Stack assy. and my racheting wrench/torx bit tools setup:

IMG_8496.JPG


Now it's time to remove the whole MIKUNI Throttle Body Assy. There are 24 bolts, all TORX, again easy to remove:
IMG_8497.JPG


This how it look like after the MIKUNI Throttle Body assy remove:
IMG_8498.JPG

Then you need to remove all those wiring (just the wiring not the rubber fuel line) that goes to the lower injectors and also remove 8 more TORX style bolts that hold the lower intake tract and the lower airbox at the same time:
IMG_8502.JPG
 

BMW Alpina

FOUNDING Member & Administrator
Staff member
More wiring removed/ lower injector wiring socket disconnected:
IMG_8503.JPG

and, only lower airbox still left behind, but still need to cut more tie locks before you can remove the lower airbox despite no more screws/bolts holding it:
IMG_8504.JPG

some rubber bands that hold the cables look needed to be removed too before you can remove the lower airbox:
IMG_8507.JPG

IMG_8517.JPG

Finally the lower airbox was removed to exposed the thermostat and hose assy. :
IMG_8519.JPG


Drain the radiator fluid from this bolts, and make sure the water bucket is at the right place, so the radiator did not "pee" on to the carpet :p:
IMG_8527.JPGIMG_8528.JPG


I have this hose tools bought few years ago when I was changing all the rubber hose in my car with Samco, although it took me a bit of time to look for it since I have so many tools that I forgot which box did I store this hose tools,
almost look like medieval torture tools :p:
IMG_8530.JPG

With this hose tools, it was so easy to remove the hose, however,... be careful, one wrong slip, you could scratch your bike...:
IMG_8531.JPG

All original hoses and thermostat assy. taken out from the bike:
IMG_8539.JPG


More pictures:
IMG_8538.JPGIMG_8542.JPGMy Sons, both of them helping me clean the "dust" from the Loctite that somehow get onto the top of the engine VALVES, using long cotton swab and alcohols.
I am sure those Loctite "dust" will not marr the piston, however, just want to be perfect :D
IMG_8540.JPG
Then cover everything for now because I will change every bolts/screws that is NON Self Tapping with ProTi Titanium Bolts and I still need to order them, because... well, I just found out their size after I remove them...
so, I will not install the Samco hose until all those ProTi Titanium Bolts arrived in maybe 1 months from today:


IMG_8541.JPG

In summary, removing the airbox to access the Samco hose is NOT easy due to all those tie locks, rubber band, socket/connector need to be disconnected, the super tight space between the airbox and the bike frame...but with the right tools, preparation and patience, it can be done. Just make sure you are doing it in a comfortable area (not hot or dirty), it will help with your patience :p
 

BMW Alpina

FOUNDING Member & Administrator
Staff member
I decided to be more productive with the rest of my time that Sunday evening, and since I supposed to received few remaining parts that I need to anodized gold in the next few days,
so I decided to PREP my Bonamici Dashboard Protector...

So Bonamici Dashboard Protector came standard with the Bonamici Racing Logo on the top, and I did not know this, I though they all came with the "V4" logo like on so many pictures...
Turn out those "V4" logo was a bulk order from one of the reseller here in the USA... Since I never specify, mine came standard with the Bonamici Racing Logo...

so... I decided to POLISH OUT/OFF those Bonamici Racing Logo, and Mirror Polish all the front surface... (just the front surface that facing us the rider, I left the other surface as it is (slightly matte finish)...

BEFORE:
IMG_8474.JPGIMG_8476.JPG


AFTER:

IMG_8544.JPG
That mirror polishing will result in the anodized color gradation/differences between the side surface and the front mirror polish surface...
I haven't decide what I am going to do with the now empty area (where the Bonamici Racing logo used to be)... I will decide AFTER I gold anodized this part hopefully done by next week...
note: I already ordered a ProTi bolts in Titanium Silver Color to contrast with the gold anodized, this ProTi bolts will hold the front polycarbonate cover.
 

BMW Alpina

FOUNDING Member & Administrator
Staff member
There are Bad News and Good News...

The Bad News is, :(
That day, Holley, EARL'S parent company made a mistake in labeling of their parts resulting in them sending me the "bracket" twice, but have not sent me the actual brake hardline straightening tools.
This pictures show the same part but with 2 different part# on their boxes... The bracket part# is 040, and the tool part# is 039. The Part# 040 is the bracket for tool with Part# 039 so that is where the confusion started.
This means, my Cooper Brake Hardline Project will be further delayed :oops:
IMG_8569.JPG

The GOOD News: :)
a. MotoCorse Steering Stem Cover finally arrived along with the MotoCorse Titanium Oil Filler Plug (with the "M" Logo engraved) This 2 items only available at MotoCorse Japan, but since I bought them through Bellissimoto, which had to source them through MotoCorse Italy... well thus the months of delay, but hey better late then never :D

Hi @PanigalePilot , I know you are curious on how this mount, so judging from the second picture below, that show the back of the cover, it looks like it will be hold by the stem NUT. I will update you once I installed them... in the next few weeks...

IMG_8556.JPGIMG_8557.JPG

This MotoCorse Japan Titanium Oil Filler Plug really like jewelry, so shiny I got to wear dark glasses :cool:
IMG_8558.JPG


Then... The long await Rizoma Veloce L Sport mirror arrived with it's bracket... well the bracket is Pair for left and right, however, I only received 1 Rizoma Veloce L Sport mirror today, so one more unit is still in back order status... oh well,
at least I can see how they looks like...


IMG_8560.JPGIMG_8561.JPG


IMG_8562.JPGIMG_8563.JPG

The SILVER Anodized Aluminum is a Perfect Match with the Rizoma Sport Ride by Wire Throttle Grip :D
IMG_8564.JPG
 

BMW Alpina

FOUNDING Member & Administrator
Staff member
I also already thinking of upgrading all the bolts on this Rizoma Veloce L Sport Mirror with ProTi and will order tonight, but I already have 1 extra bolts that fit perfectly for the joint of the Rizoma, so I upgrade it,
and below is before (Left picture) and after comparison (right picture). The Rizoma bolt on this position will be this Titanium Silver Color, but the Rizoma Bolts on the Black Anodized Rizoma Bracket will be Light Gold to give the "CONTRAST" as usual :p
IMG_8567.JPGIMG_8568.JPG


Ok... so many good news, but wait there are more ;)

The Staublis are here:

IMG_8570.JPGIMG_8571.JPG

IMG_8572.JPG


Test fit them on the Rear Billet Brembo with ProTi Banjo (I just ordered LONGER ProTi Banjo Bolts), Yap, Definitely GORGEOUS :D:
IMG_8574.JPGIMG_8575.JPG

Also test fit on the front stock caliper, although for sure it will be a DIFFERENT Caliper :p
IMG_8573.JPG
 

BMW Alpina

FOUNDING Member & Administrator
Staff member
OK, progress is slow but it does not matter as long as you do not stop :p

The anodizing shop had created a sample color for me which I approved, so they no longer need my MotoCorse engine bracket (for color sampling purposes) which means... finally I can install it:D

Before picture:
IMG_8586.JPG

Make sure all ProTi Titanium bolts are coated with Shell Gadus Grease:
IMG_8587.JPG

then install those ProTi Titanium Bolts, of course, as usual, to provide CONTRAST, I choose the Titanium Silver Proti :cool::
edit: oh and of course finally able to install that MotoCorse M12 Engine to Frame Bolt with cover (which will be further upgraded for that small center cover holding bolt with ProTi Titanium Bolt soon)
IMG_8588.JPGIMG_8589.JPG
IMG_8590.JPGIMG_8591.JPG
 

BMW Alpina

FOUNDING Member & Administrator
Staff member
More stuff arrived, this time from ProBOLT USA, and the order are for ALUMINUM Bolts, yes, ALUMINUM...
Why, well here is why:
A Table of Electrical Conductivity and Resistivity of Common Materials

Originally, I was going to replace the bolts for the battery terminal and fuse block with ProTi Titanium, however, I suddenly remember, the CONDUCTIVITY properties of Titanium is BAD...
and I decided to use ALUMINUM because they will have even better conductivity than the stock factory steel bolts.
Plus, I can see that the cables dangling from these terminals will not produce much weight so ALUMINUM from ProBolt (7075-T6 high grade) will be strong enough for this application.
(on the other hand, the upcoming ground bolts goes to the frame, have more weight to carry, so on that bolts it will be a nicer Zinc Coated steel... upgrade coming soon).

Their head is also drilled :p
IMG_8592.JPGIMG_8593.JPG

Comparison with stock bolts:
IMG_8594.JPGIMG_8595.JPG

Upgrade done:

IMG_8597.JPGIMG_8596.JPG

so based on my experience removing all the stock Ducati bolts from the airbox, and in preparation of installing the upcoming ProTi Titanium bolts for those bolts from the airbox...
I decided to purchase some more tools :D

The center black color socket is the 1/4" socket to hold the TORX bit that I used before, the Left and Right chrome color are the NEW socket that just arrived today. They are much smaller in dimension, allowing better access and have better BIT holding mechanism using either magnet or heavy duty clamp, while the black one have tiny wire like mechanism that prone to break.
IMG_8600.JPG


Below are both new socket, however, the left one is even smaller, just in case :p
IMG_8599.JPG


For the REAL STUBBORN bolts (that I might remove in the future), I also bought the same socket for TORX/Allen Bit but it can accomodate 3/8" and 1/2" ratcheting wrench.
IMG_8598.JPG


and finally, a screwdriver like tool to drive the socket, with the capability of become the extension with 1/4" ratcheting wrench:
IMG_8601.JPGIMG_8603.JPG
 

BMW Alpina

FOUNDING Member & Administrator
Staff member
Another Early Saturday update :p

I took out the stock front rotor and caliper because a nice forum member already purchased them from me :D
at the same time, doing some upgrade:

LEFT picture before, Right picture after:
IMG_8605.JPGIMG_8635.JPG


Below are the process, took out the right rotor:
IMG_8606.JPGIMG_8607.JPG


Install the new Brembo T-Drive rotor, use ProTi Titanium Bolts in GOLD color for CONTRAST, I even align the RED BREMBO LOGO on the rotor to the opposite side of the tire valve and below the "forged magnesium" sticker of the wheel,
which also make the top rotor bolt align for MAXIMUM SYMMETRY :p:
IMG_8621.JPGIMG_8622.JPG


I also add the AELLA Magnesium Color Spacer, right picture is a close up picture and later will use the AELLA Titanium Axle Nut (center silver nut on this picture), oh by the way the ProTi bolts came with dry blue Loctite:
IMG_8617.JPGIMG_8613.JPG


And below is close up picture:
IMG_8623.JPG


Do the same thing for the right side rotor, but this one have the ABS/Speed Black Ring or as Ducati parts catalog called it "PHONIC" Wheel (more pictures continue on the next post):
IMG_8608.JPG
 

BMW Alpina

FOUNDING Member & Administrator
Staff member
Right wheel after upgrade:
IMG_8625.JPGIMG_8626.JPG

IMG_8627.JPGIMG_8628.JPG


IMG_8629.JPG


How the AELLA Magnesium color looks on the bike and it match the color of the Marchesini Magnesium Forged Wheel:
IMG_8633.JPGIMG_8634.JPG


and here are the original front rotors and brake ready to ship to a good Ducati enthusiast, just need to take out the rear rotors too :D

IMG_8609.JPGIMG_8610.JPG

IMG_8611.JPG


Ups I forgot, here are the picture of the Front AELLA Titanium Axle Nut with some drilled holes on it.
I install this AELLA Titanium Axle Nut but did not tighten the Nut at this moment because hopefully in the next months or so, I will received my Zeta Racing Titanium FRONT axle that I had order 3 months ago...
and now looking at this picture, after I upload it, remind me that I forgot to replace that once single stock bolt holding the pickup sensor it self... ok... will need to find the ProTi bolt for it and replace it the same day :p
IMG_8631.JPG
 

BMW Alpina

FOUNDING Member & Administrator
Staff member
Starting from this post onward, all modifications posted here will be CURRENT...
Ah finally, I finished transferring all of my previous posts from the old forum, and ready to MOVE FORWARD in a BETTER ENVIRONMENT 😇


So, I picked up all the parts from the anodize shop, Guess, what the right barb will be for? hint: it's for something very special from Brembo :D

IMG_E8660.JPG

More Parts:
IMG_E8659.JPGIMG_E8661.JPG

IMG_E8662.JPGIMG_E8663.JPG

IMG_E8664.JPGIMG_E8665.JPG

IMG_8669.JPG

You won't find this BRAKETECH color combo at any online store :p
IMG_8667.JPGIMG_8668.JPG
 
Top