I managed to have a bit more time with my bike today and here is what I did:
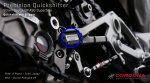
I decided to install the Cordona Quickshifter replacing the stock OEM. To my surprise, the Cordona shortest position is exactly what the current stock OEM length is:

I installed the Cordona Quickshifter using the ProTi bolt, tightened to 10Nm with Loctite Medium, then I tightened the shifter lever bolt also at 10Nm:


But Ups........ I just realized, that I need to install the Cordona to the lever on the rear set first before I can install to the gear shift lever on the engine, so I took it out again and install it on the Left Rear Set, same 10Nm with Loctite medium:


However, this remind me that I still have one more ProTi bolt upgrade for the foot peg lever which I had ordered since 2 months ago and not arrived yet, this means I can't install the rear set (and the Cordona) yet... well.... this got to wait.
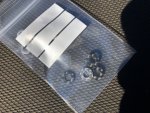
This is the bolt that I want to replace with a different ProTi bolt (larger diameter heads more more even clamping plus in gold color):

But in the meantime, at least the Cordona quickshifter already half installed

So, I decided to turn my effort to wiring, tightened the Positive Battery terminal to 2Nm, only to realized that I forgot to install the charging plug cable, so I had to remove it and then reinstall with the charging plug cable. But the torque is very small 2Nm...

Then, I tightened the 2 larger wire at 4Nm:


Last, I connect the throttle by wire cable and tie-lock it:

That is it for this weekend, I will try to secure more wirings in the coming days but it's so time consuming since the guidance on how to run the wire, tie-lock and secure them are burried within many pdf files at Ducati service manual so it took time to find each one of them.
Well that is because I want to make sure I secure all the wiring just like the way the factory did and perhaps add some more to make it more secure.
I decided to install the Cordona Quickshifter replacing the stock OEM. To my surprise, the Cordona shortest position is exactly what the current stock OEM length is:
I installed the Cordona Quickshifter using the ProTi bolt, tightened to 10Nm with Loctite Medium, then I tightened the shifter lever bolt also at 10Nm:
But Ups........ I just realized, that I need to install the Cordona to the lever on the rear set first before I can install to the gear shift lever on the engine, so I took it out again and install it on the Left Rear Set, same 10Nm with Loctite medium:
However, this remind me that I still have one more ProTi bolt upgrade for the foot peg lever which I had ordered since 2 months ago and not arrived yet, this means I can't install the rear set (and the Cordona) yet... well.... this got to wait.
This is the bolt that I want to replace with a different ProTi bolt (larger diameter heads more more even clamping plus in gold color):
But in the meantime, at least the Cordona quickshifter already half installed
So, I decided to turn my effort to wiring, tightened the Positive Battery terminal to 2Nm, only to realized that I forgot to install the charging plug cable, so I had to remove it and then reinstall with the charging plug cable. But the torque is very small 2Nm...
Then, I tightened the 2 larger wire at 4Nm:
Last, I connect the throttle by wire cable and tie-lock it:
That is it for this weekend, I will try to secure more wirings in the coming days but it's so time consuming since the guidance on how to run the wire, tie-lock and secure them are burried within many pdf files at Ducati service manual so it took time to find each one of them.
Well that is because I want to make sure I secure all the wiring just like the way the factory did and perhaps add some more to make it more secure.


 :
: :
: :
: ):
):