Ducati 998s FE Final Edition (REPLICA but MODIFIED FAR BEYOND the Original) Build Thread

BMW Alpina

FOUNDING Member & Administrator
Staff member
Now it is time to TEST to make sure these "MOTORSPORT Grade" wires work by first connecting all 3 wires (Ground, Indicator and Turn Signal) :ROFLMAO::
IMG_8261.JPGIMG_8262.JPG

And yes, they worked:
First, both left and right INDICATOR Lights (White LED):
IMG_8265.JPG

Then test the Left and Right turn signal, and again worked:
IMG_8266.JPGIMG_8267.JPG

Now I need to add the Rizoma Adapter to install these Rizoma Corsa indicator / turn signal combo onto the MS Production Corse (larger size) Intakes, with Titanium ProTi bolt of course:
IMG_8269.JPGIMG_8270.JPG

Done:
IMG_8271.JPG

But wait, I forgot,... I need to install the Rizoma Corsa onto the Rizoma Adaptor first before installing the Rizoma Adaptor onto the MS Production Carbon Intake.
Use the ProTi Titanium Nuts of course:
IMG_8385.JPGIMG_8387.JPG

IMG_8386.JPG

Installed:
IMG_8388.JPG

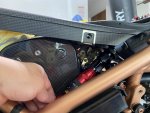
Run the wiring inside the MS Production Intake:
IMG_8389.JPGIMG_8390.JPG

Out to the other side of the MS Production Carbon Fiber Air Intake ready to be connected to the supply wire harness:
IMG_8391.JPGIMG_8392.JPG

IMG_8393.JPGIMG_8394.JPG
 

BMW Alpina

FOUNDING Member & Administrator
Staff member
Now time to pay attention back to the Speedometer. First, I found this new but old stock real Ducati Carbon Fiber speedometer surrounds (to someday replace the foam):
IMG_8153.JPG

Test fit them, but I still need to refinished them in Matte Clear, so it will become DRY CARBON looks:
IMG_8154.JPG

First problem, the Neutral Light Indicator is NOT bright enough, so I am replacing with brighter LED:
IMG_8280.JPGIMG_8281.JPG

IMG_8282.JPG


Before and After
IMG_8283.JPGIMG_8284.JPG
 

BMW Alpina

FOUNDING Member & Administrator
Staff member
Oh, talking about light, I bought this dual-function tail light and brake light. Soon I will post why:
IMG_8285.JPGIMG_8286.JPG


I also purchased these custom Y-Splitter SuperSeal connectors from a vendor in Italy to be use with the 2 lights above... I think you might already know where I am going with this:
IMG_8303.JPG
 

BMW Alpina

FOUNDING Member & Administrator
Staff member

BMW Alpina

FOUNDING Member & Administrator
Staff member
Ok, let's continue with past progress, but posted in the present time (like back to the future) :ROFLMAO:

I found a Titanium rear brake light switch rod by NCR, so I bought it.
IMG_8145.JPG

Comparison vs the stock factory rod:
IMG_8146.JPG

Add the ProTi Titanium Nut of course:
IMG_8147.JPG

Next, test run the Samco Crankcase Breather Hose from the engine crankcase valve (STM) to the Carbon Fiber oil catch/breather box at the rear of the bike and from the AIRBOX to the Carbon Fiber oil catch/breather box (it's a close circuit)
IMG_8167.JPGIMG_8168.JPG
IMG_8169.JPGIMG_8171.JPG


Notice how there is another Samco hose at the background
IMG_8170.JPG

IMG_8174.JPGIMG_8173.JPG

Unfortunately, a ProTi Titanium bolt holding the top of the shock absorber protrudes too far and pinches one of these Samco hoses, so it needs to be dremelled:
IMG_8176.JPGIMG_8177.JPG

IMG_8178.JPGIMG_8179.JPG
 

BMW Alpina

FOUNDING Member & Administrator
Staff member
Purchase a new, smaller size Earl's AN adjustable wrench to allow me to tighten several aluminum quick dry break in tight spaces:
IMG_8180.JPGIMG_8181.JPG

And these are the dry breaks, Staubli of course :cool::
IMG_8204.JPGIMG_8205.JPG

Please pay attention to the 10AN Dry Breaks:
IMG_8206.JPGIMG_8210.JPG

Because the one of the 6AN is just for extra simplicity for the fuel line, but the 10AN are for quickly removing the AirBox while using those Samco hoses for the crankcase breather system.
IMG_8207.JPG


Bought some Goodridge heat protection sleeves:
IMG_8208.JPGIMG_8209.JPG

And a vital part is these RaceTronix 1-way breather valve, that is easier to install to the airbox then the Ducati original REED Valve system:
IMG_8211.JPG

Next, buy more fittings and sealed washers to build this crankcase breather line:
IMG_8212.JPGIMG_8213.JPG

IMG_8214.JPGIMG_8218.JPG

IMG_8215.JPGIMG_8216.JPG

IMG_8217.JPGIMG_8219.JPG

These sealed washers are to ensure air-tight sealing in the airbox where this Racetronix 1-way breather valve will enter:
IMG_8221.JPGIMG_8222.JPG

IMG_8223.JPG
 

BMW Alpina

FOUNDING Member & Administrator
Staff member
After test fit, I found the current configuration below, does not fit the available space between the airbox and the side airbox cover/frame:
IMG_8225.JPGIMG_8224.JPG

So I ordered more parts, and more parts arrived:

The Fragola hose end cover:
IMG_8287.JPGIMG_8288.JPG

More Staubli for the injector line going to airbox also arrived:
IMG_8293.JPGIMG_8294.JPG

IMG_8295.JPGIMG_8296.JPG

IMG_8297.JPGIMG_8300.JPG

But first, I need to enlarge the hold in the airbox orginally made for Ducati official reed valve:
IMG_8335.JPGIMG_8336.JPG

IMG_8337.JPG

Now it fits the Racetronix 1-way valve:
IMG_8338.JPGIMG_8339.JPG

Racetronix 1-way valve is perfectly seated:
IMG_8340.JPGIMG_8341.JPG


IMG_8344.JPG
 

Attachments

BMW Alpina

FOUNDING Member & Administrator
Staff member
In the meantime, I also need to create a "threaded stud" to hold the K&N Air Filter in the airbox, so I just use a ProTi Titanium Bolt and fused them with the carbon fiber airbox with of course carbon fiber layers:
IMG_8349.JPGIMG_8350.JPG

IMG_8351.JPGIMG_8352.JPG

IMG_8353.JPG
 

BMW Alpina

FOUNDING Member & Administrator
Staff member
A few days later, the custom-machined TITANIUM Grade 5 Plates arrived. Yes, these plates are CNC machined with Titanium Grade 5 material:
IMG_8369.JPGIMG_8370.JPG

What are these plates for?... those will be reinforcement plates (top and bottom) so I can install Staubli Dry Break for the fuel line going into the airbox. These plates act like a "bulkhead".
 
Top