Jrkk's budget build V4 base
- Thread starter Jrkk
- Start date
Wow, I had to rethink then whether I want to put heat shield under my gas tank or not.One more pic of tank heat shield, so you can see that silver shield is still visible, but it's not bad thanks to black tape on sides of the tank. I wasn't even think that I could tape it all black.
View attachment 4233
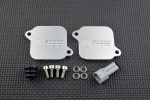
By the way, I just bought the same AIS block off plate from Smart-Moto like yours because I like how they look on your picture very much

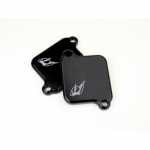
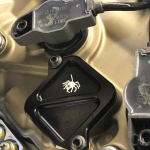
I think the Smart-Moto above look much better than the "Driven" or "Spider" Block off plate below:


Jrkk
Well-known member
Ok, I change back to big pics.
Regarding to AIS, I think it's not possible to do if you don't take rad off. There is also one about 20mm diameter rubber tube that connects original AIS valves to solenoid, that needs to go away, and it's tricky to remove anyway.
Rear sprocket color was kind of an accident, I was looking red (of course) when I found good sale (-60%), in this gold one. Was happy with it thought, looks good with golden chain.
Lower chain guard is fixed with heat gun. Most plastic's are easy to reshape with heat.
One warning for AIS plate's. With smart moto's plate, there was too short bolts with it. I strip one thread only 8-10 Nm of torque . Plenty of thread there, so about 5-10mm longer bolts is needed.
Tank heat shield. I think this is very good place to use it. Last week was firs warm (even hot) week here, and my bud's -20 was boiling it's gas when he got home. I was not having any boiling in tank. We measured temps with laser thermometer and I was having lower temps. If wandering about the look's, you can always leave the side panels on.
Jrkk
Well-known member
I wrote that I tear off yellow decals from silencers. I got some heat resistant alu decals and I place them vertical cos of heal plate. Not sure about end result.
I leave them on now but if they starting to peel, I will ditch them.
This was way too big.
![20210114_220138[1].jpg 20210114_220138[1].jpg](https://ducatimodified.com/data/attachments/4/4231-7fc0ef9adbbe3118a65315d333f87814.jpg)
This was too much off center if not behind heel plate
![20210114_220159[1].jpg 20210114_220159[1].jpg](https://ducatimodified.com/data/attachments/4/4232-71a8cd9071690efde046dd209e6c372f.jpg)
![20210119_231949[1].jpg 20210119_231949[1].jpg](https://ducatimodified.com/data/attachments/4/4233-50afb2f0103861c6703c8df1fbe09047.jpg)
![20210119_232029[1].jpg 20210119_232029[1].jpg](https://ducatimodified.com/data/attachments/4/4234-681026fb3c37535e7e750f07936625a5.jpg)
Jrkk
Well-known member
Ha, I just realized that my temporary side stand pin is still there. I like to have longer pin to ease unfold the stand with my heel and haven't found long enough pin. Need to fabricate it at some point.
Just needs to take it off at track day, maybe?
Then I continued sticker thing. White number plate's for race numbers.
Front piece was total mess. I heated and stretched it too much, so no straight line on other side. And windshield screw opening stretched bad also. I rescued with pinstripe, and idea is to replace it when it gets bad. That can happen quickly on track when you are close to someone's rear tyre.
So when I decided to use pinstripe, I made some model to battery cover as well and striped that , and in fact tail pieces looks much better with black stripes.
When I redo front, I'll make it wider, like it should be.
One tail pic you can see moved data plug in tail box. easy to charge and use T800, and when I have to take to the dealer, no need to take seat off.
Seat also changed to DP race model.
One pic shows new black Öhlins steering damper (Yes I have ÖÄÅ in my keyboard) and some titanium bolts here and there.
![20201231_003635[1].jpg 20201231_003635[1].jpg](https://ducatimodified.com/data/attachments/4/4239-0232d52d199c882622bab2659af25fbd.jpg)
![20201231_013104[1].jpg 20201231_013104[1].jpg](https://ducatimodified.com/data/attachments/4/4240-1ec0723402d6dcdb3caa8f0b2142e66b.jpg)
![20210101_165631[1].jpg 20210101_165631[1].jpg](https://ducatimodified.com/data/attachments/4/4241-77f6c6d9948379648dd7f05c09a4df56.jpg)
![20210123_014629[1].jpg 20210123_014629[1].jpg](https://ducatimodified.com/data/attachments/4/4242-d7a99905fc592cfc88eaa7c7829d039c.jpg)
![20210128_204019[1].jpg 20210128_204019[1].jpg](https://ducatimodified.com/data/attachments/4/4243-b216528e6ee6b5e34d376c6b26793d6e.jpg)
![20210128_221531[1].jpg 20210128_221531[1].jpg](https://ducatimodified.com/data/attachments/4/4244-35d785f8494a588de5381a9942948dcc.jpg)
![20210128_230053[1].jpg 20210128_230053[1].jpg](https://ducatimodified.com/data/attachments/4/4245-94508938b723ded809b3c6cf44c5edca.jpg)
![20210128_230101[1].jpg 20210128_230101[1].jpg](https://ducatimodified.com/data/attachments/4/4246-ba9803151907856d225034c7bb8959ed.jpg)
![20210128_230106[1].jpg 20210128_230106[1].jpg](https://ducatimodified.com/data/attachments/4/4247-916687f479ee8261b314d26152ff7a3c.jpg)
![20210131_013423[2].jpg 20210131_013423[2].jpg](https://ducatimodified.com/data/attachments/4/4248-8b73a523f7ecbbe0721e1765b7ee62ea.jpg)
Jrkk
Well-known member
Ok. Now we get first DIY part what I was talking about.
In first post I told that we had tragedy in our family. My dad past away, and he was very tech orientated dude (73 years) and left me 3D printer (and lots of tools, computers and stuff what I all ready had)
I had used that my previous projects as well, but now when its in my garage, usage will go next level.
First I got throttle spacer file from friendly dude from another forum. Made those to all our group, and tweaked my throttle tube with thin plastic. There is glue between seam so it will not open up or what ever it might do.
![20201001_001219[1].jpg 20201001_001219[1].jpg](https://ducatimodified.com/data/attachments/4/4249-c2b10b05f8381b0259a78f1dfd8377b9.jpg)
Next I started to model mirror block off's just for fun, I know they are not that expensive, but cos I can.
This was first practice model in rough resolution, witch I tweaked a lot.
![20210205_080018[1].jpg 20210205_080018[1].jpg](https://ducatimodified.com/data/attachments/4/4250-a9a41da723faff3dc4bcb549c3a3ff22.jpg)
Then I tried what kind of logos and texts is possible to make
![20210210_003241[1].jpg 20210210_003241[1].jpg](https://ducatimodified.com/data/attachments/4/4251-90c3579773642efe9bcd464f511dce20.jpg)
And different colors and bolt colors.
These are from ABS plastic so they will be strong and handle sun light
![20210213_013352[1].jpg 20210213_013352[1].jpg](https://ducatimodified.com/data/attachments/4/4252-cb48aacfa8fadca5e3459adfcceacf17.jpg)
![20210213_022829[1].jpg 20210213_022829[1].jpg](https://ducatimodified.com/data/attachments/4/4253-0d407b10158835f128c7a257c853bbf8.jpg)
This is final version, and of course both colors. Made those again to all of our group, (-20V4S guy get himself red CNC ones so not for him)
![20210213_191422[1].jpg 20210213_191422[1].jpg](https://ducatimodified.com/data/attachments/4/4254-7c9dff9edf65c40f66e9e64bf390cd3b.jpg)
Ok, I just quickly read your first post of today (well after my morning time here in California), and I really have to start answering my work email, but I just make a quick mental note about your creative idea to fix the white number sticker edge by covering it with another sticker (pin stripe), that is very nice solution,
oh, and I wish I have your keyboard so I can write Ohlins the proper way as Öhlins
without having to copy and paste the right font for the Ö
oh, and I wish I have your keyboard so I can write Ohlins the proper way as Öhlins
without having to copy and paste the right font for the Ö
Just have time to take a break from work and read your second posts for today.Ok. Now we get first DIY part what I was talking about.
In first post I told that we had tragedy in our family. My dad past away, and he was very tech orientated dude (73 years) and left me 3D printer (and lots of tools, computers and stuff what I all ready had)
I had used that my previous projects as well, but now when its in my garage, usage will go next level.
First I got throttle spacer file from friendly dude from another forum. Made those to all our group, and tweaked my throttle tube with thin plastic. There is glue between seam so it will not open up or what ever it might do.
View attachment 4255
Next I started to model mirror block off's just for fun, I know they are not that expensive, but cos I can.
This was first practice model in rough resolution, witch I tweaked a lot.
View attachment 4256
Then I tried what kind of logos and texts is possible to make
View attachment 4257
And different colors and bolt colors.
These are from ABS plastic so they will be strong and handle sun light
View attachment 4258
View attachment 4259
This is final version, and of course both colors. Made those again to all of our group, (-20V4S guy get himself red CNC ones so not for him)
View attachment 4260
That is a super nice 3D printing project for the mirror block off and you are very skillful too. I wish I also can use CAD/3D printers, but I am old, and not as good as your father was in 3D printing, so for me I did the next best thing I can do, buy a 3D printer and tell my 2 sons to study how to work with Fusion360 and have them 3D printing parts for me when I need it
Also, my condolences on the passing of your good father, and I am sure he is proud and love you because you are also very technical like him. I wish and working so my 2 sons can be very technical too.
Jrkk
Well-known member
Thank you for your kind words.
What comes to 3d modelling, I'm constantly learning and do it all by the hard way. I have AutoCAD because my work, but I use it to electric planning, so all needed to learn. AutoCAD isn't easy cos it have so many possibilities. Need to take some lessons.
What comes to 3d modelling, I'm constantly learning and do it all by the hard way. I have AutoCAD because my work, but I use it to electric planning, so all needed to learn. AutoCAD isn't easy cos it have so many possibilities. Need to take some lessons.
Jrkk
Well-known member
Back to build.
When I was doing that mirror block off plates, I was practicing for something trickier.
From the day one I have known that something needs to do about license plate holder. It's too long and turn signals is too big. My opinion only so I'm not judging anyone.
So I decided to start with original tail light with side emitting amber LEDs.
I have used these in my previous builds so I already know what to expect.
![20201003_015305[1].jpg 20201003_015305[1].jpg](https://ducatimodified.com/data/attachments/4/4255-f5c97ed794cb32a4bf874f5ca4c764e6.jpg)
![20201003_010644[1].jpg 20201003_010644[1].jpg](https://ducatimodified.com/data/attachments/4/4256-e96730f7f9eeafb6f0dafb92cc4f359c.jpg)
![20201003_010640[1].jpg 20201003_010640[1].jpg](https://ducatimodified.com/data/attachments/4/4257-0ff9c05e6f8b3950db1d0f174b54beb0.jpg)
![20201001_231634[1].jpg 20201001_231634[1].jpg](https://ducatimodified.com/data/attachments/4/4258-e08eee2f9d8b70157afde15fee16a461.jpg)
Jrkk
Well-known member
Then hard work started, and I can tell you that when you are not professional at this it's gonna take long hours. I didn't count hours....too much.
First I made paper model from opening, then 2mm thick print from that. Then when that was about right I started to make it thicker. Then holes and edges and always tweaking with dimensions. I was again testing different logos and texts. Plan was to fabricate race block off plate to as all, and plate holder bracket cover for me and the guy with -20VS. I print more than 30 piece's. But many of my broblems was related to print settings. Final edition print time was 32hours
I'm not gonna post every phase, just selected some examples.
![20210224_233751[1].jpg 20210224_233751[1].jpg](https://ducatimodified.com/data/attachments/4/4262-0c5a0318069e3340b7c32a0bc3b34bd1.jpg)
![20210227_153430[1].jpg 20210227_153430[1].jpg](https://ducatimodified.com/data/attachments/4/4264-126d907d3f98e022509c440085a67daf.jpg)
![IMG-20210227-WA0004[1].jpg IMG-20210227-WA0004[1].jpg](https://ducatimodified.com/data/attachments/4/4265-e99e9fbd8077ff3a15cdbaa26691e0b0.jpg)
![20210227_020704[1].jpg 20210227_020704[1].jpg](https://ducatimodified.com/data/attachments/4/4266-b6568e68cc8126307e5c7bfcfa1732d8.jpg)
![20210301_110831[1].jpg 20210301_110831[1].jpg](https://ducatimodified.com/data/attachments/4/4267-433f1d5f68fe95d1b160387b66256aee.jpg)
![20210302_115140[1].jpg 20210302_115140[1].jpg](https://ducatimodified.com/data/attachments/4/4268-94814c5e01d30298d813b44e048ed313.jpg)
![20210303_125625[1].jpg 20210303_125625[1].jpg](https://ducatimodified.com/data/attachments/4/4269-66f0e08e8251af535451245887238e53.jpg)
![20210304_025405[1].jpg 20210304_025405[1].jpg](https://ducatimodified.com/data/attachments/4/4270-a13d6b0c6b3e2477f506d04af86eb55c.jpg)
![20210325_122347[1].jpg 20210325_122347[1].jpg](https://ducatimodified.com/data/attachments/4/4271-53207f65ffd4ff95557f3dc3808bd7c4.jpg)
![20210418_001825[1].jpg 20210418_001825[1].jpg](https://ducatimodified.com/data/attachments/4/4272-2a03579571ba02cb42c41bdc2407f5f6.jpg)
Jrkk
Well-known member
Then my mate with V4S ordered V4evo tail light with integrated turn signals, and I was thinking about legal aspect of my led strips. So I ordered also, but different brand. I found that they come from taiwan, V4evo just brand them.
Two first pics show how koso license plate light (that's what you get with Ducati performance tail tidy) sinks into cover.

![20210407_083749[1].jpg 20210407_083749[1].jpg](https://ducatimodified.com/data/attachments/4/4273-2ae0ff354fce198b89835e453032fa0b.jpg)
![20210509_004036[1].jpg 20210509_004036[1].jpg](https://ducatimodified.com/data/attachments/4/4274-529536545c1672883eed3c52ac5f4a75.jpg)
Two first pics show how koso license plate light (that's what you get with Ducati performance tail tidy) sinks into cover.


![20210407_083749[1].jpg 20210407_083749[1].jpg](https://ducatimodified.com/data/attachments/4/4273-2ae0ff354fce198b89835e453032fa0b.jpg)
![20210509_004036[1].jpg 20210509_004036[1].jpg](https://ducatimodified.com/data/attachments/4/4274-529536545c1672883eed3c52ac5f4a75.jpg)
Jrkk
Well-known member
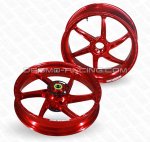
So, some might noticed that rear wheel was different. It's 1098 forged, which I get at good price. We usually don't have tyre service at track, so option is to change tires by hand or having spare wheels.
It had some brake fluid spillage marks, but I managed to polish it off.
I'm still after good bargain of front. Although Oz gass in red is so sweet.
In previous post, last pic was also some another hidden gem...

![20210219_131812[1].jpg 20210219_131812[1].jpg](https://ducatimodified.com/data/attachments/4/4277-b59cdc1f3abf2815ee47154cd2ba4395.jpg)
![20210219_160354[1].jpg 20210219_160354[1].jpg](https://ducatimodified.com/data/attachments/4/4278-d251d291004c8dcc1a958776c073c820.jpg)
![20210308_075441[1].jpg 20210308_075441[1].jpg](https://ducatimodified.com/data/attachments/4/4279-26fab3badbabab61e420fe6c853eb11b.jpg)
It had some brake fluid spillage marks, but I managed to polish it off.
I'm still after good bargain of front. Although Oz gass in red is so sweet.
In previous post, last pic was also some another hidden gem...

![20210219_131812[1].jpg 20210219_131812[1].jpg](https://ducatimodified.com/data/attachments/4/4277-b59cdc1f3abf2815ee47154cd2ba4395.jpg)
![20210219_160354[1].jpg 20210219_160354[1].jpg](https://ducatimodified.com/data/attachments/4/4278-d251d291004c8dcc1a958776c073c820.jpg)
![20210308_075441[1].jpg 20210308_075441[1].jpg](https://ducatimodified.com/data/attachments/4/4279-26fab3badbabab61e420fe6c853eb11b.jpg)
You and @HKMP7 are very good with this "Where in the world is Waldo" hidden gem games... I tried as hard as I can but can't spot the hidden gem... 
Although I notice you had another creative but easy to use way of the safety pin on your engine oil filler cap
Also, that return spring on the rear master cylinder is also very nice an functional
wait, is it the rear wheel air valve cap? the red one?
Although I notice you had another creative but easy to use way of the safety pin on your engine oil filler cap
Also, that return spring on the rear master cylinder is also very nice an functional
wait, is it the rear wheel air valve cap? the red one?
Hmm, the location is very close to the rear suspension and exhaust manifold... I don' think it is electronic, could be somekind of lever to adjust the rear shock pre-load easily? or some breather valve ? but most likely my guesses are incorrect 
Jrkk
Well-known member
Preload it is.
Suspension tweaks has been on my list and I wanted to have something else than Öhlins.
Italian suspension fits nicely to an Italian bike.
I got lucky.
I was trying to order older xxf11 model, but apparently that's discontinued now, and couple of months later I got new xxz31 for same price.
![20210422_151553[1].jpg 20210422_151553[1].jpg](https://ducatimodified.com/data/attachments/4/4283-6f3c4b9aceaf5afc6615e42cfb57fd77.jpg)
![20210422_193045[1].jpg 20210422_193045[1].jpg](https://ducatimodified.com/data/attachments/4/4284-fae2a4aa2f151023ca243f1f87d72123.jpg)
![20210422_193102[1].jpg 20210422_193102[1].jpg](https://ducatimodified.com/data/attachments/4/4285-0e70d3d209f07330126cbc7d5c2fb9f3.jpg)
Jrkk
Well-known member
Qs updated with Cordona. At first I installed it like their manual says, but temps are so high even at that side plate. I measured 55°C. So I'm afraid that it won't last. So I moved it to lower fairing, detached with Velcro, easy to remove when removing fairings.
So, if someone have it installed to the side plate (like manual says), be aware of temps.
![20210429_001047[1].jpg 20210429_001047[1].jpg](https://ducatimodified.com/data/attachments/4/4287-a2cf3645100fb11855f9fba17e4e14f1.jpg)
![20210509_004118[1].jpg 20210509_004118[1].jpg](https://ducatimodified.com/data/attachments/4/4288-a789f871bee7155fa114ca80f71763b0.jpg)
![IMG-20210512-WA0000[1].jpg IMG-20210512-WA0000[1].jpg](https://ducatimodified.com/data/attachments/4/4289-3a79eaf6933a63ee7cbb242557ca340f.jpg)
![20210521_141305[1].jpg 20210521_141305[1].jpg](https://ducatimodified.com/data/attachments/4/4290-b6a48f80a85d55c309ab41028f14af33.jpg)

![20210120_215220[1].jpg 20210120_215220[1].jpg](https://ducatimodified.com/data/attachments/4/4227-5a3b924cb02e62fc033ce4efea202698.jpg)
![20210210_102101[1].jpg 20210210_102101[1].jpg](https://ducatimodified.com/data/attachments/4/4259-19f964c37b9265d695a72449303de767.jpg)
![20210210_102056[1].jpg 20210210_102056[1].jpg](https://ducatimodified.com/data/attachments/4/4260-a849f48d58859d358a0f535c775caf65.jpg)
![20210210_102042[1].jpg 20210210_102042[1].jpg](https://ducatimodified.com/data/attachments/4/4261-16c18026a72e8e527cc29190fae98ff1.jpg)

![20210511_110735[1].jpg 20210511_110735[1].jpg](https://ducatimodified.com/data/attachments/4/4291-c133f203167b2ebdab746262a46668ee.jpg)
![20210511_110755[1].jpg 20210511_110755[1].jpg](https://ducatimodified.com/data/attachments/4/4292-dc46b5a04c91441d6422edd80051f711.jpg)
![20210511_111020[1].jpg 20210511_111020[1].jpg](https://ducatimodified.com/data/attachments/4/4293-3132802b0dc37990adc349b79ea2aeaa.jpg)