Ducati 998s FE Final Edition (REPLICA but MODIFIED FAR BEYOND the Original) Build Thread

BMW Alpina

FOUNDING Member & Administrator
Staff member
I started installing the DLC-Coated Titanium Piston one by one while taking the stock aluminum piston one by one. I used Motul Brake Fluid to "lubricate" the seals while inserting the new DLC-Coated Titanium Pistons:
IMG_7404.JPG

IMG_7403.JPG

IMG_7405.JPGIMG_7406.JPG

IMG_7407.JPGIMG_7408.JPG

IMG_7409.JPGIMG_7410.JPG

IMG_7411.JPG

Then reinstall the brake pads:
IMG_7413.JPGIMG_7417.JPG

IMG_7415.JPGIMG_7416.JPG

IMG_7418.JPGIMG_7419.JPG

And the upgrade was successfully completed :cool:
 

BMW Alpina

FOUNDING Member & Administrator
Staff member
By the way,
I wish the Motocorse spacer that came with the lower fork bracket kit can fit, but they do not... so a few weeks ago, the Correct Spacer for the GP4-MS caliper finally arrived. It is a Red Anodized spacer at 12.5mm from Addiction Motorsports in UK.
And now the position of the brake caliper against the edge of the T-Drive Brembo rotors are perfect:
IMG_7424.JPGIMG_7433.JPG

But I found out, we still have issues. The Right side T-Drive rotor is not fully centered, and they're almost rubbing on the caliper surface. This is not acceptable, so I re-measure the rotor spacer thickness again.
IMG_7439.JPG


I then discovered that Alpha Racing in Germany offers a high-quality rotor spacer with the correct bolt hole pattern and the right thickness, so I ordered it, and it arrived extremely quickly. I ordered 2 thicknesses, the 1mm and 0.5mm, so that I can stack and swap if needed:
IMG_7497.JPGIMG_7498.JPG


I need to take out the right T-Drive rotor to install the new spacer, but since I already balanced this wheel, I use a Red Sharpie to create dot-markers on the position of the T-Drive rotor so I don't need to re-balance the wheel again.
IMG_7499.JPGIMG_7500.JPG

IMG_7501.JPG

I measured the custom CNC machined spacer that I made a long time ago, and the thickness is 2.42mm:
IMG_7502.JPG

I decided to stack 2 x 1mm of Alpha Racing spacers for a combined thickness of 2mm to replace the 2.42mm spacer above:
IMG_7504.JPG

Then I install the right T-Drive rotor back to the wheel:
IMG_7513.JPGIMG_7514.JPG

And now they are centered without getting too close to rub the caliper:
IMG_7506.JPGIMG_7507.JPG

IMG_7510.JPG

Next, I will be posting about installing the Goodridge 700 Series Aramid Fiber (Kevlar) brake line soon.
 

BMW Alpina

FOUNDING Member & Administrator
Staff member
Found some bargain on eBay UK, submitted an offer, and got lucky, so why not for some NOS Ducati Performance bike cover:
IMG_7381.JPG


Then, more Goodridge fitting needed to complete the brake and clutch lines arrived directly from Goodridge in UK:
IMG_7443.JPGIMG_7444.JPG


I need this banjo fitting for the first line to the front brake master cylinder:
IMG_7445.JPG

I need this fitting for the second line going to the front brake lever:
IMG_7447.JPG


They will be mounted on top of each other (STACKED) like in this picture:
IMG_7448.JPG

Then this banjo fitting for the clutch slave cylinder:
IMG_7450.JPG


Then this fitting for the clutch master cylinder:
IMG_7451.JPG


These 2 adapters are for the rear brake master cylinder:
IMG_7453.JPGIMG_7454.JPG

I did use the original Ducati line for some reference, but mostly it is not really valid for my application:
IMG_7455.JPG


I am using this Earl's annotuff aluminum fitting for the rear brake, but I just don't like it, so I am going to replace it with a stainless steel version:
IMG_7462.JPGIMG_7465.JPG
IMG_7464.JPG

This was how I plan to reroute the rear brake line through the swingarm (hold by the carbon fiber chainguard):
IMG_7466.JPGIMG_7467.JPG
IMG_7468.JPG


This is how I was rerouting the clutch line from the slave to the clutch master. Notice, I need to use a dual nipple to combine 2 shorter line for the clutch because all of these Goodridge 700 series Aramid Fiber Reinforced lines were extra lines that Goodridge UK made for me, but have mistakes on their fittings, so I have them for free.
I feel bad throwing them away because they were brand new (and still brand new) and its an expensive line. So I just need to be creative with some adaptors.
IMG_7457.JPGIMG_7458.JPG

IMG_7459.JPG

Having said that, I don't like the way the clutch line double nipple located on the frame so I decided to re-measured and found out, the lines going to the rear brake are better to be used for clutch line, while the clutch line can be used for the rear brake line so I swapped them.
More about it soon.
 

Attachments

BMW Alpina

FOUNDING Member & Administrator
Staff member
Next, well actually this is many months ago (I just forgot to post it), a PAIR of Custom CNC machine Titanium Injection Holder arrives:

IMG_6369.JPG

IMG_6372.JPGIMG_6373.JPG

I also found a pair of Titanium adapters to AN6 for the fuel line to be attached. This Titanium Adapter (with heatsinks) normally used for part of Turbo system:
IMG_6375.JPG

I attached the AN6 adapter to the Titanium Injector Holder:
IMG_6378.JPG

IMG_6377.JPG

IMG_6379.JPG


Here is how the injector being hold by the Titanium Injector Holder:
IMG_6382.JPG

IMG_6383.JPG

This is how it likes mounted with ProTi Titanium bolt to the CNC machined velocity stack from JetPrime:
IMG_6385.JPGIMG_6386.JPG
IMG_6387.JPG
 

Attachments

BMW Alpina

FOUNDING Member & Administrator
Staff member
I still have the original Fuel Pump assy. From my 998, and initially, I thought of selling it, but then I thought about it, I decided to just build a SECOND set of fuel pump as a spare.
I will of course make this second fuel pump assy. looks as good as new set. First thing is to start collecting all the parts for the fuel pump assy. that Ducati no longer produces, and below is one of those parts that arrived:

IMG_7153.JPG

This is also a few months ago, but I forgot to post, when I purchase all the Stahlbus quick brake bleeder valve and install it on the brake calipers and master/slave cylinders:
IMG_7154.JPG

IMG_7155.JPG

IMG_7156.JPG

IMG_7469.JPG

I also swapped the Goodridge 700 hoses for the clutch line, from the one originally for the rear brake line, so now it fits better for the clutch. It is now the longer 1 piece while the rear brake line is 2 pieces joined together:
IMG_7470.JPG

IMG_7471.JPG


IMG_7472.JPG

IMG_7473.JPG

But it is still about 1cm to 2cm too short, so I found a solution that I will post later.

I also need to have hose management for the front brake hoses and I decided to replace the past fork hose clamp of Ducati 999 to the clamps from 1198 (picture below show before and after), the 1198 clamp is a close loop design, more secure:
IMG_7474.JPG

IMG_7478.JPG

IMG_7480.JPG

The only issue is, its diameter is too large for the location I want to be on the Ohlins forks, so I will need to add some type of spacer (which I also already have the solution and will show later).
 

BMW Alpina

FOUNDING Member & Administrator
Staff member
Now, it's time to bleed the clutch brake line.

Install the Goodridge clutch line with a Goodridge swivel adapter from Metric to AN, then to the banjo. Yes, I need this adapter because, as I pointed out, these Goodridge 700 series Aramid Fiber reinforced hoses came from Goodridge with the wrong end fitting. But rather than throw them away (well, they are custom-made length and brand new), I decided to just add an adapter.
Besides, they look more "technical" with these adapters... :p
IMG_7482.JPG


IMG_7483.JPG

IMG_7484.JPG

This is how I routed the clutch line:
IMG_7485.JPGIMG_7486.JPG

If you recall, this clutch line was still about 1 cm too short, so to overcome this, I replaced the banjo on the clutch slave cylinder with a slightly longer banjo, which solve the issue:
IMG_7517.JPGIMG_7515.JPG

IMG_7525.JPG

Yes, it is perfect now:
IMG_7518.JPG

IMG_7519.JPGIMG_7520.JPG

IMG_7521.JPGIMG_7600.JPG


I chose Motul RBF660 for the fluid. Initially, I want to use the Motul RBF700 but I read somewhere in the spec that the RBF700 is not mixeable or might have issue if mixed with a DOT 4 or even an RBF660).
Since in my Panigale V4 916 25 Anniversario, I already used RBF660, I decided to just stay with RBF660.
IMG_7680.JPG

I used my trusted Vacuum brake bleeder combined with Stahlbus quick bleeder valve:
IMG_7701.JPGIMG_7702.JPG

IMG_7703.JPGIMG_7705.JPG

and DONE:
IMG_7707.JPG
 

BMW Alpina

FOUNDING Member & Administrator
Staff member
A bit of intermezzo...
I want to see which rear view mirror color I should choose, so I need to install the front fairing temporarily to do that...
Ok, back a bit... I actually already have the original RED color 998 plastic rear view mirror. I also have the brand new old stock still sealed in the box, Ducati Performance Aluminum Silver rear view mirror, plus I have a Rizoma Veloce L Sport (with turn signal) also ready for 998.
But... I still prefer a Rizoma Stealth, problem is Rizoma will NOT make one for 998 for obvious reason... but this is DucatiMODIFIED we are talking about... so... I have some idea :cool:
But first color...

Ok, here are the quick test fit, and I suddenly feel warm in my heart... finally I see how it looks with the front fairing... all this effort, all this years are worth it 😌
IMG_8161.JPG

Then I want to see how it look with it's younger brother,.. and yeah,... I know I made it 😌:
IMG_8163.JPG

Ok, back to business.... test fit how it looks like with a Rizoma Stealth in Black Color, and yeah... I think I want it this way 😉
IMG_8166.JPG

Note: of course, I can easily cheat by buying the copy cat (fake) Rizoma which have elongated holes to accommodate different mounting hole spacing, but then it is cheating... so the only way is to modify an original Rizoma Stealth Mirror from another bike model that Rizoma Italy made... so stay tuned... as I said, Ideas has been floating around...
 

BMW Alpina

FOUNDING Member & Administrator
Staff member
Going back a few weeks again,

Start with the dual Banjo bolt from ProTi with Ducati's original cooper washer:
IMG_7481.JPG

Adjust the position of the front brake fluid reservoir, make sure it will clear the front fairing (and front fairing holder):
IMG_7602.JPGIMG_7603.JPG

Everything looks ready, all bolts tightened to torque spec (notice the orientation of the 2 front brake line banjos):
IMG_7604.JPGIMG_7605.JPG


IMG_7708.JPG


IMG_7606.JPGIMG_7607.JPG

For front brakes, I make sure I use the recent production Motul RBF660 (I have some older but new unopened bottles that I will use for flushing the line, but for the front brake, I need to make sure I have fresh fluid):
IMG_7681.JPG

Bleed manually:
IMG_7678.JPGIMG_7679.JPG

But took too long, so use my Vacuum brake bleeder:
IMG_7690.JPG


IMG_7684.JPGIMG_7685.JPG

IMG_7686.JPG

Then bleed the front master cylinder, to make sure no air bubble:
IMG_7692.JPG

Cap the Ducati by Rizoma brake fluid reservoir, and now it's a perfect firm brake lever:
IMG_7694.JPGIMG_7696.JPG


Now is the time to center the axle, first making sure, no leak and all line/speedometer cable routed properly:
IMG_7698.JPGIMG_7699.JPG
 

BMW Alpina

FOUNDING Member & Administrator
Staff member
Put a lot of Gadus Grease B on the Motocorse Titanium Brake Caliper bolts:
IMG_7711.JPGIMG_7710.JPG

Tightened the brake caliper bolts lightly
IMG_7712.JPG

Pull the brake lever then tightened all the brake caliper bolt to torque:
IMG_7714.JPG

Apply Gadus Grease B on the lower fork axle ProTi Titanium pinch bolts:
IMG_7715.JPG

Tightened the right side pinch bolt (only) to torque:
IMG_7716.JPG

Put Gadus Grease B on the AELLA Titanium Front Axle Nut, and tighten it lightly:
IMG_7717.JPG

Press the fork up and down:
IMG_7718.JPG

Tightened the axle nut, then tightened the left lower fork pinch bolt to torque:
IMG_7719.JPG

Clean all the extra grease:
IMG_7727.JPGIMG_7728.JPG
IMG_7729.JPG

Right side too, need to be cleaned from all those grease:
IMG_7730.JPGIMG_7731.JPG
IMG_7732.JPG

Now, the finishing touch, the Ducati by Rizoma front slider. Note, this looks like the Panigale V4S front axle slider, but in fact it is not. It need to be a bit shorter so... I forget what other model it came from, but I believe it is from Hypermotard (I bought this shorter one a few years ago):
IMG_7733.JPG

Install the front axle slider:
IMG_7734.JPGIMG_7739.JPG

IMG_7737.JPG

IMG_7745.JPGIMG_7743.JPG
 

BMW Alpina

FOUNDING Member & Administrator
Staff member
Next, organize the routing of the front brake lines and the speedometer cable. The 1198 fork clamp I bought is perfect but it is not as simple to tightened, so I decided to Epoxy the ProTi Titanium Nut, this way I can just screw in the bolt easily without worry the nut can fall, slanted or spin and eat the plastic clamp:

IMG_7720.JPGIMG_7721.JPG

IMG_7722.JPG

To make sure the epoxy does not accumulate and block the thread, I use Loctite Anti-Seize and insert the ProTi Titanium Bolt right away:
IMG_7723.JPG

IMG_7724.JPGIMG_7725.JPG

Then, after the epoxy dried, I installed the fork clamp on my fork:
IMG_7750.JPGIMG_7751.JPG

IMG_7753.JPGIMG_7752.JPG

I also added one more clamp higher on the fork to hold the front brake lines near the front master cylinder:
IMG_7754.JPGIMG_7756.JPG
 

BMW Alpina

FOUNDING Member & Administrator
Staff member
Having said that, the 1198 clamp is very slightly loose, so I added a lining of foam tape:
IMG_7779.JPGIMG_7780.JPG

Now they are super snug, and tight:
IMG_7788.JPGIMG_7787.JPG

IMG_7791.JPGIMG_7790.JPG

IMG_7789.JPG

Same thing with the top clamp, also add the foam lining:
IMG_7792.JPGIMG_7793.JPG
 

BMW Alpina

FOUNDING Member & Administrator
Staff member
More updates:

This Stainless Steel bolt for the hose clamp is "ok" but not up to level of "sophistication" as the other bolts and I found a perfect replacement from ProBolt UK :cool:
IMG_7757.JPG

So now it is Titanium by ProBolt UK. The only thing is, the ProBolt UK Titanium bolt does not have Phillips screwdriver capabilities, so make sure if you are replacing them, you have access to tighten with a regular socket tool:
IMG_7758.JPGIMG_7759.JPG

The look around to find more hose clamp that can have their bolts replaced with the Titanium Bolts from ProBolt UK:
IMG_7760.JPGIMG_7761.JPG

IMG_7762.JPG
 

BMW Alpina

FOUNDING Member & Administrator
Staff member
I then reinstall the Ilmberger Carbon Fiber Timing Belt Cover for the horizontal cylinder that was taken off to prevent scratching while installing the wiring harness and Goodridge Oil Line for the Cylinder Heads:
IMG_7763.JPGIMG_7764.JPG
 

BMW Alpina

FOUNDING Member & Administrator
Staff member
A few posts above (and almost 2 weeks ago), I used the first version of Rizoma Stealth Mirror for First Generation (2018 to 2024) Panigale V4S to imagine what it would look like on my 998, and immediately, I want it that way.
So, I decided to buy one of the first batch of Rizoma Stealth Mirrors for the 2025 Ducati Panigale V4S that arrived on our shores.
But after I buy it... I began to worry, because there is a chance the Rizoma Stealth Mirror for the latest YEAR 2025 Ducati Panigale V4S, cannot be modified to fit my 998.
So when the Rizoma Stealth Mirror arrived yesterday, I opened it immediately to see how it mounts to its lower bracket (it is a 2-piece design).

Anyway, let's start with the pictures... because pictures speak a thousand words :cool::
IMG_8199.JPGIMG_8200.JPG

IMG_8201.JPG

IMG_8190.JPGIMG_8191.JPG

IMG_8203.JPG

IMG_8197.JPG

OK, so we confirm they are GORGEOUS ... but can they be modified to fit my 998?
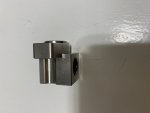
Let's start by taking out that RED warning Sticker saying do NOT UNSCREW the bolts:
IMG_8196.JPG


VOILA the hidden M8 Hex Socket Screw, what a pleasant sight... because this means EVERYTHING will be just FINE 😌
IMG_8192.JPG

This morning, I start by taking out that "DO NOT UNSCREW" Red Sticker completely:
IMG_8227.JPG

Heat up the area where the small Set Screw with a heat gun to loosen it up. That Set Screw LOCKS the main M8 screw in place:
IMG_8226.JPG

Oh, also that set screw actually need a very small IMPERIAL size Hex Socket tool to open. Once I took out the small set screw, I use a large socket wrench to took out the main M8 screw:
IMG_8228.JPG

But despite heating up more with heat gun, the M8 screw will not open, so I get my Makita Impact Driver, set it up at Medium Impact Power and start opening it...
After several hard tries, it finally open:
IMG_8229.JPG
IMG_8230.JPG

I then do the same to the SECOND mirror, but this second mirror main M8 bolt just won't open. Either the Loctite on this second mirror grips stronger, or the set screw, damage the thread on the M8 bolt making it cannot open...
At one point, I even began to think this M8 might be a left hand thread version... but after carefully viewing the thread (through the small set screw hole with magnifying glasss), I am quite sure they are the regular right hand threaded.
So I keep heating it up with my Makita heat gun, then spray a lot of Kroil lubricant for loosening up seized threads:
IMG_8232.JPG

IMG_8233.JPG

Finally, after cranking up the power level of my Makita impact driver, I am able to took out the M8 main bolt for this second mirror:
IMG_8234.JPG

I quickly wash the mirror with water then wipe with alcohol, inspect the thread and everything is good... what a relieve since any damage is costly (they are $699 a pair):
IMG_8235.JPG


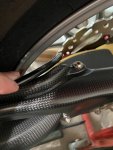
I also found an extra ProTi M8L35 (35mm length) bolt that I will use to mount them to the 998 mirror center hole stand mount:
IMG_8236.JPG

IMG_8237.JPG

But I still need to align and drill the holes on my MS Production Carbon Fiber front fairing/cowling, so I cannot mount it now. I also will add an adapter below the mirror mount so it will confirm with the curve contour of the front fairing/cowling edge.
In the meantime, I took picture of how it look (roughly) when mounted to the 998... and Yes, I think I made the right choice 😍

IMG_8239.JPG
 
Top