DUCATI Panigale V4 25° Anniversario 916 BUILD Thread

BMW Alpina

FOUNDING Member & Administrator
Staff member
If anyone here interested in LOWERING rear suspension height of your bike for any reason,

I noticed a picture on Instagram, so I contacted Brocks Performance.
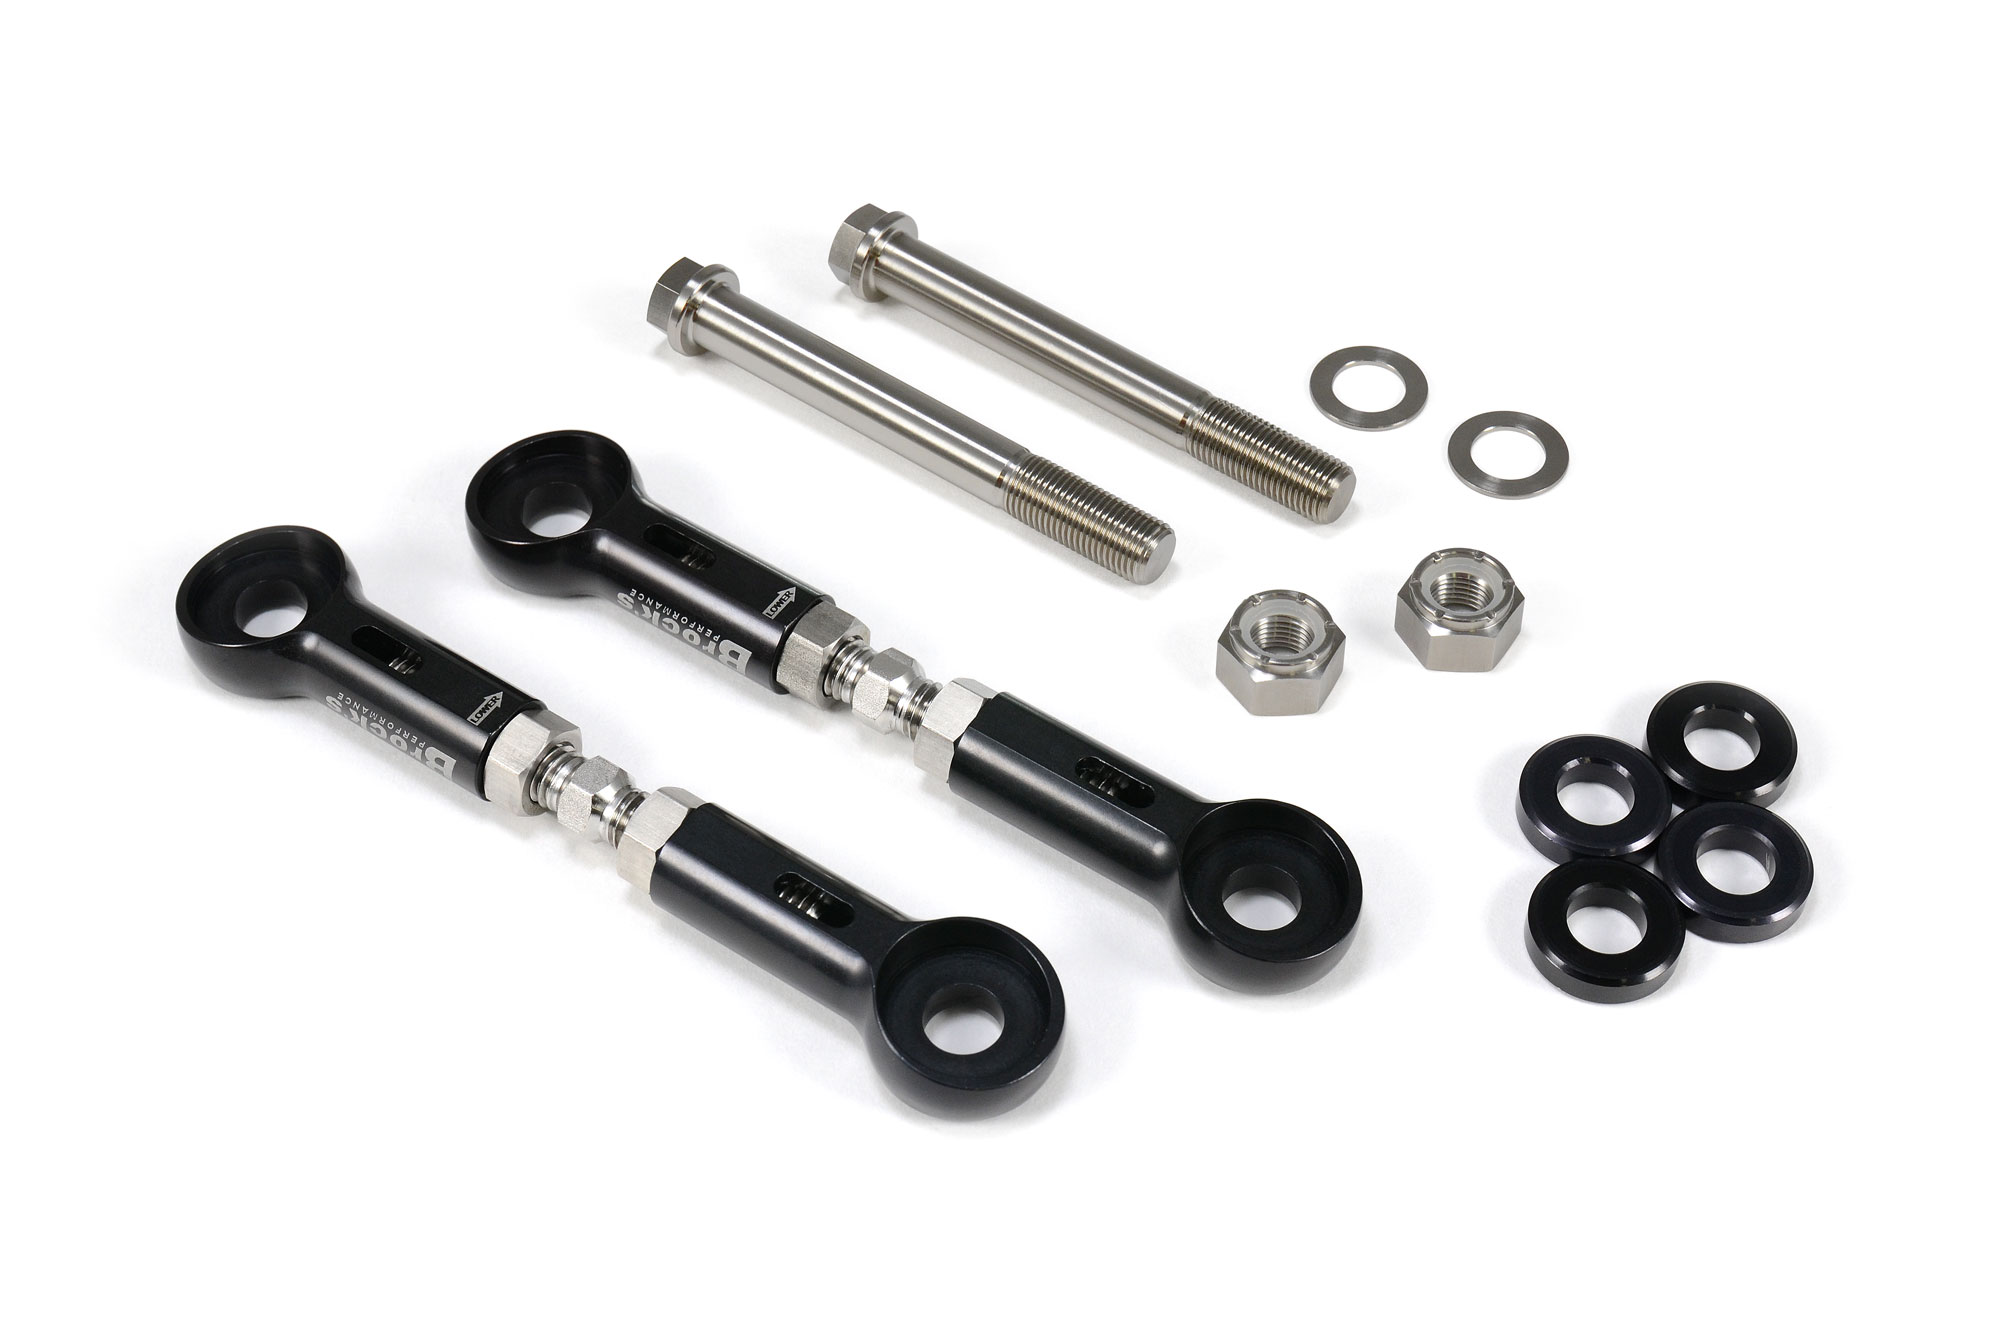
The adjustable link on that picture wa a slightly modified (material removal) of the Brock's Performance lowering kit for Hayabusa: Window Link Kit Adjustable Hayabusa (99-20)
This kit will also need longer bolts.
However, Brock's Performance just told me that they will have a solution specific for our Panigale V4 available in about 2 weeks from that day.
I was excited because my current AELLA lowering link is NOT adjustable. However, then I realized, that the Instagram picture below shows a Panigale V4 with the optional Akrapovic full race/slip on system.
That is why it is easy to reach the adjustment bolts.
On my bike with the type approved Akrapovic (shape like stock silencer), the link would be half covered by the silencer,
meaning if I want to adjust the right height, I will have to remove the silencer (and we all know that is not the easiest thing to do with our bike).
So I think I will just have to be happy with my NON Adjustable AELLA lowering link, but I thought I should share about this product in case anyone here interested in lowering their bike.

Brock's Performance also informed me that they are also working on possible solution to RAISED the bike. Just contact them directly, they are very fast in responding to your inquiry.

And here is their solution for Panigale V4 (to lower the bike) ready to purchase at their website:
Lowering Links

They even offer a version with Titanium Bolts/Hardware:
Window Link Kit Adjustable Panigale V4 / S / Speciale (18-20) w/ Titanium Bolts


BMW Alpina

FOUNDING Member & Administrator
Staff member
My painter just emailed me the pictures of my Peter Lieb Lower Tank Carbon Fiber Cover/Protector with the Akrapovic Sticker covered by layers of Matte Clear Coat so you can feel the sticker edges anymore and it is smooth.
I also asked my painter to adjust the shade a bit more matte and hopefully it will be ready along with my modified tail fairing (correct the number 1 with the right font style) in a few weeks.

Tank Protector with Akrapovic Sticker Rev#1.jpg
 

BMW Alpina

FOUNDING Member & Administrator
Staff member
I spent a good amount of time of that week, researching several Coating process for metal. It's like being a college student again but just more fun 🤓🧐

Initially I was set on doing TiN (Titanium Nitrite) coating for the aluminum rear suspension bracket (like the coating on the Ohlins forks lower tube and many golden coatings on drill bits)
however, I learned the PVD TiN coating process is done at temperature of around 800F and that would weaken or alter the strength of the aluminum.
So, I will still use regular anodizing for the rear aluminum suspension bracket and also for the upcoming rear BrakeTech rotor carrier and front MotoCorse hub cover.
(remember: not Type 3 mil sped anodizing, those are too thick, I learned the hard way when I coat my custom Brembo rotor hat for my Honda Fit project and having problem with the F40 style floating hardware)

But for parts that is NOT aluminum, I decided to go ahead and perform TiN coating on all the Grade 12.9 steel bolts, nuts and washers (including the bumax and 316 stainless steel washers).
The TiN coating is only about 2 micron thick on average so it won't effect the thread of the bolts/nuts.

I just ship all those bolts to the TiN coating company, oh, almost forgot, the TiN coating company also provide polishing service so hopefully I got them back golden, polished and shiny in 1 or 2 weeks 😃

This wikipedia page have more info regarding TiN coating:
Titanium nitride - Wikipedia

Now... back to anodizing the aluminum parts, the anodizing company that I would like to work with, do not offer polishing,
and one of my aluminum rear suspension bracket had press marked from the swing arm when I was trying to remove them, this means I need to learn on polishing aluminum to remove this imperfection.
 

BMW Alpina

FOUNDING Member & Administrator
Staff member
Another weekend pass by and it was a dedicated ProTi weekend for the engine. I also use this opportunity to teach my younger 12 years old son who wants to be a Mechanical Engineer more about the basic of bolts, screw and the needs to torque it right with hands on experience. Yes, he is doing a lot of wrenching this weekend and that's make me happy 🙂

I started with installing the bracket for the Ducati by Rizoma Rear Brake Reservoir. This Ducati by Rizoma Rear Brake Reservoir was actually the Front Clutch Reservoir. Since I love their design (Rizoma WAVE),
I decided I wants to make all 3 reservoir in my bike to have the same styling.
For the front reservoir, I was considering those MotoCorse reservoir, they actually already have the brake and clutch reservoir for the Brembo RCS Corsa Corta (even though the RCS 16 Corsa Corta clutch master cylinder is not out yet).
However their design use O-Ring and I worry if after few years, the O-Ring start leaking. It will be a nightmare if I wake up in the morning and find out all the paint work on the fairings were ruined by the brake fluid.
Of course, if you are doing preventive maintenance and regularly replace the O-Ring every few years, that should be ok.
Also, if you ride it a lot, those vibrations could potentially wear the O-Ring faster since it is only supported mostly by the bleed screw on the RCS Corsa Corta.
MotoCorse also informed me that it will limit the steering movement (at least for the RCS Corsa Corta version), you cannot go lock to lock anymore. But they do looks very very very beautiful though...

Ok, back to work...To install this bracket, I need CUT the current rear reservoir bracket/hose guide, but I don't want to cut the original parts from Ducati so I purchase a Carbon ShiftTech version, mark it and cut it with Dremel:
IMG_7871.JPG

Although I never plan to ride my bike, however, I might be washing my bike once every year, and once you cut a carbon fiber, the exposed surface where you cut it need to be sealed again so water won't seep and de-laminate the carbon.
This won't happen quickly of course, but just to be sure. The best way to do this is to apply Polymer Resin on those exposed surface, and I do have a bottle of polymer resin and it's catalyst somewhere in my house, problem is I forgot where I put them and can't find them 😅 so I am going to order a new bottle, but in the meantime, I just going to paint the exposed surface (and also the rear side of the Shiftech Carbon Bracket) Black. Below is the back surface after painting, much better than the "raw" unfinished looks above.
IMG_7881.JPG

And these are the pictures from the front side after I cut it and on the right picture, you can see how the exposed surface after cutting (on the edge) also painted by me:
IMG_7882.JPGIMG_7883.JPG

Then I tie lock the hose and cables behind this carbon bracket (because this carbon bracket don't have the unique tie-lock channel like the original Ducati Parts), and I bolted on the engine block using all ProTi Titanium Bolts:
(the socket connector for the rear brake light switch on the right slide onto the right tower of this bracket)
IMG_7885.JPG


Now, time to prepare the Rizoma MIRROR (yes MIRROR) Bracket that I modify to use as the bracket for the Ducati by Rizoma Rear Brake Reservoir.
I carefully choose all the right Spacers (combinations of Titanium (Yes Titanium Spacer), Aluminum & Stainless Steel material) depend on the location, thickness and color matching. I also of course only use ProTi Titanium Bolts. Here they are,
and take a look at the first washer, they are TITANIUM washer and they were really nice !!!
IMG_7854.JPGIMG_7855.JPG


I also make sure the ProTi Titanium Bolts (after all those spacers/washer stack on top of each other) still have the same length going into the thread holes at the engine block so it retain the clamping force as the original bolts when torque.
The right pictures shows the 2 stacks of aluminum spacers I use for the ProTi Titanium bolts that attached this Rizoma Mirror Bracket to the engine block:
IMG_7857.JPGIMG_7856.JPG

By the way, since I have 2 Ducati by Rizoma Clutch Reservoir (one for this rear brake and one for the front clutch), I noticed that they came from different batches, because they have different laser marking at the bottom of the reservoir below.
I just want to make sure they are not fake, but all other details (even the plastic casting mark) are exactly the same between both, plus I bought both of them from official Ducati dealer, to make sure:

IMG_7846.JPG
 

BMW Alpina

FOUNDING Member & Administrator
Staff member
Here was the picture after I bolted them onto the engine block 💖
IMG_7886.JPGIMG_7887.JPG

Next step was installing the AELLA Right Side Frame Slider which also need to be modified using Stainless Steel Spacer to CLEAR the Ducati by Rizoma Rear Brake Reservoir and it's bracket Assembly.
And when I mean to CLEAR it, I calculate down to mm and it CLEAR it by some few mm 🧐

This picture below show how close the "CLEARANCE" was:
IMG_7888.JPG


More pictures with the AELLA Right Side Slider, properly installed and now using All ProTi Titanium Bolts to secure the AELLA Slider :cool:
Well, actually one more ProTi bolt that hold the BLACK Slider has not arrived yet, so just 1 more ProTi Titanium Bolts to install in the next few weeks :p
IMG_7902.JPGIMG_7903.JPG

IMG_7904.JPGIMG_7899.JPG

IMG_7893.JPG

Please note that I already ordered and still waiting for the MotoCorse Right Engine to Frame Bracket which will be in Gold Color in combination with Titanium Silver colored ProTi Titanium Bolt and also MotoCorse SILVER color Engine Bolt Cover.
Those are located right behind this Ducati by Rizoma brake reservoir and will provide an even better background contrast (y)


This is how the MotoCorse bracket looks like (picture taken from MotoCorse website since mine had not arrive yet and my Engine Bolt Cover will be Stainless instead of Red),
 

BMW Alpina

FOUNDING Member & Administrator
Staff member
Back to the rest of the ProTi Engine Bolts, up to this moment, my son and I had finished replacing the Right Side (Clutch Side) factory bolts with ProTi Titanium Bolts.

First I want to point out that, you need to purchase Seal A (THREE BOND 1207B) for 4 bolts on the clutch side.
You will notice that when you took out 3 bolts on the top right corner, the bolts is wet with water coolant (on the thread), and when you took out 1 center bolt at the lower row, it will actually leak oil!!!
You will also need this Seal A for some of the bolts on the Right (Generator ) and Lower (oil sump) side.
These are the location of those bolts that need Three Bond 1207B sealant applied on their thread for the clutch side (marked in GREEN):

Capture1.JPG


You also need to tighten this bolts in certain pattern per the picture below:
Capture3.JPG

My son and I use our small Snap-On Torque Wrench since this bolt need to be tighten in such low torque value between 5Nm to 10Nm.
We also apply SILVER Anti Seize paste (by Loctite), I decided to tell my son to tighten them at 7.5Nm (middle value):
IMG_7874.JPGIMG_7875.JPG


There is one bolt that have tricky location right behind the RPM pick up sensor, so you need to unbolted the RPM sensor then Rotate the whole sensor assembly so your wrench can pass through to access the bolt.
IMG_7876.JPG


The good news is, I also have some extra ProTi bolts so I can use it to also replace the bolt holding the RPM pickup sensor with ProTi Titanium Bolt:
IMG_7906.JPG

And below are pictures of the Right/Clutch side engine cover with the bolts replaced with ProTi Titanium bolts:
IMG_7907.JPGIMG_7908.JPG


Oh, by the way, I also took out the Rear Brembo Caliper because I am going to replace the PINCH Bolt (that holds the 2 halves of the Brembo Caliper together and the brake pad pin) and I need to measure them.
After measuring, I found that these are the right ProTi bolts for this:
ProTi Caliper Guide Pin PINTO2-OTB01 x 1 pieces
ProTi Caliper Pinch Bolt for the REAR Brembo Caliper, ProTi Assembly Universal Bolt M8L40-OTB01 x 2 pieces


IMG_7853.JPG
 

BMW Alpina

FOUNDING Member & Administrator
Staff member
The following day, my your son and I spent our relaxing Sunday afternoon installing the LEFT ProTi Titanium Bolt for the Generator Side Cover, and also install the Ducati Performance Carbon Generator Protector and AELLA Left Frame Slider.
The picture below shows the bolt tightening pattern and note on Bolt# 6 and Bolt#12, you need to apply "SEAL A"
Capture.JPG

Capture.JPG

Thanks to @HKMP7 who helped me by measuring the original Ducati bolt that came with his Ducati Performance Carbon Fiber Generator Protector,
Because mine had not arrived yet at that time, so I know in advance that the original Ducati bolt length is 32mm and head diameter 12.4mm.
This way, I can order the equivalent ProTi Titanium Bolts without waiting for my Ducati Performance Carbon Fiber Generator Protector to arrived.

Now, since the closest ProTi bolts is 35mm length with 13mm head diameter, I decided to also bought 2mm Stainless Steel spacer to make it "proper" factory spec.

So below are the picture of my Ducati Performance Carbon Fiber Generator Protector with the 2mm Stainless Steel Spacer and 35mm length ProTi bolts that I finally installed today:
IMG_7923.JPGIMG_7924.JPG
IMG_7925.JPG


After that, I also installed the AELLA LEFT side Frame Slider. I also change the AELLA Stainless Steel bolt to ProTi. Since I knew that I need to CLEAR the Ducati Performance Carbon Fiber Generator Cover, so I bought several 15mm Stainless Steel Spacer along with 15mm longer ProTi Titanium Bolt (2 pieces of M6x50mm and 1 pieces of M6x60mm, both with 13mm diameter head).

Here are the pictures that show the 15mm Stainless Steel Spacer (although for the center bolt, I utilized the unused gold15mm spacer from the Right side AELLA frame slider ;)

IMG_7921.JPGIMG_7922.JPG


and here are the overall pictures (also shows the rest of the ProTi Titanium Bolts on the entire right side Generator Cover):
IMG_7917.JPGIMG_7918.JPG
IMG_7919.JPGIMG_7920.JPG

I did not have time today to change the lower sump cover bolts... so it will be the following weekends...

However, I always thought that the 2 FLUSH CONCAVE ProTi Bolts for the STM Timing Cover looks too... ordinary, almost looks like the original Ducati bolts except this ProTi one is Torx instead of socket hex...
so on Monday, I should received unique spacers and I can wait to modify those 2 bolts with nicer looking one... stay tune (y)
 

BMW Alpina

FOUNDING Member & Administrator
Staff member
By the way, if you are using your current stock Brembo Stylema brake caliper, the correct/recommended size for the master cylinder is the 17RCS Corsa Corta because our stock Brembo Stylema brake caliper only have 4x30mm piston size.
The 19RCS Corsa Corta is too large and will make your brake lever feel hard/woody when you press it.
Here is the link that mention this recommended sizing when Brembo launch the 17RCS Corsa Corta: BREMBO PRESENTS THE 17 & 15RCS CORSA CORTA

My 17RCS Corsa Corta brake master cylinder already arrived a few weeks ago, and I plan to install it either this weekend or in two weeks:

IMG_7926.JPGIMG_7927.JPG
IMG_7928.JPG

At that time, I was also thinking to upgrade my front brake caliper to GP4-MS (street friendly version with piston seal for street application) and the piston size for the GP4-MS are also 4x30mm so the 17RCS Corsa Corta will still work.
I just wish they offer the GP4-MS in the older style Titanium/Hard Anodized color instead of the current Nickel Plated color...
100 mm 'GP4-MS' Radial Billet Caliper Kit


BMW Alpina

FOUNDING Member & Administrator
Staff member
The Carbon Fiber Belly Pan from Peter Lieb arrived today, as usual, Peter Lieb's quality is second to none, also came with all the bolt/nuts/washer but I will replace them all with ProTi Titanium hardware :p

IMG_7942.JPGIMG_7943.JPG
IMG_7944.JPG

Talking about hardware, the previous weeks, I spent countless hours looking for the right Convex Spacer at the right size and the right finish for my STM Timing Cover...
and I found them... from... a large UK company (with a US subsidiary) that supply hardware for furniture industry. Funny how I found their UK company first before being redirected to their US subsidiary. 🧐

Minimum quantity order is 25 pieces, so it looks like I will have a life time supply of M6 Convex Spacer 😅
I choose the one with 316 Stainless steel material (although they also came in 303 Stainless Steel) just to make sure they look nice.
IMG_7945.JPG

This spacer act as an adapter that allow me to use a Normal ProTi Titanium Bolt (with flat head) even though the STM have Concave holes, and below were before and after comparison pictures:

LEFT picture BEFORE, and RIGHT picture after
IMG_7946.JPGIMG_7947.JPG


The left / before picture shows the ProTi Titanium Torx Concave bolt that is FLUSH with the STM cover, they are nicer than the stock Ducati socket hex but still not look good enough, I think...
I love the Protruding proud look of the bolts on the RIGHT / AFTER picture, now it has "CHARACTER" :cool:
However, those bolts on the Right/After picture will be replaced again with the correct length (15mm) and the 1mm smaller diameter of the head (12mm instead of the current 13mm), I will order them tonight...
Still same style from ProTi, then it will be Perfect

one more picture:
IMG_7948.JPG
 

BMW Alpina

FOUNDING Member & Administrator
Staff member
By the way, I don't know why... but somehow I keep finding things that can improve the "cosmetic" aspect of my bike...
As you all know, my bike is now literally naked and it's on my living room all the time, so when I am not watching TV (or while watching TV), my eyes can't help but wonder to look at the "naked" shape 🤓

I somehow found my eyes focusing on the solid/hardline part of the brake line (and also the braided brake-line) and thought there must be a way do make it look better...
(again not to make it to perform better in engineering/weight wise but simply just to make it looks better).

I remember the good old days when I was selling tons of Kevlar braided hose from Goodridge to my Aprilia customer, and that make me start checking the current Goodridge offering again.

Turn out Goodridge still offer Kevlar braided hose (700 series) unfortunately they don't offer them in -2AN size anymore, only -3AN but which is still OK,
however I need to find a way to connect the Kevlar braided hose with the solid/hardline piping. (which I already did just not crimped like the Ducati did though).

I am sure some of you wonder why solid/hardline piping?, After all, FrenTubo sell several nice kits with different hose and fitting material (including their Carbotech, Stainless Steel or Kevlar braided hose)...

Well, that is because no matter how good your stainless steel braided or Kevlar braided or carbon fiber braided PTFE hose, they will still expand more under pressure than a solid/hardline piping.
And in our Panigale V4, the brake lines are longer because every line (front and rear) need to go to ABS module before going to caliper, and thus the expansion effect if I replace all those hardline with regular braided lines will be more pronounced.

Of course, if you bypass the ABS and going straight from your Master cylinder to the caliper, then the much shorter distance of the braided line will have less expansion under pressure effect,
so a hardline will not benefit that much plus, you need the "flex" around the steering and swing arm area anyway.

I could understand that some people might complain that the ABS give lack of "feel" but I think this is more because the rider prefer not to adjust to the new "feel" with using ABS.

Below is a copy and paste of Cycle World interview with Brembo engineer on MotoGP braking, and I copy and paste the paragraph that directly related to ABS.
Note this interview was done in 2014 and I sure more progress had been made with ABS since then:
MotoGP: Faster And Faster, Part 1

CW: In 2016, ABS will be obligatory on all bikes sold in the European market. ABS is prohibited in Formula 1 and MotoGP. What is your opinion of ABS in racing?
L.B.: ABS is perfect for the street rider, but in racing, it should be the rider who controls. Probably ABS would be safer, but racing is also a test of the rider, and so for the show, I don't think ABS would be good.

CW:
How often do you find yourself locking the front brakes?
A.D.: I try, of course, never to lock because it is very dangerous. Not just to lose the front, but you have to release and brake again, and this upsets the bike. Also, you go too deep. In Argentina, I locked the brakes several times, and this hurt my performance very much. There was not so much grip, and for me, when I cannot brake late and hard, I suffer in my lap times. We are really on the limit all the time on the brakes, so it depends completely on the judgment and feel of the rider because it is so easy to lock the front or lift the rear wheel.

CW: What about the rear brake? How much and how hard do you use it and what do you use it for?
A.D.: I use the rear brake quite a lot. In MotoGP, we use the rear brake on the exit to control the spinning. If you use the rear brake well, you can use less traction control because you can tame a big spin by reducing it but not eliminating it. I use the rear a lot also on the braking even though with the four-stroke there is enough engine braking so that many riders do not use the rear. But this is my style, and I always use the rear brake.


Because of the reasons above, if I upgrade my brake line (for any reasons), I will NOT bypass the ABS. Some will disagree with me,
but I am confident that ABS like all the driver aids, if allowed in MotoGP, will help the rider stop faster.
It might not be good for entertainment value, but no doubt ABS will be able to help any rider stop their bike faster (and most importantly safer) on the track.

If anyone is curious, try to disconnect your ABS in your car, then brake as hard and as good as you could while preventing wheel lock up, and then do the same with ABS and see which one stop shorter and straighter.
Ducati ABS is even better because it is a "Cornering ABS" designed specifically for 2 wheel application: The breaks of the future: Bosch Cornering ABS


another links about using ABS (but in car racing):
https://www.bosch-motorsport.com/co...n Manual_148638347_ABS_M5_Kit_Porsche_Cup.pdf
https://www.manthey-racing.de/Installation_Manual_ABS_991_GT3_Cup_Gen_2.pdf

Back to upgrading my brake line :)
While doing more research, I found the cooper solid/hardline in 3/16 size (exactly the same as our hardline/solid line size) or -3AN equivalent.
I think this cooper line left picture (with proper clear coat treatment to prevent oxidation and perhaps some polishing pre-treatment) will looks gorgeous against the BLACK background of the swing arm (right picture):
Copper Brake Pipe 3/16 inch | CBP-3 | Merlin Motorsport


IMG_7953.JPG
So.... I am going to do this cooper solid hardline (cosmetic) upgrade in combination with the 700 Series Kevlar Goodridge braided line where it need to be able to flex, and stainless steel AN fittings of course...
and maybe some Staubli dry connect...
Bending a solid cooper hardline even though easier than stainless steel hardline, will still be much harder than just using a flex braided line completely... and I will need to buy the right bending and flaring tool and It might slow down this project more... but I just received information that Brembo is delaying production of my (paid in full) front 330mm T-Drive rotor until end of September 2020 anyway so why not :)
 

Lucati

FOUNDING Member & Moderator
Staff member
I had a tiny oil leak coming from the right (Clutch) side engine cover awhile back. Prior to taking it off and resealing it all, I checked the torque on the bolts, and they were all to about 7-8nm. I torqued mine all down to 10 after resealing and havnt had any problem.
You may want to considering taking the engine covers bolt torques from 7.5nm to 10nm
 

BMW Alpina

FOUNDING Member & Administrator
Staff member
I had a tiny oil leak coming from the right (Clutch) side engine cover awhile back. Prior to taking it off and resealing it all, I checked the torque on the bolts, and they were all to about 7-8nm. I torqued mine all down to 10 after resealing and havnt had any problem.
You may want to considering taking the engine covers bolt torques from 7.5nm to 10nm
Great idea Lucati, (y)
I will re-torque all of them before I close my fairings. Thanks 🙏
 

BMW Alpina

FOUNDING Member & Administrator
Staff member
I talked to Merlin Motorsport in UK, I knew them when I bought some parts for my previous custom Brembo 6 piston upgrade on my Honda Fit,
and I was planning to order the 700 Goodridge Kevlar line from them (including fabrication service crimped with the fitting).
But Merlin cannot crimp the Braided Kevlar line directly to the solid/hardline like the way Ducati did... and I don't think anyone can either...

I actually want to re-experience assembling Goodridge stainless steel braided hose with the removable fitting (like what I did when I represent Goodridge in my country of origin back in the early 2000's),
however, at that time, I never purchase/use the crimping tool from Goodridge before and for this project, I need to use crimping since the 700 Kevlar hose can only be used with Crimping (no reusable fitting)... so I think I will let Merlin Motorsport UK perform the crimping.

Anyway, because of that I decided to do the hardline fabrication on my own for learning and experience.

2 years ago, I also had some brake tube bending experience when I need to bend an adapter (hard) tubing between a larger 1inch master cylinder from JDM Honda Odyssey, but it was just a short tubing adapter, so I will need to learn more.
Below is my post about this:
My Front Brembo Gran Turismo 6 Piston Type III Rotor - Unofficial Honda FIT Forums

I still have that tool for bending (Eastwood also, picture below), wonder if it fit the 3/16" tubing though... I need to look for that bending tool, must be somewhere in one of the boxes in my garage :)

DSC08995.JPG


Actually, from what I found so far, the easiest way to order custom high quality braided brake hose is through HEL Performance UK:
https://www.helperformance.com/custom-braided-brake-lines

They have this online tool to spec our custom order brake line very user friendly.
HEL brake line is very good quality with stainless steel fitting, but for this project, I really want to have Goodridge Kevlar line just for sentimental reason as usual because I used to sell a lot of them, so no HEL this time but back to Goodridge :D
Sometimes I wonder what happened to all my old contacts at Goodridge Head office in Exeter UK... they all was very nice, and they accept custom order for some of the Aprilia scooter brake line (SR125) from my napkin drawing... the good old day...
maybe some of them already become top management by now... well anyway, I don't want to bother them for a very small order so I think I will just buy from Merlin crimped and assembled for the 700 Kevlar hose.

By the way, below is the picture of my HEL brake line for my final part that connect to my Brembo 6 piston on my Honda Fit:
DSC09522.JPGDSC09720.JPG

Oh, I also assembled this 910 Aramid (Kevlar) braided Goodridge hose for fuel and oil line on my Honda Fit a few years ago but this one can be assembled using reusable fitting without crimping:
Project Setrab Oil Cooler plus SPAL Radiator Fan - Unofficial Honda FIT Forums

This is going to be FUN :D


Attachments

BMW Alpina

FOUNDING Member & Administrator
Staff member
Many months ago, I purchased this paints:
IMG_7423.JPG

The reason was because the Ducati by Rizoma Brake Lever Protector have this very nice RED Anodized Ring on the the base of the handlebar weight,
but the Rizoma "ProGuard" Brake Lever Protector (not the Ducati by Rizoma version) that I purchase to become the Clutch Lever Protector do NOT have the RED Anodized ring.
So I was planning to use the paint above (suppose to be able to replicate Anodize color) and if fail to match, I was planning to anodize it...
but anodizing just a small part like that will be not economical because anodized usually charge per run and not per part...
Picture below:

IMG_7956.JPG


Not too long after I purchased the paint above, I found a Chinese Made Brake/Clutch lever protector on eBay with a nice RED Anodized base ring, so I order it.
I am NOT sure that it will fit, but the price is low enough that it's worth it, and finally Mr. Postman deliver it:

IMG_7955.JPG

Amazingly, the thread on that RED anodized base ring, MATCH the Rizoma thread and although the color is not 100% match... well it close enough for my work :p
I still need to GRIND the back of the base ring though to match the special mounting bolt system from Ducati...
Picture below:

IMG_7957.JPG
 

BMW Alpina

FOUNDING Member & Administrator
Staff member
Another Weekend, Another Updates:

I install the rest of the ENGINE ProTi Titanium Bolts, this time for the lower belly pan.
I have "extra" ProTi Titanium Bolts, so I also install for the Oil Filter Cover (the original lower belly pan bolt from ProTi does not include this 3 bolts).
I also replace several mounting bolts like to mount the plastic Canister on the left side or the housing for the right exhaust valve with the "extra" ProTi Titanium Bolts.
Oh, also the rear cylinder coil bolts (and I will order more bolts for that center cylinder head breather cover). I think I also going to remove the upper radiator so I can access the front cylinder coil too.
At that time, I think I need to be reasonable and not get too carried away (although now I let my self get carried away 😅:
IMG_8002.JPGIMG_8003.JPG
IMG_8009.JPGIMG_8010.JPG


Then, since I plan to install my 17RCS Corsa Corta Master Cylinder along with the Bike Sport Development Switch next week, I decided to DRAIN all brake fluid directly from the ABS.
(I also plan to replace the Banjo bolt on the ABS with ProTi Titanium Banjo bolts plus my new obsession with the cooper nickel solid/hardline upgrade 😀),
so if I start draining it now, hopefully by next weekend, all brake fluid will be mostly drained... (still need to be careful if some left in the brake line, don't want to have any chemical marks from the brake fluid).

IMG_8004.JPGIMG_8005.JPG
IMG_8006.JPGIMG_8007.JPG
IMG_8008.JPG
 

BMW Alpina

FOUNDING Member & Administrator
Staff member
I am not happy to see my front sprocket washer with lots of rust marks... I use some sand paper, and Brasso and polished mine:
IMG_7989.JPGIMG_7990.JPG

However my goal is to make it look like it was made from Machined Aluminum (thus the lines on the surfaces) plus I want to make sure it will NEVER rust again,
so I used the Red Anodized Look Paint, borrowed my son's amateur paint booth (from Amazon cartoon box) with my son's teaching me to hang it with a sewing thread (belong to my wife) and voila 🤩
IMG_7991.JPGIMG_7992.JPG

I LOVE the RED Anodized Machined Aluminum Looks much better than the RUST (real rust) looks 💄
This will give good contrast with the Sitta Front Sprocket, Original Ducati Shiny Bolt, and ED 3D Gold Chain, oh and it will be inside a Carbon Front Sprocket Cover so it will mimic the look of the Right Dry Clutch Carbon Cover with the STM Dry Clutch center part in the similar Red Anodized Color looks.
IMG_7995.JPG IMG_7996.JPG


Next, I decided to take out my Dashboard so I can measure every bolts and nuts around that area to be replaced by Gold ProTi Titanium Bolts or Nuts,
and while the Dashboard is out, this is perfect timing to install the CNC Racing Screen Protector properly.
The CND Racing Screen Protector came complete with cleaning cloth and tools (like credit card) to help with the air bubble.
It also came with FOUR yes (4) screen protector so I will have some spare in case I won a lottery and buy a few more bikes 🤑
IMG_7997.JPGIMG_7998.JPG


First I perform a Test Fit, so I know where the border is, plus I can decide which version to use.
And I decided to use the "ULTRA CLEAR" version instead of the "ANTI GLARE" since in my living room, Glare will never be a problem 😎
IMG_7999.JPG


Then use a DILUTED Hand Soap so I can "align" the screen protector for PERFECT CENTER location then use the "credit card" like tool to squeeze out all bubble.
The picture below was after installing the CNC Racing Screen Protector. I did not remove the upper most thin plastic layer right away because I want to let it dry to ensure strong bonding,
that way, when I remove the upper most thin plastic layer, the CNC Racing Screen Protector will not move.

IMG_8001.JPG
 

BMW Alpina

FOUNDING Member & Administrator
Staff member
I already purchased several bottles of Motul RBF660 a few weeks ago, I originally want to use Castrol React SRF, however they ran out a few weeks ago.
IMG_8011.JPG


I currently have this tool which I used to bleed the brake on my car, this system is PUSHING the brake fluid via the brake reservoir, however,
I experience leak so I worry if it leak again, it will spray all the brake fluid to the bike, so I am not going to use it.

Motive.jpg


I used to have VACULA (Vacuum Brake Bleeder) in my Aprilia shop a long time ago, but that require powerful compressor. It sucks from the bleeder valve using vacuum so it is safer.
I used it a lot since Goodridge braided line was one of the best selling parts in my shop at that time and all the clients want us to install and bleed it (which means more money from install cost for me,
and a chance to put Goodridge sticker on my client's bike so free promotion while my clients also love the Goodridge sticker too) 😀

Still, this time, I think I am just rely on Stahlbus bleeder valve on both the Master and the Caliper, meaning a lot of manual pumping, well that's OK, so my forearm can be big again 💪
 

BMW Alpina

FOUNDING Member & Administrator
Staff member
That late afternoon, UPS sent me an email saying a shipment that supposed to arrived t will be delayed to tomorrow, so I decided to take my family grocery shopping right after 5pm.
I just return and saw an email from UPS now saying the shipment had arrived and left on my front door. I rush out, worry, hoping no one steal it from the porch, and good thing its there,
so I open it up and happy to see the DISASSEMBLED BrakeTech Rear Rotors ⚙⛓. I asked BrakeTech to ship them DISASSEMBLED because I plan to anodized the Carrier (center part) in Gold Color:

IMG_8021.JPG

Note:
Before purchase, I contacted BrakeTech directly via their regular email on their website, and Jeff the owner responded directly by email.
It's refreshing to see a such a personal customer service level from the owner for EVERY customer who contacted them. (not just some select few customers).
So if someday, you have some questions, I am sure Jeff will be glad to help you too. Jeff also explain with illustration on pdf document on where to "cut" the ABS ring so it won't interfere with the mounting bolt.
I will also post a step by step cutting work with Dremel once I am ready to install it, however, it might be another month since I still need to anodized the carrier,
and I need to wait for other parts to arrive so I can anodize everything together so they will have the same shade from the same anodizing batch.


Another shipment also arrived from UK today, which is a TITANIUM spacer for some brake caliper that I don't know, however, it had the PERFECT size for my project to replace the boring factory handlebar bolt.
This TITANIUM spacer will enable me to use a M10 ProTi Titanium Bolt in Gold color (with thread insert to adapt from M16 to M10), so now I just have to wait for the ProTi bolts to arrive.
IMG_8020.JPG


I also replace the rear pinch bolt late last night to ProTi:
IMG_8012.JPGIMG_8013.JPG


Take out the front headlight so I can measure all the bolts and nuts behind the dashboard and measure the equivalent ProTi Titanium Bolt/Nuts for them:
IMG_8014.JPGIMG_8015.JPG

While doing the above, I notice the way how the steering lock/limiter engage and stop the steering from moving, and I decide to add Rubber Vacuum Plug so it wont create scratch,
left picture show just left side rubber plug, and right picture shows both with rubber vacuum plug:

IMG_8016.JPGIMG_8017.JPG

I also found out that to replace the bolts holding the bracket of the horn will require taking out the lower triple clamp and since I already bought a ProTi bolt kit for the horn... and I don't want to waste it...
so now I will need to remove the lower triple clamp... hmmm maybe... I can do more than that... while I took it out ;)
 
Last edited:

BMW Alpina

FOUNDING Member & Administrator
Staff member
OK, Time for another Weekend Update 🙃

I decided to install my 17RCS Corsa Corta Brake Master Cylinder with the Bike Sport Developments Switches today, here are the steps:

Take out out all the Rubber Bands that hold the wiring and remove the whole throttle grip assy by removing the 2 black phillips screws behind the plastic housing (no need to remove the silver with unique head screws) and slide it out of the handlebar.
You need to take them out so you can have access to insert the tools needed to remove the starter switch assy.
IMG_8036.JPGIMG_8037.JPG
IMG_8044.JPG

Use Ducati Special Tools and insert it on the holes on the outer lower side of the start switch assy to release the latch and then slide it out (oh don't forget to disconnect the plug goes into the start switch assy):
IMG_8046.JPGIMG_8047.JPG
IMG_8045.JPG

Then install back the whole throttle grip assy, and if you like to "upgrade the looks", you can replace the black phillips screws with a ProTi Titanium Screws like what I did 😀
ProTi did not make the self tapping silver screws in the same head diameter as the silver screws, so I decided to keep the stock silver screws...
IMG_8048.JPGIMG_8050.JPG

Next, if you want to upgrade the looks of the Bike Sport Developments (BSD) Switch assy, you can replace their stainless steel screws with ProTi Titanium Screws 😉
IMG_8051.JPGIMG_8053.JPGIMG_8052.JPG
 

BMW Alpina

FOUNDING Member & Administrator
Staff member
Finally, I install the 17RCS Corsa Corta with the BSD Switch ASSY, and in my case, add few spacers with much longer ProTi Titanium Screws and add Rizoma Rear View Bracket on Top...
Why the Rizoma Rear View Bracket??? Well, I am going to use it as the base for my upcoming custom bracket for the Ducati by Rizoma Brake Fluid Reservoir (combine with AELLA tie down for some Ducati as the horizontal bracket).
Unfortunately the AELLA tie down still stuck in Japan so, I need to wait many more weeks more before I can install the Ducati by Rizoma Brake Fluid Reservoir... Yes, sounds complicated but once I am done, you will see, its actually quite simple.

IMG_8056.JPGIMG_8063.JPG
IMG_8064.JPGIMG_8065.JPG
IMG_8066.JPGIMG_8067.JPG


But wait there is a bit more...;)
If you don't like the look of the bolt holding the folding lever, then you can always upgrade to ProTi Titanium Bolt:
IMG_8060.JPGIMG_8061.JPG
IMG_8068.JPG

Now, this is 17RCS Corsa Corta Master Cylinder install is FAR from finish...
I still need to upgrade the Pivot Bolt to Titanium from Kohken Japan (will arrive together with the AELLA tie down bracket) combine with ProTi Titanium NUT.
Also it will be connected to a custom Goodridge Kevlar Braided Line, all Stainless and ProTi Titanium Banjo bolts, and maybe I will paint that Brembo logo on the knob adjuster RED myself 🧐
Got to start lifting weight again, not to be strong but to make sure I have steady non shaky hand when I paint that logo with a tiny brush 🤜
 
Top