+1So nice
I vote “heat”.
Panigale Vision
- Thread starter Andy7
- Start date
I would leave them in their original color because heating a metal will alter their strength but that is just me and my nerd side being paranoid of everything related to safetyMail arrived a day late so I was getting a little impatient here but it was well worth it.
View attachment 3447
I can’t describe how much I love the look and finish of AEM’s product here, but memes never let me downIn fact I think I might be a bit sad to actually install these because they’d make an awesome ornament on my shelf
View attachment 3448
The one thing I have to decide now is whether to hit these ti sprocket pins/nuts with some heat to make them nice and blue like my exhaust or leave as they are. Thoughts?
View attachment 3449
Good call @craig bush & @HKMP7, I think it would look nicer (but).
I also appreciate your metallurgy knowledge Howard, so it probably pays to leave them as they are for now. Do you think the colouring process requires enough heat to change the structure of the metal too severely?
I will do some more reading about this treatment of titanium to come to a better understanding this weekend.
craig bush
Well-known member
Agreed re: heat - through normal use the parts are subjected to SOME level of heat. Is it enough to discolor them?
At what temp does the strength of titanium start to degrade? It must be relatively high - Ti is used in moderate/high temp applications like connecting rods.
At what temp does the strength of titanium start to degrade? It must be relatively high - Ti is used in moderate/high temp applications like connecting rods.
Good call @craig bush & @HKMP7, I think it would look nicer (but).
I also appreciate your metallurgy knowledge Howard, so it probably pays to leave them as they are for now. Do you think the colouring process requires enough heat to change the structure of the metal too severely?
I will do some more reading about this treatment of titanium to come to a better understanding this weekend.
Hi Guys,Agreed re: heat - through normal use the parts are subjected to SOME level of heat. Is it enough to discolor them?
At what temp does the strength of titanium start to degrade? It must be relatively high - Ti is used in moderate/high temp applications like connecting rods.
I think you guys are right that the heating time required to turn the titanium bolt surface to blue might not be long enough to altered the entire structure of the Titanium bolt...
I never burn a Titanium bolt with a torch before, so I don't know how long does it take or at what temperature needed... I was just being paranoid as usual
My delivery arrived on Wednesday which I was eager for as it contained my new HM OEM replacement quickshifter (+ some other things) which I needed by this weekend in order to be able to ride to town to get a new tyre.

I ordered some new Domino grips and a Gilles tooling brake lever guard to give me some peace of mind when I’m filtering through traffic. As well as my front 520 15 tooth sprocket and an EK 3D black and gold chain. Unfortunately the chain wasn’t in the box but it is on the way now.
Grips and guard were easy


Didn’t waste any time fitting the quickshifter on alas the shift rod was far too long and amid some expletive frustrations I decided to order the right length online and then see if I could come up with a solution when I went to town the next day.
I had a brilliant result in a hardware shop finding a substitute rod for $6 (kind of ridiculous the hm one cost me $55 )
)
Anyway we shall see how my cheap job goes tomorrow over a couple hundred km.


Wires neatly & safely zip tied. In the top pic you can see the sensor on the shifter is set at 50% - this is adjustable in 5% increments so you can set it to suit how much force is required for changes. I’m looking forward to trying a few different levels out to see what feels best and how much of an improvement over stock.
One thing left to do which is wait for chain to arrive so I can finally get the sprockets changed over but that’s at least a few more weeks away.
I did reinstall all the fairings and belly pan this evening but ran out of light for any good photos. Will update tomorrow when I get a chance.
*edit* - shifter is setup with reverse pattern, the rearsets make this super easy to flip between standard & gp just by relocating where the rod attaches (2 min job)


I ordered some new Domino grips and a Gilles tooling brake lever guard to give me some peace of mind when I’m filtering through traffic. As well as my front 520 15 tooth sprocket and an EK 3D black and gold chain. Unfortunately the chain wasn’t in the box but it is on the way now.
Grips and guard were easy


Didn’t waste any time fitting the quickshifter on alas the shift rod was far too long and amid some expletive frustrations I decided to order the right length online and then see if I could come up with a solution when I went to town the next day.
I had a brilliant result in a hardware shop finding a substitute rod for $6 (kind of ridiculous the hm one cost me $55
Anyway we shall see how my cheap job goes tomorrow over a couple hundred km.


Wires neatly & safely zip tied. In the top pic you can see the sensor on the shifter is set at 50% - this is adjustable in 5% increments so you can set it to suit how much force is required for changes. I’m looking forward to trying a few different levels out to see what feels best and how much of an improvement over stock.
One thing left to do which is wait for chain to arrive so I can finally get the sprockets changed over but that’s at least a few more weeks away.
I did reinstall all the fairings and belly pan this evening but ran out of light for any good photos. Will update tomorrow when I get a chance.
*edit* - shifter is setup with reverse pattern, the rearsets make this super easy to flip between standard & gp just by relocating where the rod attaches (2 min job)


It was a long ride into the dealer this morning mostly because I was worried the tyre was so worn out it would shit itself in the middle of nowhere and I’d be stranded. This meant I didn’t have a good time with the quickshifter due to tentative shifts in the hope of preserving all the tyre life I could lol. The result was false neutrals, mis-shifts and overall just an embarrassing performance by the operator.
Good news however, after getting the new rubber and being able to ride properly on the way home it was a completely different story until about half an hour from the end when I went to shift down and couldn’t find my gear lever. Talk about heart in mouth moment. As luck would have it the shift rod had simply detached at the front end. Even better, the screw was still there. 2 minute stop to hand tighten it to get me the rest of the way back.
Another surprise when I got to the dealer, my clamp had arrived so I just spent the last 2 hours cleaning up the bike and swapping the clamps over. Anyway here’s the result all ready for my trip to Sydney next weekend for my cousins wedding (but mostly to get nice pics in front of the Sydney harbour bridge so it has a fancy backdrop while it’s bike of the month in may )
)


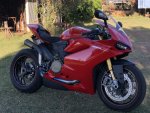
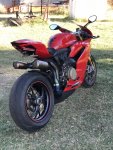
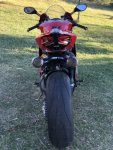
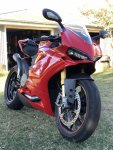


Good news however, after getting the new rubber and being able to ride properly on the way home it was a completely different story until about half an hour from the end when I went to shift down and couldn’t find my gear lever. Talk about heart in mouth moment. As luck would have it the shift rod had simply detached at the front end. Even better, the screw was still there. 2 minute stop to hand tighten it to get me the rest of the way back.
Another surprise when I got to the dealer, my clamp had arrived so I just spent the last 2 hours cleaning up the bike and swapping the clamps over. Anyway here’s the result all ready for my trip to Sydney next weekend for my cousins wedding (but mostly to get nice pics in front of the Sydney harbour bridge so it has a fancy backdrop while it’s bike of the month in may


.jpg)
Not a lot been happening the last few weeks, other than my little incident (slow lowside/drop) so been sourcing parts to replace & upgrade what was damaged.
Fortunately there was no major injuries to the bike (or myself) although just enough bits here and there to make the job a bit expensive & inconvenient.
Front to back these were:
• cracked magnesium fairing stay
• bent clip on which also marred the top triple clamp
• broken steering stop on the lower triple clamp
• rearset was a bit mangled (although this saved nearly all my fairings and swingarm - big relief)
• bottom fairing chipped where the gear lever squashed it
Finally, and the most heartbreaking discovery was the Akra muffler made brief contact with the asphalt and left a small scratch
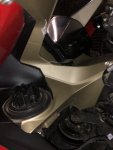
*bottom right you can notice where the steering stop failed*
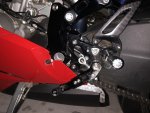
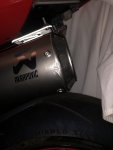
Part 2 will include everything I’ve ordered so far plus a few options I have which I’m hoping for some suggestions on
Fortunately there was no major injuries to the bike (or myself) although just enough bits here and there to make the job a bit expensive & inconvenient.
Front to back these were:
• cracked magnesium fairing stay
• bent clip on which also marred the top triple clamp
• broken steering stop on the lower triple clamp
• rearset was a bit mangled (although this saved nearly all my fairings and swingarm - big relief)
• bottom fairing chipped where the gear lever squashed it
Finally, and the most heartbreaking discovery was the Akra muffler made brief contact with the asphalt and left a small scratch

*bottom right you can notice where the steering stop failed*


Part 2 will include everything I’ve ordered so far plus a few options I have which I’m hoping for some suggestions on
Last edited:
The Akrapovic is the hardest to fix, but perhaps some metal polisher can work on it and lessen the cosmetic damage or even fix it...Not a lot been happening the last few weeks, other than my little incident (slow lowside/drop) so been sourcing parts to replace & upgrade what was damaged.
Fortunately there was no major injuries to the bike (or myself) although just enough bits here and there to make the job a bit expensive & inconvenient.
Front to back these were:
• cracked magnesium fairing stay
• bent clip on which also marred the top triple clamp
• broken steering stop on the lower triple clamp
• rearset was a bit mangled (although this saved nearly all my fairings and swingarm - big relief)
• bottom fairing chipped where the gear lever squashed it
Finally, and the most heartbreaking discovery was the Akra muffler made brief contact with the asphalt and left a small scratch
View attachment 3987
*bottom right you can notice where the steering stop failed*
View attachment 3989
View attachment 3991
Part 2 will include everything I’ve ordered so far plus a few options I have which I’m hoping for some suggestions on
The most important thing is you are ok and more reasons to upgrade
The first drop is the hardestThe Akrapovic is the hardest to fix, but perhaps some metal polisher can work on it and lessen the cosmetic damage or even fix it...
Now to address the damage to the rearsets I immediately got in contact with cnc to replace the broken/bent pieces. I thought it might not be too costly since they only cost me $700(aud) for the whole set when I bought them however the total for those came to nearly $400 once shipping was included. If I make a habit of dropping the bike I will consider changing to another brand who are a simpler setup and cheaper to maintain. Still waiting for these to arrive
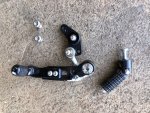
I have to thank @BMW Alpina & @HKMP7 again for the advice regarding triple clamps and clip ons. I ended up going with the full IMA setup (in black).
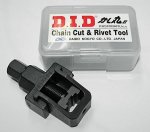
I spent the last few days ordering some tools which Ive put off doing thus far but couldn’t ignore any longer. A proper socket for removing the rear wheel, a chain wrench and a steering stem nut tool. No fancy brands, but necessary items. The only thing I didn’t confirm yet is a chain tool so I can press the new one on myself - I’ve been informed d.i.d are pretty unbeatable but always happy to hear ideas. (Using an Ek 3D chain)
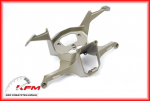
I’m a bit conflicted on what to do with the fairing stay now. As far as I can tell I’ve got 3 main options - stick with stock, there’s no used ones on eBay (heaps for the 1199 though) and because my bike is the S version it’s different than the base model due to the led headlights. So what I can tell I can buy a new oem one for around $400. If I could find a used for 1/2 that price it would be ideal. I am keen on sticking with the stock form as I’ve read a lot of stories of people having trouble with their imu after swapping this (admittedly to a race version)
Fullsix offer a full carbon version that looks fantastic for about double the price of the oem one ($800aud). Very tempting but I am worried about the durability again in case of another drop - I think it would be more likely to shatter and the likelihood of damaging the dash would increase. However with a few other safety precautions this is probably avoidable (most of which being the better engineered steering stop on the lower triple clamp).
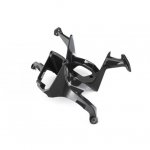
So far as I can tell, my third option is the motoholders street-fairing compatible stay, I’m not a huge fan of this one as I can’t imagine it being as study as the magnesium and not nearly as attractive as either of the above design. I need to find some more reviews on the product and maybe a video or better pictures to understand the benefits some more.
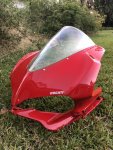
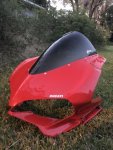
Now, one item actually did arrive today and that was the Zero Gravity Corsa light smoke screen I ordered 8 weeks ago!
Much of an improvement to the original and I’m interested to see how the aero is improved now when tucked in.
I actually needed something to aim towards and it just so happens the DOC NSW are running their club track day at the end of July so I booked that in last week. Some would probably say it’s overkill turning up to your first track day on a 1299 but sometimes you gotta learn to fly before you can walk...? And who knows, if it goes well this thread might turn into a track bike conversion next

I have to thank @BMW Alpina & @HKMP7 again for the advice regarding triple clamps and clip ons. I ended up going with the full IMA setup (in black).
I spent the last few days ordering some tools which Ive put off doing thus far but couldn’t ignore any longer. A proper socket for removing the rear wheel, a chain wrench and a steering stem nut tool. No fancy brands, but necessary items. The only thing I didn’t confirm yet is a chain tool so I can press the new one on myself - I’ve been informed d.i.d are pretty unbeatable but always happy to hear ideas. (Using an Ek 3D chain)

I’m a bit conflicted on what to do with the fairing stay now. As far as I can tell I’ve got 3 main options - stick with stock, there’s no used ones on eBay (heaps for the 1199 though) and because my bike is the S version it’s different than the base model due to the led headlights. So what I can tell I can buy a new oem one for around $400. If I could find a used for 1/2 that price it would be ideal. I am keen on sticking with the stock form as I’ve read a lot of stories of people having trouble with their imu after swapping this (admittedly to a race version)

Fullsix offer a full carbon version that looks fantastic for about double the price of the oem one ($800aud). Very tempting but I am worried about the durability again in case of another drop - I think it would be more likely to shatter and the likelihood of damaging the dash would increase. However with a few other safety precautions this is probably avoidable (most of which being the better engineered steering stop on the lower triple clamp).

So far as I can tell, my third option is the motoholders street-fairing compatible stay, I’m not a huge fan of this one as I can’t imagine it being as study as the magnesium and not nearly as attractive as either of the above design. I need to find some more reviews on the product and maybe a video or better pictures to understand the benefits some more.
Now, one item actually did arrive today and that was the Zero Gravity Corsa light smoke screen I ordered 8 weeks ago!
Much of an improvement to the original and I’m interested to see how the aero is improved now when tucked in.


I actually needed something to aim towards and it just so happens the DOC NSW are running their club track day at the end of July so I booked that in last week. Some would probably say it’s overkill turning up to your first track day on a 1299
Hi Andy,
I remember when I did my chain tool research that this chain tool was recommended by several people for ease of use and good quality: PBR Chain Tool - Motion Pro
I remember when I did my chain tool research that this chain tool was recommended by several people for ease of use and good quality: PBR Chain Tool - Motion Pro
I was just thinking, there’s a lot better (crappier) bikes to practice working on and learn new skills but so far I’ve managed alright.
Dealer wanted $250 to install the chain and sprockets. F that, how hard can it be? The tools I needed put me in that cost realm anyway so I’ll be ahead next change.
The motion pro pbr tool is amazing, makes the job really easy.
Couple before and after pics before I highlight some learning points.
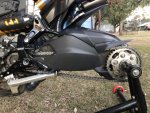
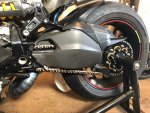
Now despite my double and triple measuring then confirming again I was breaking the new chain at the right length I still ended up one link shorter than I really needed - what this meant was I had to rotate the axle around to the very shortest position in order to fit the master link.
Unfortunately during this process, which I didn’t notice at the time was some slight contact made between the sprocket and swingarm at its very shortest position.
Due to the small increase in diameter thanks to the extra 2 teeth the paint was conveniently scratched on the arm. Once the fitment was complete I tightened it again to increase the gap but hopefully others can take my experience and learn. Also to be more observant as you’re working However in the back of my mind now (and further down the track) I’d like to strip the swingarm down and have it coated either a deeper black to match the wheel or maybe magnesium engine colour. Hmmm (long term project)
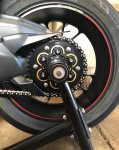
All in all I’m satisfied with the result and look of the new hardware.
Dealer wanted $250 to install the chain and sprockets. F that, how hard can it be? The tools I needed put me in that cost realm anyway so I’ll be ahead next change.
The motion pro pbr tool is amazing, makes the job really easy.
Couple before and after pics before I highlight some learning points.


Now despite my double and triple measuring then confirming again I was breaking the new chain at the right length I still ended up one link shorter than I really needed - what this meant was I had to rotate the axle around to the very shortest position in order to fit the master link.
Unfortunately during this process, which I didn’t notice at the time was some slight contact made between the sprocket and swingarm at its very shortest position.
Due to the small increase in diameter thanks to the extra 2 teeth the paint was conveniently scratched on the arm. Once the fitment was complete I tightened it again to increase the gap but hopefully others can take my experience and learn. Also to be more observant as you’re working

All in all I’m satisfied with the result and look of the new hardware.
Hi Andy,I was just thinking, there’s a lot better (crappier) bikes to practice working on and learn new skills but so far I’ve managed alright.
Dealer wanted $250 to install the chain and sprockets. F that, how hard can it be? The tools I needed put me in that cost realm anyway so I’ll be ahead next change.
The motion pro pbr tool is amazing, makes the job really easy.
Couple before and after pics before I highlight some learning points.
View attachment 4241
View attachment 4242
Now despite my double and triple measuring then confirming again I was breaking the new chain at the right length I still ended up one link shorter than I really needed - what this meant was I had to rotate the axle around to the very shortest position in order to fit the master link.
Unfortunately during this process, which I didn’t notice at the time was some slight contact made between the sprocket and swingarm at its very shortest position.
Due to the small increase in diameter thanks to the extra 2 teeth the paint was conveniently scratched on the arm. Once the fitment was complete I tightened it again to increase the gap but hopefully others can take my experience and learn. Also to be more observant as you’re workingHowever in the back of my mind now (and further down the track) I’d like to strip the swingarm down and have it coated either a deeper black to match the wheel or maybe magnesium engine colour. Hmmm (long term project)
View attachment 4244
All in all I’m satisfied with the result and look of the new hardware.
Even I who is not the owner of your bike is satisfied with this new much improve looks just by looking at your pictures above, (I just wake up and going to start my Friday working day now, and so nice to wake up with a nice beautiful bike to look and amaze)
Those EK 3D chain and your sprocket setup really improve the looks (with that nice black wheel on the background too) by far compare to the stock chain/sprocket.
BEAUTIFUL
Thankyou Howard, I’m really keen to go ride it and test out how different it feels now with the slight gearing change. Still waiting on my triple clamps and clip ons before I can do that! 
Very much an improvement over the silver look from factory, and yet again I managed to fail weighing all the components I replaced lol. I think I’ll ask mum for a set of scales for my birthday next month
Very much an improvement over the silver look from factory, and yet again I managed to fail weighing all the components I replaced lol. I think I’ll ask mum for a set of scales for my birthday next month
