Rear Wheel Nut Socket - how do you avoid damage?

Pete T

Moderator
Staff member
I recently noticed degradation of my very expensive, supposedly super strong stainless steel heel nut socket and, more importantly, the scuff marks it leaves on the rear wheel nut and the taper cone bush. This is after removing the rear wheel just six times. My current wheel nut and taper cone are OEM but I have an Aella taper cone on the way and I'm shopping for a (I think black anodised) rear wheel nut. So seeing the tough OEM items damaged (cosmetically) is not good news for prospective bling upgrades.

Today I posted a thread on the UK forum hoping to tap into the wealth of engineering expertise. Here's the thread...

As expected the feedback has been very helpful regarding the choice of an appropriate tool - wish I had asked before I bought one! 😬 - but, also expected, no responses so far about how people avoid damaging delicate anodised and precious titanium components. So that seems like a good question for this forum where we have a strong interest in bling upgrades.

It's difficult to photograph but if you look carefully the left faces of the nut (which incur stress as we un-do the nut) are scuffed. And if you zoom on the photo you can see the face of the taper cone is scraped along the inside edge (closest to the nut) around the entire circumference.

In fact looking at the top-most right hand face (the tightening face) you can see it also has some slight scuffing. Removal of the nut is a moderately violent act using an impact wrench. But tightening is done relatively gently with a torque wrench.
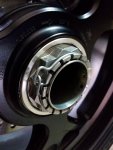
20201029_161942.jpg

While the scuffing doesn't bother me and is hardly noticeable on the OEM nut and taper cone it would certainly stand out on polished titanium and would reveal bare aluminium on anodised surfaces.

So, those who have upgraded these components, how do you deal with this? Sooner or later you have to remove the rear wheel. How do you avoid damage? And which wheel nut socket do you use?
 

HKMP7

First 9 & Moderator
Staff member
I use thin tape 2 layers or a plastic bag to keep from marring up the rear nut.
I also use hand tools to remove it never a impact.
 

BMW Alpina

FOUNDING Member & Administrator
Staff member
Hi Pete T,

Like in life, "something's got to give". So the choice here is which one do you want to save, the tool or the nut?
If you want a super strong tool that last forever, then it will be made of harder material like stainless steel or steel alloy. However the Stainless/Steel alloy material will also be harder than the Titanium and especially Aluminum Nut which guarantee marring the surface of the nut.

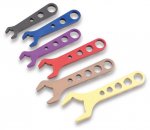
For example, when you work on aluminum AN fitting for brake or radiator or oil hose, you need to tighten those fitting with special aluminum wrench, not because is is a better stronger wrench but simply because they will not marred the surface easily due to the similar strength in their material. Here is an example of those tools:
Earls 230402ERL Earls Hose End Wrench Set
230402.jpg

So the same principle here on why I choose Titanium Nuts (in my case from AELLA) with Aluminum Socket Tools from CNC Racing and Motocorse.
The Titanium Nuts have a harder surface than the aluminum socket tools, thus significantly reducing the chance of marring the titanium nuts surface.

Now, I haven't tightened the nut yet, but I had trouble taking out the original stock Ducati factory steel alloy nut a few months ago.
It was tightened at the factory so tight that even my Makita 1/2" impact wrench that never failed to take out car hub nut, failed to take out my rear wheel nut.
I later finally able to took out the wheel nut using a 40 inch breaker bar https://www.amazon.com/gp/product/B07H3KJQ83/ref=ppx_yo_dt_b_search_asin_title?ie=UTF8&psc=1

Even with the stock steel alloy nut, I use method like HKMP7 above, which 2 layers of 3M blue painters tape on top of the alloy nut so it will reduce the chance of marring plus make it even tight fitting for more uniform pressure.
But in this case I was NOT protecting the Ducati stock steel alloy nut, but I was protecting my CNC Racing aluminum socket tools from marring.
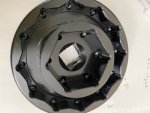
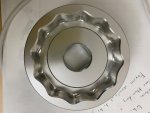
As you can see on this picture below that show not much damage to the CNC Racing aluminum socket tool inner surface.
You can also notice bit and pieces of the blue painters tape still left in the tool inner surface. So at the location with the highest pressure contact point, even 2 layers of 3M blue painters tape failed to protect the surface fully.
But of course if I do this many times, eventually the aluminum tools will wear out against the stock steel alloy nut. (aluminum fatique).
IMG_9347.JPG

However the main problem was, due to the super strong force exerted by the socket wrench square STEEL male drive (mostly from the failed attempt of the Makita Impact Wrench) to the square female hole of the aluminum socket tool,
that female hole now had significant WEAR MARKS as you can see on the picture below:
(and of course you cannot put a 3M tape to over the steel square male drive since it is already a very tight fit)
IMG_9346.JPG
I don't think this will happened again moving forward because I think the factory just tightened the stock nut at higher force than 230Nm, but I might be wrong.
For sure I will not use impact wrench anymore when opening the nut since I have the 40in breaker bar now.

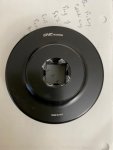
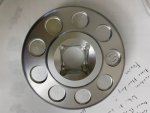
Still, I decided to purchase a new tool from Motocorse just to to try if. the Motocorse tools of course also made from aluminum. The Motocorse tools has ticker walls compare to the CNC racing which means it might have slightly more wall strength but it does not have the ability to also function for the front wheel nut like the CNC racing one. The Motocorse is strictly for the rear wheel nut only.
IMG_9348.JPGIMG_9349.JPG


In summary, First, you need to purchase a socket tools made of aluminum, it might not last forever, but it is better than marring the wheel nut surface.
Second, it is best if you choose Titanium Wheel Nut since it will be harder than the aluminum socket tools (of course still use the painters tape for extra precaution).
Third, if you must have an aluminum wheel nut (due to the beautiful anodized color), then you need to make sure you protect with painters tape really well, and get the aluminum socket tools that is as tight fitting as possible for uniform pressure (reduce small high pressure contact area). It might be best to buy the aluminum wheel nut and the socket tools from the same manufacturer because most likely they machine their nut and socket tools to the closest tolerance.
Also, make sure you do not "jerk" the socket (no impact wrench for sure) when you tighten or loosen the nut.
 

HKMP7

First 9 & Moderator
Staff member
Who ever puts the factory wheel nut on is a sick twisted individual. Because there is no way mine was torqued to 230nm I had to use a 550 lb ft impact to get mine off. Now with it being torqued to spec I can remove it no problem with hand tools.
 
Last edited:

Pete T

Moderator
Staff member
HK and BMW thankyou, you have given me some good tips. A thin plastic cushion should help a lot. In the case of anodised aluminium they seem to be affordable enough to replace every once in a while - I'm sure that the tape would mitigate but I'd expect eventually the nut would look tired.

I saw a CNC titanium nut that I really liked. Then the price! Plus shipping!! And that prompted me to get this discussion going which is really about the issues that confront us when we change or modify our OEM components. I've literally been experimenting this last six months with the OEM nut, my expensive but disappointing socket, and my pneumatic wrench. I think for now I'll keep experimenting with an aluminium nut and I do like that 40" breaker bar.

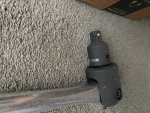
BMW I notice your socket is 1/2" drive but the bar is 3/4". In fact I've never seen one of the bespoke sockets (with shallow depth and guide rings) with anything other than 1/2" drive. Do you use a 3/4" - 1/2" step down adapter?
 

BMW Alpina

FOUNDING Member & Administrator
Staff member
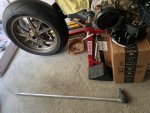
Also to make it easy to see how long this breaker bar is I just took a picture for you with the breaker bar beside the bike and also the step down adapter::

IMG_9351.JPGIMG_9352.JPG
 

Lucati

FOUNDING Member & Moderator
Staff member
Like was said above....I use the blue masking tape over the wheel nut then the socket

and good lord the first time I took the oem nut off, I had back problems the following day
 

Pete T

Moderator
Staff member
Last edited:

BMW Alpina

FOUNDING Member & Administrator
Staff member
Aha, just realised the Motocorse rear-only is 3/4" drive socket...so the unicorn was right in front of me the whole time...
Hi Pete T,
Wow, you are correct, all this time I never realized that my Motocorse rear nut socket tools was 3/4" drive, I thought it was 1/2" drive
I just checked and you are correct ! Lucky me then that I bought the correct 3/4" breaker bar 😁
 

Pete T

Moderator
Staff member
I've just had three weeks off the bike due to a back injury. Chiro has sorted it but now it's rain for a week. Every now at then I go out to the garage, put some music on, take the cover off and just stare. It helps.
 

PanigalePilot

FOUNDING Member & Moderator
Staff member
I recently noticed degradation of my very expensive, supposedly super strong stainless steel heel nut socket and, more importantly, the scuff marks it leaves on the rear wheel nut and the taper cone bush. This is after removing the rear wheel just six times. My current wheel nut and taper cone are OEM but I have an Aella taper cone on the way and I'm shopping for a (I think black anodised) rear wheel nut. So seeing the tough OEM items damaged (cosmetically) is not good news for prospective bling upgrades.

Today I posted a thread on the UK forum hoping to tap into the wealth of engineering expertise. Here's the thread...

As expected the feedback has been very helpful regarding the choice of an appropriate tool - wish I had asked before I bought one! 😬 - but, also expected, no responses so far about how people avoid damaging delicate anodised and precious titanium components. So that seems like a good question for this forum where we have a strong interest in bling upgrades.

It's difficult to photograph but if you look carefully the left faces of the nut (which incur stress as we un-do the nut) are scuffed. And if you zoom on the photo you can see the face of the taper cone is scraped along the inside edge (closest to the nut) around the entire circumference.

In fact looking at the top-most right hand face (the tightening face) you can see it also has some slight scuffing. Removal of the nut is a moderately violent act using an impact wrench. But tightening is done relatively gently with a torque wrench.

View attachment 1662

While the scuffing doesn't bother me and is hardly noticeable on the OEM nut and taper cone it would certainly stand out on polished titanium and would reveal bare aluminium on anodised surfaces.

So, those who have upgraded these components, how do you deal with this? Sooner or later you have to remove the rear wheel. How do you avoid damage? And which wheel nut socket do you use?
Hi Pete T
Same as the other guys I use tape on my CNC Racing Ti nut. I do not use a rattle gun to remove or to put on. The OEM one was a bitch to get off the first time. I personally doubt they are over torqued at the factory. I am sure in a sophisticated factory installing the nut on a production line that the tool used would be set at the 230nm and it would be routinely checked for accuracy. It would be what I would do if I was the in charge of production there. That being said it is an incredibly high figure to torque that nut too and I am sure that is why they are so hard to get off. Everyone complains about it. You should have seen the breaker bar we used to get my OEM off the first time. It was over a metre long and usually used to for truck wheel nuts.

Agree with everything said before. I have never torqued it back up to 230nm. For the last few years my rear nut gets put on at 180nm and that feels tight. I use a large Hazet 40 to 200nm torque wrench to check. The particular series I have is 2% accuracy. It was an expensive tool but I know my nut is then pretty close to 180nm. I have been using that torque now for about 5 years and about 5000 to 6000km and no problem so far.
 

Pete T

Moderator
Staff member
Hi Pete T
Same as the other guys I use tape on my CNC Racing Ti nut. I do not use a rattle gun to remove or to put on...
Yes the tape and a mighty big breaker bar will be my go-to weapons in future. Feedback on two forums has been consistent in discouraging the use of an impact wrench.

The funny thing is I only started using an impact wrench after reading all the plaudits on Ducati forums suggesting they're great and you need one capable of 400Nm or more to get the nut off! So they have their following. But interestingly the more nerdy engineering types that I targetted in the Technical Help forum on the UK site all discouraged the impact wrench because it's just too brutal. So it not only pays to ask the right question but also somehow try to attract the right people. There is a great deal of bad advice out there.

I'm still researching 1m breaker bars and have ordered the Moto Corse alloy socket and a couple of anodised nuts. And I've written to CTMOTO asking how to go about returning their tool under their lifetime guarantee. Ha! I'm expecting the "guarantee" is worthless, or that it will cost me $100 to post it back.
 
Top