Hypermotard 821 daily driver build

Araitim

MASTER Builder & Moderator
Staff member
Hello, it's time for me to share my build. It is a daily driver 2013 hypermotard 821. I have 24k miles on it and it gos up every day. I have it mostly where I want it but I want to share the high points of my build. A little about myself, I am a single income family with 4 kids and a wife. This requires me to be creative and thrifty in my build and modifications so I bought a lathe and milling machine a while back to aid in having fancy things. Most of the things I get are carefully selected second hand or new at a drastic discount(I kind of pride myself on finding the deal).


I'll start with the dry clutch conversion.

The clutch is a kbike slipper. The output shaft on the 821/939 is shorter than a normal dry clutch bike so the hub of the new clutch needed to be turned on the lathe to create a female recessed area that will accept the male shaped nut into the hub(every kit comes with the hub machined and a special sealing nut but noone will sell just the nut) That nut I'm using comes from the 1100 hyper as well as a few other bikes. One thing that messed me up 2 times now, in all the kits you see on line(there are 3 kits that are available) show a splined primary gear. The 821/939 has a tapered fit keyway retainer gear. This needed to be taken from the 916 or 1100 monster/hyper. The 1100 hyper EVO clutch gear is drilled to make it lighter. It drops the weight by a half of a pound. If you are doing this pay attention to the primary gear, the 821 and 939 are NOT splined.

The next big obstacle (or so i was thinking it would be). How to seal the clutch pushrod within the output shaft/clutch hub shaft. All the kits use a super fancy special nut that recesses into the hub and have a double seal built into the nut. I tried numerous times using various materials to make my own sealing nut buy failed every time. In the end I used that hyper 1100 male nut along with taking the new nut from the Kbike clutch, chocking it into the lathe and turning it into (essentially ) a fancy spacer. Next I needed to make a bushing that will support the push rod as well a sel the rod. I ended up using some oillite bushing stock and turning it down to fit inside of the output shaft yet house a seal (didn't get a pic of this . I'm sorry). Normally oil flows through this shaft to lubricate the wet clutch. The oil is stopped/slowed using a special oil block bolt that gos in place of a ball-on-spring design under the front sprocket on the left side of the engine. I am switching to dry so this needs to be blocked or else it will dump oil out the middle of the clutch)

One thing to note, I needed to go to the local bolt supplier to get new bolts for the dry clutch cover, the wet clutch cover bolts have a flair at the base that doesnt allow them to fit into the recesses in the cover. $8 for all allen head bolts with locking washers grade 8.
My bike came to me with 7k miles on it. Right now she is steadily climbing past 24k miles.

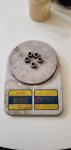
In the end this conversion slightly changed the ratio of the crank rotation to clutch speed due to being 1 tooth less for the primary gear on the dry set up. This made the bike feel quicker without sacrificing top speed much. The primary gear on the dry set up is slightly lighter. The whole dry clutch assembly along with the drilled clutch gear as a whole is heavier than the wet set up, 10.31lbs for the dry vs 9.32lbs for the wet(the added weight was after the primary gear. The primary gear itsself is lighter on the dry. I mention this because this primary gear Is directly on the crank,on the opposite side of the flywheel. This type of weight makes more of a difference in how the bike spins up and revs out vs anything after this gear). Since I was doing all this and had some down time I micro polished the gear faces just because.

While the engine was apart I decided to cut down the OEM steel flywheel. This also makes the bike more exciting in the way it makes power. It wants to rev out very quickly. It is very snappy. The down side is that you feel more of the fueling hiccups while maintaining any steady speed. But, to be honest the bike pulls VERY hard with everything connected to the crank being lighter and the fact that the clutch does not slip...at all once the lever is released.

There is alot more done. I will share as I get time.20200920_090856_compress52.jpg20200629_183724_compress50.jpgIMG_20200709_165539_079_compress96.jpg20200127_135218_compress40.jpg20200127_135312_compress31.jpgScreenshot_20201105-174733_Chrome_compress36.jpg20200127_144819_compress7.jpg20200601_135932_compress16.jpg20200127_140005_compress89.jpg20200127_140048_compress40.jpgScreenshot_20201105-174623_Chrome.jpgScreenshot_20201105-174952_Chrome.jpgScreenshot_20201105-174444_Chrome_compress24.jpgScreenshot_20201105-174348_Chrome_compress71.jpgScreenshot_20201105-174405_Chrome_compress82.jpg20200102_192115_compress3.jpg20200110_194641_compress86.jpg20200111_165304_compress58.jpgScreenshot_20201105-174520_Chrome_compress97.jpg
 
Last edited by a moderator:

Araitim

MASTER Builder & Moderator
Staff member
In the begining I was having false neutral issues between 5th and 6th. I tried many of things including adjusting cable (originally the bike was a cable actuated system .doing the dry clutch j had to convert to hydraulic. I'll address this when I go over the master cylinders I went with).

I ended up getting the Factory Pro shift detent kit. It comes with a thicker stiffer spring, slightly thicker arm, smaller roller and a ceramic bearing movement. This did help with the false neutral situation but didn't completely eliminate it if I'm being lazy. The effort to move the shift lever did increase.Screenshot_20200809-065602_Gallery_compress29.jpgSmartSelect_20200809-065725_Gallery_compress9.jpgSmartSelect_20200809-070014_Gallery_compress58.jpg
 
Last edited by a moderator:

Araitim

MASTER Builder & Moderator
Staff member
My bike is a base hypermotard. This means that it came with non adjustable forks and a axial front master cylinder. The clutch on all 821/939 is cable actuated. The 1100,796 and 950 are all hydraulic. Doing the dry clutch conversion requires the conversion from cable to hydraulic actuation. The engine cases are already machined with all the provisions to accept this , the only variable was which rod length was needed. I jumped on eBay and just bought all 3 of the rod lengths associated with the Testastretta motors. I did the hydraulic actuation conversion a long time ago, back when I was still running a wet clutch. At that time I needed to use the shortest rod. Later when I went to the dry clutch I needed to switch to the longest.

As for the parts, I used a steel braided clutch line taken from a multistrada 1200, and Oberon slave cylinder (because I desperately wanted to use the anti rotation pin push rods), full billet Ducabike(made by IRC) radial master cylinders with ducabike levers that I picked up for next to nothing and matching Rizoma reservoir's . Because the base bike uses an axial front master cylinder I needed to make an axial to radial line fitting on the lathe(the other options were to buy one or buy new line to the abs pump). The combination of HH/double H pads in the front along with the new master cylinder creates very strong, consistent and predictable braking . The clutch pull is lighter, smoother and always in the same spot. A very worthwhile mod in my opinion.SmartSelect_20201105-192148_Gallery.jpgSmartSelect_20201105-192153_Gallery.jpgScreenshot_20200330-141000_eBay_compress62.jpgScreenshot_20200725-073918_Chrome_compress79.jpgScreenshot_20200725-073834_Chrome_compress43.jpg20200618_175815_compress50.jpg
 
Last edited by a moderator:

Araitim

MASTER Builder & Moderator
Staff member
Next up, handlebars and steering damper. The base hyper bike comes with steel 7/8 bars(SP bikes use 1 1/8 fat bars). I decided I wanted to make it a bit more fancy so I picked up some Protaper CR high bars and Protaper fat bar risers. Over all they are almost the same height(protaper set up slightly higher) with a different sweep. The Protaper aluminum fat bars transfer far less vibration . This has become an issue as I get older, numb hands. The positioning is more relaxed and comfortable but the main reason for doing it( to look more fancy)was definitely achieved. I'm very happy with the performance and functionally(plus it's slightly less weight)

I also needed to change my head tube bearings, they were very notchy . I was surprised to see that the "hooligan bike" came with ball bearing steering bearings. I would have thought they would have had a more robust taper roller bearing. I installed some taper roller bearing.

Next up, steering damper. A FB friend crashed his hyper and was parting it out. I picked up his Hyperpro steering damper and ducabike mouth for a song and a dance(make no mistake, I a VERY greatful for the deals I find/are presented to me). Once arrived I was frustrated with how ducabike mounting kit made the damper sit crooked (the mounting kit alone costs like $200+)while the bars are strait so I jumped back on the milling machine and lathe to machine a new form mount. The new mount allows for the damper to sit strait to the bars while still maintainig full functionality.SmartSelect_20201105-194702_Gallery_compress23.jpgSmartSelect_20201105-194649_Gallery_compress61.jpgSmartSelect_20201105-194643_Gallery_compress22.jpgSmartSelect_20201105-194630_Gallery_compress66.jpgSmartSelect_20201105-194327_Gallery_compress99.jpgSmartSelect_20201105-194934_Gallery_compress13.jpgSmartSelect_20201105-194914_Gallery_compress72.jpgSmartSelect_20201105-194856_Gallery_compress52.jpgSmartSelect_20201105-194823_Gallery_compress42.jpgSmartSelect_20201105-194816_Gallery_compress74.jpgSmartSelect_20201105-194747_Gallery_compress11.jpgSmartSelect_20201105-194710_Gallery_compress36.jpg
 
Last edited by a moderator:

BMW Alpina

FOUNDING Member & Administrator
Staff member
Hello Araitim,

Thanks so much for starting this Hypermotard 821 Daily Driver BUILD thread. All of us really appreciate your content contribution and assure you that this forum will be the most civilized and comfortable forum.
If there is anything me or the 5 other forum moderators can do to assist you, please kindly just let one of us know about it.

By the way, I noticed you post your pictures above using the "ATTACH files" Button, thus resulting the pictures showing up as a smaller THUMBNAIL.
Do you prefer your pictures like that (as a smaller thumbnail)?
or
Do you prefer your pictures to be LARGE in size so members can see it right away without having to click on the thumbnails?

If you want your pictures to be large, you can post it by clicking the "image" button I circle in RED (screen shot below). This button is located on the rows of button on top of the window where you write your thread/post.
Once you click that button, you can choose whether uploading your picture from your computer/phone or use a weblink.
We set the maximum image size to be 800 x 600 pixel, , so if your pictures is super large high res file, you need to resize it to 800x600 pixel in size.
We do this so you can post 2 pictures side by side, which is good when you are doing "before and after" comparison picture, plus it is high res enough yet still upload quick enough.

Again below is the screenshot with the red circle showing the "image button" that you can click:

Capture.JPG
 

Araitim

MASTER Builder & Moderator
Staff member
OH! Man. I'm sorry. I intend on posting the pics in full size(resized through a resizing app) with not having to click on them. I use my phone for everything so I went about it the wrong way. I'll upload the pics in a way that they are larger size.
 

Andy7

FOUNDING Member & Moderator
Staff member
Awesome bike! I'm a big fan of the hypers - nearly bought one recently but ended up with a Tuono for a couple reasons. Cool to see you making the most with your budget (I think this is the case with a lot of us) and using your own skills to come up with something unique. Can confirm I'm always on the lookout for a discount or used parts in good condition haha.
A proper hooligan machine 🤪
Question: Did you do the major service (valve adjustment) yourself?
 

BMW Alpina

FOUNDING Member & Administrator
Staff member
OH! Man. I'm sorry. I intend on posting the pics in full size(resized through a resizing app) with not having to click on them. I use my phone for everything so I went about it the wrong way. I'll upload the pics in a way that they are larger size.
Hi Araitim,
No worries, I just edited your posts and now all your pictures are in large size (y)
Also, I just sent you a Private Message regarding your machining capability, please kindly review
 

BMW Alpina

FOUNDING Member & Administrator
Staff member
Hi Araitim,
Ok, I just finished reading all your posts above, and you are a great modificator !!!
I mean, your creativity and solution/problem solving shows that you are extremely good and have passion in mechanical things !!!

Like you, I also always try to get the best deal or the most "financially efficient" way in buying things...
it's just another level of satisfaction knowing that you can get the most value for every hard earned $ that you spend.
I am looking forward to learn more from your build. Thanks again Araitim 😃
 

Araitim

MASTER Builder & Moderator
Staff member
Awesome bike! I'm a big fan of the hypers - nearly bought one recently but ended up with a Tuono for a couple reasons. Cool to see you making the most with your budget (I think this is the case with a lot of us) and using your own skills to come up with something unique. Can confirm I'm always on the lookout for a discount or used parts in good condition haha.
A proper hooligan machine 🤪
Question: Did you do the major service (valve adjustment) yourself?
Thank you! I do indeed do all the maintenance myself. It is my first Ducati so the valve shimming and belt tension were a learning curve but I have installed new belts once(need to do a new set over winter), adjusted 3 valves one time (and tensioned the belts) and adjusted 2 valves many miles later(and tensioned the belts). One thing that was interesting to learn, there are 2 seperate value ratios for both the belts and valve shimming. 1 is 'as new' which is the tighter tolerances and second is 'working' values which represents a larger variable. This is true for the belts(tensioned to a different frequentcy on new vs midlife/used belts i.e. taking your belts off during other services while not yet needing new belts) as well as the valve shim gapping. This threw me off the first service I did because I thought 3 valves were out of spec but they we withing the 'working' tolerance so I didn't actually need to shim those first 3.

Those Tuono's are crazy machines. I was recently looking at them especially the V4. From what I have read that new Tuono 660 is hyped to be the new bench mark for middle weight naked/hooligan bike
 

Araitim

MASTER Builder & Moderator
Staff member
Hi Araitim,
Ok, I just finished reading all your posts above, and you are a great modificator !!!
I mean, your creativity and solution/problem solving shows that you are extremely good and have passion in mechanical things !!!

Like you, I also always try to get the best deal or the most "financially efficient" way in buying things...
it's just another level of satisfaction knowing that you can get the most value for every hard earned $ that you spend.
I am looking forward to learn more from your build. Thanks again Araitim 😃
Thank you so much for the help and kind words. I have more to share, it just takes a while to type it all up on a little phone 😂. I love messing with all things mechanical. Infact, I used to get in trouble for taking things apart when I was very young(a small tv I received for Christmas when I was 12 yo comes to mind. I got in so much trouble for that. I put it back together and it worked just fine, I don't know what the big commotion was all about. LOL).
 

Andy7

FOUNDING Member & Moderator
Staff member
No doubt about that, YouTube has come to my aid a lot. Especially when I changed the exhaust on my 1299. Fortunately if I can see someone do it first I manage to pick it up pretty quickly.
How much time do you set aside to check the valves and replace belts?

For sure, the Tuono is a lot of fun - I really wanted to see how a v4 feels and I have no complaints so far. Superbike performance with the comfort to ride all day and great manouverbility. The 660 looks like it’ll do really well, now we just need Ducati to come out with a streetfighter V2
 

Araitim

MASTER Builder & Moderator
Staff member
No doubt about that, YouTube has come to my aid a lot. Especially when I changed the exhaust on my 1299. Fortunately if I can see someone do it first I manage to pick it up pretty quickly.
How much time do you set aside to check the valves and replace belts?

For sure, the Tuono is a lot of fun - I really wanted to see how a v4 feels and I have no complaints so far. Superbike performance with the comfort to ride all day and great manouverbility. The 660 looks like it’ll do really well, now we just need Ducati to come out with a streetfighter V2
Every time I did valve and belt maintenance I would start later in the day. Do the whole job but leave it open. Check my work in the morning with fresh eyes and adjust if needed. Never took more than over night. I was riding the morning of disassembly and then again in the afternoon the next day. I feel that doing the work one day, sleeping on it and rechecking in the morning is the best option for me to prevent errors. I'm very efficient at disassembly and assembly on this bike now.
 

Araitim

MASTER Builder & Moderator
Staff member
Rearsets and drivetrain and tuning , OH my

Ok, so. Back a few years while I was trying to sort out my false neutral issues I bought the super cheep Chineese shift lever. For some reason my left foot doesn't pivot up as far as most so my shifter lever needs to either be pointed down pretty far or have a super short lever. The Chineese lever is not good but can be made usable by drilling out the 2 arm bolts and tapping up a size. The ones that come in it can't generate have enough clamping force to ridgedly hold the 2 pieces together. The 2 pieces would move all over the place. Eventually I made a new shorter arm to fit on the rocker assembly. It worked fine for a year or so.

One day I stumbled upon this guy named Giuseppe Starace. He makes custom hand made carbon fiber intake housing for the 821/939. The options are OEM with free flowing filter, DP(of you can find one) which creates a larger cavity for air to flow in but holds the filter element tight to the topmof the kid essentially making that area useless), MWR modification which requires cutting a 2nd hole in the top of the box and using self tapping screws to hd in a foam filter and Starace . I picked the Starace for a few reasons. I'll touch on that in a minute. Apparently I made friends with this guy very early in his venture into the 821/939 hypermotard. This was a time that he was hand making every intake. I received it and it made a very noticable improvement in performance. The bike rwved quicker and it pulled all the way till redline now so naturally I shared my experience being a guy who loves small lesser known companies that make exceptional parts.

Me being a guy who tries to dicect things and understand what makes one thing work better than the other I sat down with this intake and pics of the other options mentioned. Keep in mind through all of this, the hyper does not have a ram air design. It is a free flow with whatever air passes over the top of the air box and below the gas tank. Parts and pics in hand the #1 obvious thing that would make a difference is the size of the opening. The DP has a large opening too but the filter element on the DP is held tight to the top of the housing, the Starace tips the filter element down between the 2 velocity stacks and away from the top of the housing. The OEM internal filter cone (piece that holds the opposite end of the filter to housing). The OEM and the DP use a larger end cone which takes up space and limits air flow, the hand made carbon Starace uses a smaller cone and even smaller cone in the carbon 3D printed V2 RSR. When I think about cutting the MWR hole it makes me think of that old science project where you cut 2 holes on top of a box and blow air across the 2 holes, the box is now under vacuum(remember, the hyper 821/939 uses a free flowing air box design not a ram air design). Cut 2 hole in the bottom and now we are working in the opposite idea of what we want, negative pressure not posative pressure. Time went by, Starace came up with a V2 intake that he is having 3D printed using some fancy high strength carbon material. His new design is said to maintain peak power but increase midrange torque. I have no Dyno numbers or anything but seat of the pants it felt stronger. It was easier to loft the front coming out of a turn in 3rd.

The exhaust I opted for was the Shift-Tech. They were having a black friday sale and was a great value. I would have loved to do a full system but the cost doesn't make much sense for me until I do a rebuild and port n polish the heads. There is an exhaust servo flapper on these bikes. They are not like the yamaha EXXUP system. According to Ducati(from what I have read) it is purely to be sound compliant. I discovered through scouring the forums a couple years back that if you disconnect the servo motor the engine light will come on. There is a super simple trick to resolve this issue(aside from removing the servo motor and plugging in a servo delete module..which I did later to free up some space under the seat). If you leave everything connected, just grind the tack welds on the 2 screws that are on the butterfly inside the collector and unscrew them you can pop the butterfly flapper off. Leaving the rest intact the system still runs through its check points and still thinks it's all still functioning. The big plus is that this is 100% reversible if your bike is still under warranty.

Having the exhaust free flowing and more air coming In I needed a tuner. I weighed all the options and the Rapidbike won. The rexxer was almost what I went with due to the unique ability to reset TPS and maintenance timers but it has other limits that I didn't like. Side note, the hypermotard 821/939 has a unique ECU and you can not do a damn thing to it at home using the usual guzzi obd tuning . This frustrates me very much. With the Rapidbike you need to tap Into alot of stuff so the bike needed to be torn apart to do so. They say to just put the tuner on, ride for a few hundred miles, hook up to a computer and apply the corrections. This can be done numerous times to narrow down the tune but.......there is a better solution that I found on a forum. This guy connected wide band O2 sensors and a data logger along with some other stuff and found that the corrections were going the wrong way actually hurting performance. He uploaded his custom map and tells you step by step what to turn on and off as well as every setting. This tune is AWESOME!!. I went a few steps further and allowed auto tune to make a very narrow range of adjustments and now the bike pulls hard all the way to redline. I'm VERY happy with this map and recommend it to anyone with a 821/939(obviously you will need to allow the auto tune make wider range of adjustments on the 939).

Time gos on and I learn of the Quick shifter modules. This presented a big problem. The distance between the shifter and the gear selector arm is not big enough to fit a conventional load cell from a race QS ....so I once again modified the Chineese lever. Things were ok but the bushing was super loose and things starters acting funny. I ended up milling out the pivot point and pressing in 2 small ceramic bearings. This worked far better than I imagined. Time went by and I was not happy with the look of my pieces together Chineese lever. The only 3 options at this point was to either get aftermarket rearsets (which are very expressive due to the unique way that they tie the frame, motor and swingarm all together) or buy the Bonamici lever or try to make a lever similar to the Bonamici lever for the 848/1098/1198. Originally I tried to make the lever, which was going very well till I realized that the whole assembly with the load cell mounted to the arm made the whole schebang too heavy. It would always hold the lever loaded to down shift. Even if I were to machine the pieces to the bare minimum it still felt like it would be too heavy so I abandoned the piece and bought the Bonamici lever that clocks the mounting point more rearward to allow for a conventional load cell...barely. The Bonamici lever is actually a very nice piece. It uses a double cartridge bearing pivot and is very ridged all the things I needed for a fraction of the price of aftermarket rearsets. There is a problem though , a problem which I think I created. If you look at how the shift arm is clocked vs how the mounting point is clocked it makes for more effort needed to shift since they are not parallel. Now factor in that factory pro detent upgrade and you have a recipe for a very stiff shift. It worked but you could not be lazy with the shifting.

Next it was time to source aftermarket rearsets. I watched and watched for a deal on used rearsets. A few slipped through my fingers which turned out to be a blessing in disguise. I did some digging and most rearsets are $600-1200(ducabike-CNC racing). Then I found Gecko Racing. These seemed like they were going to be 'the one'. All the pieces were flat so if they were junk I could easily recreate broken pieces out of better materials should something happen and at ~$300(more if you want passanger mounts) it seems like the perfect value I was looking for. Till I found RSV Racing out of Thailand. They make very few parts and just so happens to make rearsets for the hypermotard 821/939. They look far more fancy than the Gecko Racing(side note,every piece of the Gecko can not be directly bolted to the other . You must use the supplied spacers between each layer. I'm guessing something to do with quality control and how flat the plates are along with the countersunk bolts possibly not seating at/below the surface). Big plus sides to the RSV is they are fully machined, both the shifter and the brake use double cartridge bearings in each arm(almost every other rearsets uses bushings. For some reason I'm not a fan of bushings. In my head it seems like the bearing is a more slop free direct connection), most of the pieces are flat and if they turn out to be weak I could make broken pieces at home out of better materials and they include the passanger assembly all for $330 shipped from Thailand. Each piece is made to order, shipping is not fast and communication is horrible but if I were to do it all over again I would do the same thing. They are not without their issue though. First thing I replaced the bolts with grade 8 and stainless bolts. Removed the 1in spacers on the foot pegs, needed to clean up the countersunk holes and had to make a mount for the shift return spring (not a complicated or hard thing to do, just a note)due to where I wanted everything adjusted. Another plus is that they utilize the OEM brake light trigger switch. It's been 8ish months of daily use and no issues whatsoever.


I probably should have broken this post up into a couple. Anyways , I'll upload more of my build when I get some time .
SmartSelect_20201109-100155_Gallery_resize_42.jpgScreenshot_20201109-100145_Gallery_resize_96.jpgScreenshot_20201109-100125_Gallery_resize_79.jpgScreenshot_20201109-100110_Gallery_resize_66.jpgSmartSelect_20201109-095259_Gallery_resize_40.jpgSmartSelect_20201109-095317_Gallery_resize_49.jpgSmartSelect_20201109-101419_Gallery_resize_57.jpgSmartSelect_20201109-100259_Gallery_resize_36.jpgSmartSelect_20201109-100909_Gallery_resize_45.jpgSmartSelect_20201109-102549_Gallery_resize_85.jpgScreenshot_20201109-100225_Gallery_resize_98.jpgSmartSelect_20201109-101014_Gallery_resize_58.jpgScreenshot_20201109-100936_Gallery_resize_5.jpgScreenshot_20201109-102520_Gallery_resize_89.jpgSmartSelect_20201109-102505_Gallery_resize_45.jpg20201109_093930_resize_15.jpg20201109_094257_resize_78.jpgSmartSelect_20201109-095241_Gallery_resize_16.jpg20201109_094142_resize_42.jpgSmartSelect_20201109-101509_Gallery_resize_57.jpg
 

Araitim

MASTER Builder & Moderator
Staff member
Hi Araitim,
When I was reading your post above, I couldn't help but notice that our (yours and mine) brains must be wired similarly 😁
Great minds think alike😃. It has to make sense to me logically for me to be onboard with it. I'm very skeptical of companies that make claims. Referring to that MWR air box filter mod they show significant gains in the Dyno but in real world I just don't buy the claims. I could be wrong. I am wrong often. LOL😅
 

Araitim

MASTER Builder & Moderator
Staff member
It's been a little bit. Had some health issues rear their ugly head again but something new came and I'm excited about it so I'm jumping past a few things to cover this. When I was first looking at exhausts I REALLY wanted the Spark.it(or the Noriyoshi but the more I looked at it the more 'Mega Man' it looked). It was too expensive for me so I settled on Shift-Tech slip on, link pipe and modified the collector 2+ years ago. It was nice and happy with the Shift-Tech aside from the large knuckle where the link pipe meets the OEM pipe(takes away from the flow of the design imo). Well, guess what popped up for sale for 50% off on black friday, the Spark.it Force 3/4 system that I originally wanted.

The Spark.it Force 3/4 system arrived and I have to say...if I had paid full price I would have been upset. First let me say, the welds are solid, good even heat and penetration(not instagram pretty) and is evident on the inside of the collector. The riser tube welds are extremely nice, looks like they finished the welds with doing a uniform brush finish to the whole system. The part that I'm not happy with is the collector. Where the front cylinder dumps into the collector there is alot of material left inside causing a restriction/turbulence. Like 1/4 in on one side. As if the one tube was not cut out quite enough to accept the other. I will be getting at this with a long shaft ball end carbide burr over the winter to help smooth the flow. Aside from that I am very satisfied with this new system.

A nice touch is the provisions for the exhaust valve servo. This is a false provisioning with no cutting into the tube. It is only for attaching the servo to prevent check engine lights. I removed my servo long ago(needed some room for the quick shift module) and installed a servo eliminator module. Being that I don't need the mount I decided to cut it off. Who needs it rattling around under the bike along with messing up the styling. It was solidly welded on but only in 2 very small spots,almost like they were expecting the majority of users to do the same. The total weight of the modified OEM collector, Shift-Tech link pipe and Shift-Tech muffler is almost exactly the same weight as this new system even though the new system has akot more pipe being that it's a high mount. Kind of makes me want to custom make a cross over pipe to run dual Spark.it silencers up high. Noone makes one of those for the Hypermotard 821/939.

It has been between 30-40°F here in mid Michigan but that didn't stop me from trying it out. It definitely sounds different . The old system pointed up at my ear so it that was pretty much all I heard all the time(I turned it up, I liked the look). The new system exits behind me which means I hear more noises I have not heard before. Did you know there is an intake suction noise with these bikes...I didn't lol. It's a fun new sound and with the Starace RSR intake I have been running creates a larger opening to let the sound out.

The OEM collector O.D. was a little over 49mm with it getting more narrow in spots as it twisted. The junction on the OEM has the same inner overlap where they meet. The Spark.it is 52mm O.D. till it hits the bend then the rest of the pipework is 54mm till it hits the muffler. I am very happy with the look of the new system . The muffler mounts in an area I was not expecting, it's clever and clean. One other down side is that the RSV rearsets I'm using, the passanger mount won't fit with this system(oem will fit just fine). This is not an issue for me since I never ride with a passanger. If I needed to I could I stall some spacers for the passanger peg arm on the pipe side.

I found one other super score of a deal came. Got some new nuts. My wife usually keeps them in her purse. She lets me have them if I ask nice. I snuck out and picked up some new ones. Lol jk. I came across these Ducabike nuts on ebay for $17. They we Labled as used but they don't look like they were ever used, threads look untouched. Long story short, now I need to find fancy lock nuts for the quick change carrier for cheap. The basic nuts on the JT carrier look out of place. Screenshot_20201203-174056_Gallery_resize_93.jpg20200414_172025_resize_28.jpgScreenshot_20201203-174029_Gallery_resize_68.jpgScreenshot_20201203-173957_Gallery_resize_56.jpgScreenshot_20201203-174234_Gallery_resize_19.jpgScreenshot_20201203-174323_Gallery_resize_58.jpgScreenshot_20201203-174312_Gallery_resize_95.jpgScreenshot_20201203-174300_Gallery_resize_41.jpgScreenshot_20201203-174248_Gallery_resize_79.jpgScreenshot_20201203-174210_Gallery_resize_60.jpgScreenshot_20201203-174201_Gallery_resize_36.jpgScreenshot_20201203-174144_Gallery_resize_3.jpgScreenshot_20201203-174154_Gallery_resize_21.jpgScreenshot_20201203-174119_Gallery_resize_20.jpgScreenshot_20201203-174107_Gallery_resize_12.jpg20201204_184928_resize_51.jpg20201204_183409_resize_12.jpg20201204_184023_resize_74.jpgScreenshot_20201205-183839_Gallery_resize_16.jpg
 

Attachments

BMW Alpina

FOUNDING Member & Administrator
Staff member
It's been a little bit. Had some health issues rear their ugly head again but something new came and I'm excited about it so I'm jumping past a few things to cover this. When I was first looking at exhausts I REALLY wanted the Spark.it(or the Noriyoshi but the more I looked at it the more 'Mega Man' it looked). It was too expensive for me so I settled on Shift-Tech slip on, link pipe and modified the collector 2+ years ago. It was nice and happy with the Shift-Tech aside from the large knuckle where the link pipe meets the OEM pipe(takes away from the flow of the design imo). Well, guess what popped up for sale for 50% off on black friday, the Spark.it Force 3/4 system that I originally wanted.

The Spark.it Force 3/4 system arrived and I have to say...if I had paid full price I would have been upset. First let me say, the welds are solid, good even heat and penetration(not instagram pretty) and is evident on the inside of the collector. The riser tube welds are extremely nice, looks like they finished the welds with doing a uniform brush finish to the whole system. The part that I'm not happy with is the collector. Where the front cylinder dumps into the collector there is alot of material left inside causing a restriction/turbulence. Like 1/4 in on one side. As if the one tube was not cut out quite enough to accept the other. I will be getting at this with a long shaft ball end carbide burr over the winter to help smooth the flow. Aside from that I am very satisfied with this new system.

A nice touch is the provisions for the exhaust valve servo. This is a false provisioning with no cutting into the tube. It is only for attaching the servo to prevent check engine lights. I removed my servo long ago(needed some room for the quick shift module) and installed a servo eliminator module. Being that I don't need the mount I decided to cut it off. Who needs it rattling around under the bike along with messing up the styling. It was solidly welded on but only in 2 very small spots,almost like they were expecting the majority of users to do the same. The total weight of the modified OEM collector, Shift-Tech link pipe and Shift-Tech muffler is almost exactly the same weight as this new system even though the new system has akot more pipe being that it's a high mount. Kind of makes me want to custom make a cross over pipe to run dual Spark.it silencers up high. Noone makes one of those for the Hypermotard 821/939.

It has been between 30-40°F here in mid Michigan but that didn't stop me from trying it out. It definitely sounds different . The old system pointed up at my ear so it that was pretty much all I heard all the time(I turned it up, I liked the look). The new system exits behind me which means I hear more noises I have not heard before. Did you know there is an intake suction noise with these bikes...I didn't lol. It's a fun new sound and with the Starace RSR intake I have been running creates a larger opening to let the sound out.

The OEM collector O.D. was a little over 49mm with it getting more narrow in spots as it twisted. The junction on the OEM has the same inner overlap where they meet. The Spark.it is 52mm O.D. till it hits the bend then the rest of the pipework is 54mm till it hits the muffler. I am very happy with the look of the new system . The muffler mounts in an area I was not expecting, it's clever and clean. One other down side is that the RSV rearsets I'm using, the passanger mount won't fit with this system(oem will fit just fine). This is not an issue for me since I never ride with a passanger. If I needed to I could I stall some spacers for the passanger peg arm on the pipe side.

I found one other super score of a deal came. Got some new nuts. My wife usually keeps them in her purse. She lets me have them if I ask nice. I snuck out and picked up some new ones. Lol jk. I came across these Ducabike nuts on ebay for $17. They we Labled as used but they don't look like they were ever used, threads look untouched. Long story short, now I need to find fancy lock nuts for the quick change carrier for cheap. The basic nuts on the JT carrier look out of place. View attachment 2254View attachment 2255View attachment 2256View attachment 2257View attachment 2258View attachment 2259View attachment 2260View attachment 2261View attachment 2262View attachment 2263View attachment 2264View attachment 2265View attachment 2266View attachment 2267View attachment 2268View attachment 2269View attachment 2270View attachment 2271View attachment 2273
Hi Araitim,
Congratulations in getting another great value purchase, I love that feeling of winning a bargain too 😃
In this case, you really win big though,... I mean when you put your new Spark.it and the shift-tech silencer side by side, it's just no comparison, Spark.it just show elegance, very nice color contrast (the carbon fiber trioval with brush stainless finish) and the shape (proportion) is also so much better. Also, the shift-tech carbon fiber pattern and finish and color looks like it's not real carbon. In summary, Your bike instantly looks more "Exclusive" with the Spark.it 🤩

And of course, I am always biased toward high mounted undertail exhaust like a 916, so when I see the side by side picture of your new and old system on the bike, the Spark.it system make it instantly recognizable like a DUCATI, while the shift-tech is almost like emmm a big scooter exhaust..., I think it even looks better than many of Termignoni silencer... I also love your idea to modify it further and make it a dual left and right silencer, I think it will look even more unique, more special, and no one else will have the same looks (unless they copy which mean you are the pioneer and master of the idea) 😎(y)

Also, what do you think about adding some dry carbon fiber heat shield on the right side of the pipe (slightly above) the right rear set like the 916? (of course in pattern and color as close as the Spark.it carbon fiber), that would require a bit of welding the mounting of course... Are you able to perform welding? Welding is one of the thing that I never tried or train in my life, I know soldering but I don't think it will help me doing welding. Maybe someday when I already retired, I will learn how to weld just so I have the experience 🤪

By the way, I was doing some axle research last night until 4 am (and spent the whole afternoon sleeping today 🥴) and I have a question.
Is your front axle the same size, shape and length as the Hypermotard 796 front axle?
 

BMW Alpina

FOUNDING Member & Administrator
Staff member
Wow, this is so funny, right after I reply to your post above, I went on to read other posts today, and I just saw your post about the Streetfighter exhaust where you mention about the "carbon leg guard" 😄
Which is exactly what I talk about above on my reply, of course being English as Second Language to me, sometimes it took me more words to describe a simple "carbon leg guard" 🤪
 
Top