Hello All,
I purchased this MTS1200 last year in April. So far I have been really pleased with it, but I can't leave any bike unmodified.
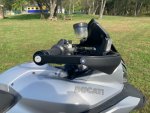
I started with the ugliest part of the bike IMO, the exhaust. This is the only picture I have of before:

I took a Termi Slip-on, this style can be found cheap ~$300. I cut it down about half its original length. I also angled it up a bit with a few pie cuts in the pipe. You can see here that I have also removed the pillon pegs and added a trim plate I made. I commute on the bike about 70% of the year and I haven't carried a passenger in over 3 years.

Picture of unmodified Slip-on

Next was windscreen and mirrors. I am about 5'7" so the shorty screen does just fine for me.

I made mirror block of caps and mounted 2.5" domed mirror right next to the hand controls. They look out right under my arms with an unobstructed view and clear the tank at full lock. This picture isn't great but it's all I have.

Next I installed some barkbuster handguards, but I was really unhappy with the look of the "unadorned" bar. I designed and 3d printed some plastic shields that bolt on to the barkbusters. I don't think this solution is ideal either, but it's better than it was and will work until I think something else up.


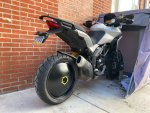
The last few years I have gone on a week long bike trip with some friends. We always try to go someplace pretty remote so it usually includes a few hundred miles of gravel road. Towards that end I wanted to run a wheel & tire setup with a little more off road focus. I briefly had a Ducati Scrambler 1100 before the MTS1200, it wasn't the bike for me overall but it was decent on a gravel road. So I decided to try that wheel tire which is 110/80/R18 instead of the factory 120/70/R17
The axle and spacers were a direct match. However I did have to machine down the brake disc mounting surfaces, make a new ABS ring to account for the diameter change and raise the fender a little.

Now obviously the wheels don't match and I am not aware of any single sided spoke wheels besides the Kineos. I am not ready to fork over the $$$ for a custom wheel. So I decided to try a project I contemplated over the years. A wheel cover, if the wheel aren't going to match, make them reaaallly not match. Here is the inspiration:


And here is my version:
I bought a generic aluminum "aero" hubcap intended application on 17" car wheels. I cut down the outside edge to fit inside the wheel and cut a hole in the center mimicking the Ducati WSBK cover for access to the wheel nut. I used five m4 bolts and drilled/tapped corresponding holes in the wheel. The yellow trim ring was just for fun, I thought it might match the rear spring. It might get changed to silver later.
During this time I also started my version of a tail tidy. I don't like any of the available aftermarket options. So bought a used license plate arm from ebay and by cutting that up in combination with making a new cover piece of my own this was the result:

Obviously I mounted the rear mudguard back on and used it as the home for the plate. I am still waiting for the blinkers to arrive and I will post the result of that when I have them installed.
Then plan is that they will flush mount to the bottom cover piece.
And that is where the bike stands now. I have more plans and will update as I go.
I purchased this MTS1200 last year in April. So far I have been really pleased with it, but I can't leave any bike unmodified.
I started with the ugliest part of the bike IMO, the exhaust. This is the only picture I have of before:
I took a Termi Slip-on, this style can be found cheap ~$300. I cut it down about half its original length. I also angled it up a bit with a few pie cuts in the pipe. You can see here that I have also removed the pillon pegs and added a trim plate I made. I commute on the bike about 70% of the year and I haven't carried a passenger in over 3 years.
Picture of unmodified Slip-on
Next was windscreen and mirrors. I am about 5'7" so the shorty screen does just fine for me.
I made mirror block of caps and mounted 2.5" domed mirror right next to the hand controls. They look out right under my arms with an unobstructed view and clear the tank at full lock. This picture isn't great but it's all I have.
Next I installed some barkbuster handguards, but I was really unhappy with the look of the "unadorned" bar. I designed and 3d printed some plastic shields that bolt on to the barkbusters. I don't think this solution is ideal either, but it's better than it was and will work until I think something else up.
The last few years I have gone on a week long bike trip with some friends. We always try to go someplace pretty remote so it usually includes a few hundred miles of gravel road. Towards that end I wanted to run a wheel & tire setup with a little more off road focus. I briefly had a Ducati Scrambler 1100 before the MTS1200, it wasn't the bike for me overall but it was decent on a gravel road. So I decided to try that wheel tire which is 110/80/R18 instead of the factory 120/70/R17
The axle and spacers were a direct match. However I did have to machine down the brake disc mounting surfaces, make a new ABS ring to account for the diameter change and raise the fender a little.
Now obviously the wheels don't match and I am not aware of any single sided spoke wheels besides the Kineos. I am not ready to fork over the $$$ for a custom wheel. So I decided to try a project I contemplated over the years. A wheel cover, if the wheel aren't going to match, make them reaaallly not match. Here is the inspiration:
And here is my version:
I bought a generic aluminum "aero" hubcap intended application on 17" car wheels. I cut down the outside edge to fit inside the wheel and cut a hole in the center mimicking the Ducati WSBK cover for access to the wheel nut. I used five m4 bolts and drilled/tapped corresponding holes in the wheel. The yellow trim ring was just for fun, I thought it might match the rear spring. It might get changed to silver later.
During this time I also started my version of a tail tidy. I don't like any of the available aftermarket options. So bought a used license plate arm from ebay and by cutting that up in combination with making a new cover piece of my own this was the result:
Obviously I mounted the rear mudguard back on and used it as the home for the plate. I am still waiting for the blinkers to arrive and I will post the result of that when I have them installed.
Then plan is that they will flush mount to the bottom cover piece.
And that is where the bike stands now. I have more plans and will update as I go.
Attachments
-
 588.7 KB Views: 5
 -
 943.4 KB Views: 5