1198S "just for fun" track build

The_rusty_racer

New member
I've owned a bunch of bikes, and I’ve been club racing, mostly Suzukis, and now an RSV4. I've just gotten my hands on my very first Duc, an 1198S. The plan is to build it into a track bike for coaching and track days as a “B bike” in case I’m unable to race the RSV4 for whatever reason. So the main goal is to make it fun and cool, while complying with the requirements of my local racing organizations.

A close friend of mine works at the local Ducati dealer, so we’ll be building the bike there after hours. This project wouldn’t have started without him and is probably even more his baby than mine. He recently did a frame-up build of a killer 848 evo, so this project is right up his alley. I’ll be using a lot of his expertise on the platform, and he’ll be riding it too.

One of the cool things about having someone working at the dealer is that a couple of the long-time guys at the shop recognized it. Apparently, the original owner was a bit of a character, and for him, money was no object. We checked the VIN and service history, and it was crashed on the left in 2010, then fully repaired to OEM level. It still has lots of evidence of a left-hand low side, so I guess it got crashed again semi-recently?

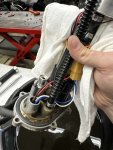
As we got it, the 1198 was a write off and besides the low side, it appears to have been left outside for at least a year, probably more. There’s soooooooo much rust. So the first order of business was to strip the bike down, get it cleaned up, and diagnose exactly what’s wrong with it.

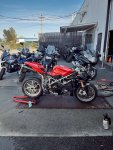
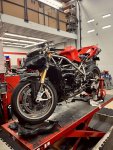
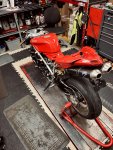
Here is the bike without the crashed fairings and after a quick wash IMG_5662.jpeg
IMG_5661.jpegIMG_5664.jpegIMG_5669.jpeg

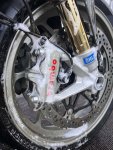
The good news ia the bike already has the 70mm termis on it and the race ECU. The forks are in shockingly good condition, and there doesn’t seem to be any scratches or rock chips on them. So a perfect track base. Because it’s got the factory Öhlins, I don’t feel the need for an upgrade. I plan to just refresh the forks and shock, and maybe do springs for my weight. One thing that will absolutely need to be addressed is brakes. Our local track is incredibly punishing on brakes, so we will probably do a new master cylinder and possibly a bit more depending on budget. For now the first stage will leave engine performance alone and just focus on reliability, ergonomics and crash protection.

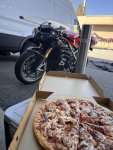
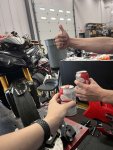
...and what's a garage hangout witour pizza and beer :p

IMG_5663.jpegIMG_5659.jpeg
 

Attachments

The_rusty_racer

New member
After tearing the bike down, we found some interesting things. The fuel cap is hard-stuck, and the key won't turn. Shockingly, we were able to get the bike to start with the stale gas in the tank and just a jump pack on the battery. It didn't run well, but it did run. After that, we discovered that the battery is the original lithium battery from 2009, when we took it out, we discovered it was really puffed up and definitely a fire hazard. Didn't get any pics of that, but a keyless gas cap and new lithium battery are already on order. from there. We got the tank and airbox off. The first thing to look at was the air filter. It has the DP filter that came with the exhaust, but it has a small hole in it. So a set of MWR pod filters got ordered.

air filter.jpeg

Next, the fuel pump, and holy crap, it was gross.

78105892037__16564423-3B2C-4C34-A122-C9393EAA7D4E.jpeg

After an initial clean it looks a lot better but still has a ways to go. safe to say a new fuel filter is on order.
IMG_5860.jpg

We also inspected the belts, and according to the part number, we estimate they were last replaced in 2015. yikes.

With that knowledge, we assumed it was worth it to fire up the parts cannon and sent it on basically all the wear items.
 

Attachments

The_rusty_racer

New member
Since this bike is gonna live on track, we wanted to see how big a tire we could fit on. My goal is to fit a 200/65 on. I believe the only way to do that is with the Pierobon swingarm mod. I had a 190/60 Pirelli slick in my storage locker, so my buddy took that and then sent me this pic of the tire on 1198. It already looks so much racier!

IMG_4099.jpg

Unfortunately, the tire rubs on the weld even with the "little" 190. My buddy says there is a mod you can do to move the brake pivot and rotate the eccentric further back. That should give us enough room to fit the 190 with tire warmers. That will be a must, and we'll probably grind down the weld to get a little more clearance. With both of those, I'm hoping we can fit at least a 200/60, but time will tell.

I didn't take any before photos, but here you can also see I've started cleaning up the exhaust with a scotch brite pad. It's looking a little less ratty; however, it still has a really long way to go.

We also discovered a big crack in the left side of the undertray (not pictured). I got this pic saying he's ordering us a carbon one. This is also a good angle to see that everything under the fairings is still super gross after our initial clean. This bike is gonna need a lot of love.
77985136847__4135E9B7-0185-48CA-88D9-DAF915A0274B.jpg
 

The_rusty_racer

New member
A lot more progress. I found a Speedy Moto front axle slider in my spare parts bin that I think it was actually for this bike, cause it fits perfectly.

IMG_5842.jpeg

The calipers came off, and my friend deep-cleaned them. He says he can do better, but I'm impressed. To my eye, they look brand new.

IMG_5838.jpg

While he was doing that, I cleaned up the OEM caliper bolts and drilled them for safety wire. Not perfect, but miles better.

IMG_5861.jpg

This was just in time for parts to start showing up :)

IMG_5845.jpeg

The bike also came with a set of Genuine Pazzo levers, which are nice, but they are in gold, which is just not my colour. Pazzo sponsors my racing, so I had a spare lever kicking around. So obviously it was out with the old gold and back with the black :p

In the background, you can see the JB weld on the front fairing stay. Don't worry, that's just a placeholder for fitting bodywork. Eventually, it'll get a lightweight MotoHolders fairing stay.

IMG_5848.jpeg

Also installed a second-hand STM slave cylinder. I would have preferred black, but after seeing it in person, it's not so bad. By no means was this a necessary mod, but the price was right. You can also see here that we pulled off the rusty chain to get in and clean the engine a bit better. The bike is gonna look good with the new chain and superlite sprockets!

IMG_5840.jpeg

At the same time we did this, we also swapped the clutch reservoir to the dark smoke Brembo reservoir and replaced the ratty old tubing with some fresh clear Tygon. We also started to dig into the engine. You can also peep the new battery.

IMG_5862.jpg

The tiny new BS lithium in its new foil-wrapped the home. The idea is to keep the heat out and hopefully extend the life of the battery, not sure how effective it'll be but see. The BS is so small that we used all the foam in the package, yet still, the battery moves around. I've ordered more foam from Amazon, so eventually it will be secure.

In the back of my mind, I'm wondering about making a dedicated aluminum or 3d printed battery box that's sized specifically for the BS. The main benefit there would be less stuff around the horizontal cylinder and, therefore, improving air flow past the rear cylinder. Probably not worth the effort, but could be a cool project.

IMG_5839.jpegIMG_5850.jpeg

With the cam covers off, we could do the valve inspection. This confirmed that it's waaaay overdue for a desmo service, with 7 of the 16 shims out of spec.

IMG_5847.jpeg
IMG_4183.jpg

At this point, we also busted out the borescope to check the cylinders; they looked imperfect but good enough for a bike with 25,000 km on it. We've elected to leave the heads on and not do a full rebuild. We'll save that for next winter.

IMG_5855.jpeg

The clutch has more evidence to show just how badly it's been neglected. New plates and basket are already on the way, along with new bearings. I'm not doing a slipper clutch yet, but I'm sure that'll happen eventually. Maybe when we do the full engine rebuild.

IMG_5852.jpg

We also discovered that someone had already done the kickstand bypass. So that's one more thing off my list for track readiness.

IMG_5841.jpg

One of the downsides of having someone who works at a dealer is that he finds crazy stuff. My friend came downstairs from the parts loft with a carbon fiber clutch reservoir bracket. To me, as a racer, this is the epitome of silly, unnecessary carbon fiber for the sake of it. This saves maybe 5g and will have zero impact on lap time. But it's so ridiculous it might be finding its way on the duc haha.

IMG_5851.jpg

I think that's all the major stuff we've done over the last month since I got the bike. Hopefully, I'll be updating this thread a lot more soon.
 

Attachments

The_rusty_racer

New member
In the last post, I forgot to mention the last attachment. One of the things the bike needs to be race-ready is a shark fin. All the ones that I can find seem to be carbon fiber, which is nice, but a little more money than I want to spend.

I found THIS DIY option, it’s a decent base, but I wasn’t a fan of the design visually.

So I designed a quick one that will mount into the bottom of the swingarm the same way. I have some scrap Aluminum lying around, and a friend has offered to cut it on their CNC at work for a case of beer. I think I'm gonna be the direction I go unless I can source a carbon one on the cheap.

shark fin v3.png
 

BMW Alpina

FOUNDING Member & Administrator
Staff member
Wow, this is a great technical track build. Can't wait to see more updates from you. I also just bought that STM Clutch Slave Cylinder in the same Red color, because they came in 28mm, while the Oberon that I previously had was 29mm. My STM evoluzione SBK clutch was not releasing with 29mm Oberon... but even with the 28mm, it still stuck. Maybe I need to reopen my STM clutch to see if I stacked them wrong...
 

The_rusty_racer

New member
Once the new clutch parts arrive, I'll be able to put it back together and test the STM slave. I'm hoping the increased lever travel and lighter pull make releasing the clutch for a race start a bit easier. When I raced my GSXR600, there was a fast kid who was having such a hard time with race starts on his 848 that even though he's a better rider on a faster bike, I could always get the holeshot on him.

I've heard good things about Oberon so maybe reach out to STM if you are still having issues?
 

The_rusty_racer

New member
Since I had more foil from the battery box, I wrapped the bottom half of the airbox to hopefully keep the intake temps down a bit. This stuff isn't that flexible, so I had a hard time with all the radiused edges. Luckily, my handiwork will be hidden under the tank and fairings when the bike is done. I did a double layer on the bottom center, between the heads, for a bit of extra insulation. I don't expect this to have much real-world impact except on the hottest days.


IMG_5875.jpegIMG_5879.jpeg
 

The_rusty_racer

New member
went to spend some time working on the bike this weekend, and when I got there, I got a lot of surprises. Homie had already completely rebuilt the forks. Here is the oil that came out of them. Clearly, it has seen better days. should perform a lot better with fresh SKF seals and Öhlins fork oil.


IMG_4195.jpeg

Doesn't look like much, but here are the forks back on the bike

IMG_5891.jpeg

We also received an exciting package from Hel.

IMG_5896.jpeg
The Hel V1 Billet MC and Braided lines. There was nothing wrong with the old ones but these are the superbike style that have two lines directly from the master to the calipers. This supposedly has the best brake feel and performance of all the arrangements.

IMG_5892.jpeg

I went with the "carbon" colour. I like that you can still see the braided line with a nice dark tint to it. I've used this colour of line on a couple of bikes, and I like it more than the full black that's completely opaque. I also love that they offer a blacked-out banjo and the option of a black logo.

You can also see that the calipers made it back on the bike with the new GPFAX pads. Keen eyes will also spot that we kept the retainer spring out of the calipers for that last little extra bit of racing performance.

IMG_5893.jpeg

In the pic of the master cylinder, you can see that the OEM clipons have black sections. I assume this is so that the switchgear and MCs get lined up in the right space at the factory. Since we are building a race bike, we are moving the stuff on the clipons around, and then those ugly black sections become visible. Sooooo.... we spent way too much effort hand refinishing the tubes.

IMG_5907.jpg

It took way more effort than I expected but eventually, I got it looking good. I haven't done the throttle side clip on yet, and honestly, I'm not excited. I just need to keep telling myself that it will be worth the work.

IMG_5909.jpg

And here it is installed with the Motion Pro grip and the Second MC from Hel. This one came off my GSXR and it looks soooo good on the duc.

The line for the rear brake was just about the perfect length. We didn't remember to spec a 90º banjo for the thumb brake, so the line looks a little silly coming from the thumb brake, but it'll work perfectly.

IMG_5911.jpg

I also picked up a set of used Bodywork that I found semi-locally. A friend was able to pick it up and bring it over. It came spray bombed in Ducati red. The paint job is fine for now but eventually. I want to do a better livery.

IMG_5912.jpg

Starting to look like a race bike!

IMG_5898.jpg

While this was happening, homie was dealing with the clutch.

You can sorta see here how long the bike was sitting in the rain without moving. The grime was all pooled on the bottom of the clutch basket. So that also got a really good cleaning.

IMG_5908.jpg

More clutch grossness

IMG_5897.jpeg

The new hub arrived. So much better aesthetically and should work a lot better too since the splines aren't pitted.

I did look into swapping to a slipper clutch but that's just not in the budget right now. If this was my main race bike, I'd splurge for the slipper. However, since it's for fun, I'm more than happy to be backing it in everywhere :p

IMG_5895.jpeg

The last thing I did was to continue cleaning up the exhaust. I didn't remember to take a good before pic. So this is after I already started cleaning it up. It was ever worse before I started.

IMG_5857.jpeg

And here's how it looks now after attacking it with a wire wheel. Far from perfect but worlds better.

IMG_5913.jpg

And I think that's all the updates from this weekend. Stay tuned!
 

The_rusty_racer

New member
Waay fewer updates this week. Most of that has to do with the bike being old and stubborn. Someone along the way had replaced the footpeg bolts with longer ones, and they stuck way past the foot pegs. The rearset bolts on the left side of the bike were stuck in pretty good, and we ended up nearly stripping out the bottom bolt. The first thing we tried was to use a butane torch to loosen it up a bit. The excessively long threads on the back had accumulated so much old chain lube and gunk that it actually caught fire. It burned out quickly, so there's no damage but I thought it was funny enough to take a pic. Is it really a passionate Italian machine if it's not on fire? :LOL:

IMG_5931.jpg

After finally removing the rearsets, I took the opportunity to sharpen the pegs for a little more grip on track. Here's a little before-and-after.

IMG_5936.jpg

From here, the next step is to get the swingarm off. It needs a deep clean, fresh bearings, and the brake pivot mod to increase the wheelbase enough to fit a bigger tire. Getting the swingarm off was a massive pain as the pivot bolt was seized in the frame.

IMG_5933.jpg

Eventually we got it off, tho. At this point, we wanted to do the swingarm mods, but after checking all three of the tap and die sets at the shop, none of them had the exact thread pitch and diameter that we needed. That kinda stalled us out, so we turned our attention to just cleaning everything up.

IMG_5937.jpg

Here's how gross the rear caliper was:

IMG_5932.jpg

And here it is after a nice, deep soak at the dish soap spa:

IMG_5934.jpg

Took forever, but ended up cleaning up all the washers, spacers, and bolts in the swingarm and eccentric. Didn't take any pics of that, but it was well worth the time to do it right.
 
Top