V4SPASTIK - 2023 V4S Panigale Street/Track Project

KODAKHODAK

Well-known member
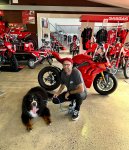
New Project Build, the Bayliss has left the building to a new owner in Sydney and the V4S got to stay to continue the Ducati legacy. Ill be transferring a few older posts to this thread to start the journey on the project at hand. Here is me and my bestie Chandler the Bernese Mountain Dog - Collected the bike from Frasers in Woologong, NSW. Definitely new bike day makes everyone smile šŸ˜

D5ECD92D-F4A5-4244-98BB-6580AE21D4A2.jpeg
 

KODAKHODAK

Well-known member
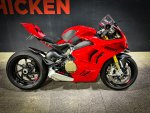
My very first mod when I got the bike was to swap the Standard Marchesini Wheels with the upgraded set of wheels that came off my V2 Bayliss. You have to agree the Marchesini M7RS do look much more aggressive. Snapped these from WRS for around $3600 AU delivered with duty fees in the cost.

38ECD952-B297-4843-999A-740A223E640B.jpeg
 

KODAKHODAK

Well-known member
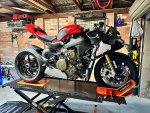
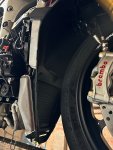
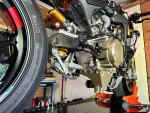
Next upgrades, bought a set of Evotech Radiator Guards, now having never worked on a V4S by taking off the fairings it was a learning process
and got to understand the bike a little bit more. To get the radiator guys in there was a little bit of shifting of the radiator and oil cooler when your required to remove certain bolts to loosen everything up, there is a few Youtube videos to watch for support. Overall took me about 2 hours start to finish. Looks way better now and have that insurance protection.

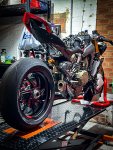
Oh yeah I bought a motorcycle hoist online here in Australia and was $960 AUD with shipping landed on my door step. Works a bloody treat and wish I bought one sooner.

If you require a link to the site check out these guys: Motorcycle Lift Table - Hydraulic

V4S_Pic0.jpgV4S_Pic1.jpg
 

KODAKHODAK

Well-known member
Hey Guys,

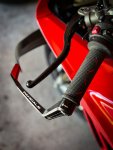
Another mod added to the V4S today, looked around for some bar ends and brake & clutch guards and came across a friend that installed a set of these DB-Race on his V4 SP2, gotta admit these are incredible and the quality as a one piece unit is just perfect for this bike.

Located them from the lads in Australia via: Lever Protection Set, Universal, Left-Right - Lever Guard

Next modification this week is removing the stock exhaust, let the fun begin!

IMG_5973_jpg.jpg
 

KODAKHODAK

Well-known member
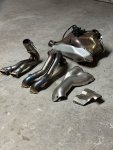
Yesterday, decided to take the stock exhaust off, having never challenged anything like this before and watching multiple videos of the best way to catch this I eventually got it off late last night.

The best tip I can give when doing this on your own is do what I did after you take off your bolts and nuts and try and put them back on the part/bike so you don't get consumed where everything goes. Overall I had to separate the oil cooler from the bike and had minimal oil spillage which was good as I only just recently got its first service and was worried that i would have to replace the oil depending on how much spilled out, lucky not much at all.

The rear was technical, especially trying to pry off the joins from the header pipe - front and rear headers. Using a block of wood and a decent rubber mallet after a good 30 mins it eventually came apart. "TIP" remove the rear header nuts to help separate for some reason soon as I removed the header nuts and moved it away from the engine it all made sense and the rear muffler came off. There is a video on Jarret Campsi Youtube where they explain the sequence on his Streetfighter. Link:


Some say to take the rear subframe off, but I managed to keep it on and used some NEW tools to help remove those hard-to-get places. Definitely grab a set of knuckle swivel socket attachments to provide angles your wrists and fingers couldn't get to :ROFLMAO:

Pretty proud of myself to have achieve this first part of the project and was great to understand how to work on a V4S for the first time.

IMG_6187.jpg

IMG_6206.jpg
 

bp_SFV4

Active member
II took my subframe off, but I also took off the entire radiator and oil cooler assembly as one piece. This made installing the radiator and oil cooler guards MUCH easier. I swapped to Engine Ice at the same time. While you're there, consider a shock spring if you need to change it.
 
Last edited:

BMW Alpina

FOUNDING Member & Administrator
Staff member
Yesterday, decided to take the stock exhaust off, having never challenged anything like this before and watching multiple videos of the best way to catch this I eventually got it off late last night.

The best tip I can give when doing this on your own is do what I did after you take off your bolts and nuts and try and put them back on the part/bike so you don't get consumed where everything goes. Overall I had to separate the oil cooler from the bike and had minimal oil spillage which was good as I only just recently got its first service and was worried that i would have to replace the oil depending on how much spilled out, lucky not much at all.

The rear was technical, especially trying to pry off the joins from the header pipe - front and rear headers. Using a block of wood and a decent rubber mallet after a good 30 mins it eventually came apart. "TIP" remove the rear header nuts to help separate for some reason soon as I removed the header nuts and moved it away from the engine it all made sense and the rear muffler came off. There is a video on Jarret Campsi Youtube where they explain the sequence on his Streetfighter. Link:


Some say to take the rear subframe off, but I managed to keep it on and used some NEW tools to help remove those hard-to-get places. Definitely grab a set of knuckle swivel socket attachments to provide angles your wrists and fingers couldn't get to :ROFLMAO:

Pretty proud of myself to have achieve this first part of the project and was great to understand how to work on a V4S for the first time.

View attachment 13259

View attachment 13260
Hi KodakHodak,
Amazing build as always, and I am looking forward to learning more from your journey.
By the way, if you are thinking of modifying the rear shock upper and lower mount or the suspension link, this is a good time because you will need to remove the swingarm for that.
And removing the swingarm can only be done when the exhaust is off the bike.
 

KODAKHODAK

Well-known member
II took my subframe off, but I also took off the entire radiator and oil cooler assembly as one piece. This made installing the radiator and oil cooler guards MUCH easier. I swapped to Engine Ice at the same time. While you're there, consider a shock spring if you need to change it.
I actually had to take the subframe off to remove the plastic engine covers, sadly the little hex bolts were so tight my alenkey tripped all of them and had to carefully hacksaw the heads to a flathead slot then used a big screwdriver to remove. All was success.
 

KODAKHODAK

Well-known member
Hi KodakHodak,
Amazing build as always, and I am looking forward to learning more from your journey.
By the way, if you are thinking of modifying the rear shock upper and lower mount or the suspension link, this is a good time because you will need to remove the swingarm for that.
And removing the swingarm can only be done when the exhaust is off the bike.
Not sure if ill touch the suspension at this point, the aim is to get the bike ready for a trackday in the new year, 2024 and understand the character of this bike. So far the street riding has been enjoyable but no where near to its full potential.
 

KODAKHODAK

Well-known member
"What's in the Boxxxxx"

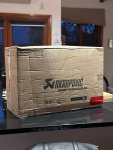
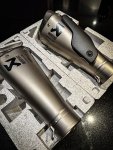
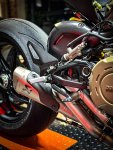
After 4 months of waiting for the box of fireworks the 2023 V4S Panigale Full Akrapovic (NON-Wheel Barrow) System has arrived, finally installed the system with great ease, the only difficult part was the back exhaust section near the rear suspension but with the right tools and patience, everything went on accordingly. Next will be custom tune at RB Racing!

Cheers
Frank
IMG_8162.jpg
IMG_8163.jpg
IMG_8187_jpg.jpg
IMG_8184_jpg.jpg
 

KODAKHODAK

Well-known member
Here it is Back Home!!!

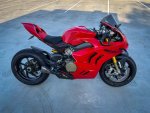
Finally, ECU Flashed with Woolich Racing Tune by RB_Racing - Took the V4S to Sydney and the boys got it done last week, today I decided to get the missy to drop me off and rode the beast home back to Canberra. Happy with the guys at RB_Racing, I didn't aim for big power, I just wanted the map to be smooth in all rev range. I had a bit of fun on the way home and gave it a squirt and she pulls hard to the point 200+km rapidly appeared šŸ¤Æ

Max Power = 201.41hp @ Engine RPM = 13.72
Max Torque = 85.75Nm @ Engine RPM = 11.70

Fresh Supercorsa V4 tyres fitted thanks to my work at Canberra BMW Motorrad - Yeah I know i work for BMW but own a Ducati šŸ˜‚ - Good thing is I got to ride the S1000RR M and even thou it was dead stock it wasnt too bad of a bike, Id be keen to see what they go like with full system and no restrictions.

Anyways, pretty stoked how the V4S is coming along, the overal look is starting to take shape, few things id like to ask is what riding modes do many of you select on the dash and do you leave the suspension iin Dynamic and forget or do some adjust to suit Street & Track conditions?

Cheers
Frank

v4s_3.jpg
 

BMW Alpina

FOUNDING Member & Administrator
Staff member
I actually had to take the subframe off to remove the plastic engine covers, sadly the little hex bolts were so tight my alenkey tripped all of them and had to carefully hacksaw the heads to a flathead slot then used a big screwdriver to remove. All was success.
Hi KodakHodak,
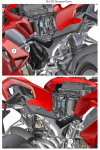
Friendly reminder: if you remove the subframe from the main frame, all those 4 large bolts holding the subframe to the main frame and engine block need to be replaced with 4 new bolts (that is what 2018 Ducati Service Manual stated),
most likely because they need to be torque to near the max limit for that bolt size, and they also hold a lot of weight (rider and passenger).

1702152104800.png

1702152153454.png
 

KODAKHODAK

Well-known member
Hi KodakHodak,
Friendly reminder: if you remove the subframe from the main frame, all those 4 large bolts holding the subframe to the main frame and engine block need to be replaced with 4 new bolts (that is what 2018 Ducati Service Manual stated),
most likely because they need to be torque to near the max limit for that bolt size, and they also hold a lot of weight (rider and passenger).

View attachment 13289

View attachment 13290
Ok cheers, I best buy a few then =)
 

bp_SFV4

Active member
Hi KodakHodak,
Friendly reminder: if you remove the subframe from the main frame, all those 4 large bolts holding the subframe to the main frame and engine block need to be replaced with 4 new bolts (that is what 2018 Ducati Service Manual stated),
most likely because they need to be torque to near the max limit for that bolt size, and they also hold a lot of weight (rider and passenger).
The manual for the exhaust doesn't say to replace them, but lowers the torque value to 24 Nm for all four.
 

BMW Alpina

FOUNDING Member & Administrator
Staff member
7791B321AA
The manual for the exhaust doesn't say to replace them, but lowers the torque value to 24 Nm for all four.
Following your information,
I just checked the Akrapovic exhaust manual for 2021 and older Panigale V4, and it did specify the torque to just 24Nm now.

Ducati must have updated it since, most likely, the Akrapovic exhaust manual is newer than the 2018 (bike) service manual that I have;

However, if those bolts had been torqued to the high torque before (from the factory), I would still replace those 4 bolts and then torque them to 24Nm.
4 stock factory bolts are not expensive, just as precautions. (might also be a good excuse to replace the 4 bolts with equivalent Titanium Bolts or the Motocorse bolts (with cover)).

EDIT, AFTER doing more reading, I believe the Akrapovic Manual is incorrect. I recommend to follow the Ducati Service Manual (instead of the Akrapovic manual). Meaning replace all 4 bolts with brand new bolts Part# 7791B321AA. Then torque the 2 upper bolts to aluminum frame to 31Nm and 2 lower bolts to the Cylinder Head to 35Nm, plus don't forget that all of them need GREASE B. My reasoning is several posts below.

It's also interesting that for the 2022 and newer Panigale V4, the exhaust design no longer requires the rear subframe to be removed when installing the Akrapovic full system (either under the engine model or the wheelbarrow model)

By the way, I just uploaded all 3 Akrapovic Full System Manuals from 2021 older bike to 2022+ and also the Wheelbarrow style to our forum resource page, link here: https://ducatimodified.com/resources/


Below is the screenshot of the page describing the subframe bolt torque in the Akrapovic exhaust manual for 2021 and older Panigale V4
1702192692074.png

1702192727713.png
 
Last edited:

KODAKHODAK

Well-known member
I Still removed the rear subframe, it made it way easier to get to certain bolts. Definitely a good learning curve doing it yourself. I even removed the charcoal canister as recommended.
 

BMW Alpina

FOUNDING Member & Administrator
Staff member
I think the issue is more to do with the threads in the aluminium frame rather than the M8 steel bolts.
No, if you check the ProTi Titanium M8 bolt page link here: https://www.protiglobal.com/good.php?fid=1408&column=M8+Bolt&column1=BOLT
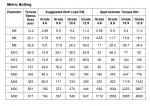
You can see the maximum safety torque is rated at 38Nm. The ProTi Titanium Bolt is made from Grade 5 Titanium and then fully FORGED, which allows them to be equivalent to Grade 10.9 steel bolts.
Even with the equivalent strength of Grade 10.9 steel, ProTi Titanium Bolt only recommends max safety torque at 38Nm.

For a second reference, below is a table of recommended Max Torque for STEEL material bolts along with the corresponding grade, and as you can see for M8 with Grade 10.9, max Torque is 38.7Nm (so the ProTi limit is spot on)
Once you torque a bolt near it's limit, it will STRETCH almost or at its stretch limit, so if you reuse, it might fail (especially under load).
The threads on the aluminum frame (and especially the aluminum cylinder head) should be stronger since they are part of a larger mass/structure, and they also have a larger diameter than the M8 bolt, 8mm diameter, so they will not stretch as much as the bolt.
But it's also true that the 2 bolts going to the aluminum frame are only recommended to 31Nm not only because of the aluminum material of the frame but also how the frame was cast compared to the aluminum cylinder heads (where the other 2 bolts torqued to 35Nm)
1702234309185.png


I was not happy with my 2018 Panigale V4 Service Manual because I worried it was too outdated,
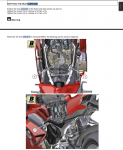
so last night, I decided to purchase the service manual specific for my 2020 V4 25Ā° Anniversario 916, and below is the screenshot from my bike model (2020) service manual related to these subframe bolts.
These 2020 V4 25Ā° Anniversario 916 specific manual still recommends replacing all 4 subframe bolts after removal/refitting.
1702234655731.png

From these 2020 V4 25Ā° Anniversario 916 service manual, the 2 bolts that connect to the cylinder head are torqued at 35Nm, which is very close to the max limit of 38Nm (and with variation/inaccuracy in torque wrench might be exceeded in some cases).
You might ask, then, why do the 2 other bolts going to the aluminum frame recommended for 31Nm also need to be replaced?
Well, all 4 bolts are using the same Part# 7791B321AA. Once you take all 4 of them out from the bike, you might mixed them and forget which one came from the 35Nm (lower bolts to the cylinder head) and which came from the 31Nm (upper bolts), so to make sure Ducati just recommend replacing all 4 bolts.
Not to mention, All 4 bolts need to hold on average, 200 pounds of rider weight (or 350 pounds of rider and passenger weight when there are passengers) plus the weight of the subframe itself. So these 4 bolts experience continuous stress.
Plus these service manual also ask to use GREASE B, meaning that 35Nm and 31Nm is WET TORQUE and not DRY TORQUE. Most max torque ratings on the tables are DRY TORQUE. So the 35Nm GREASED Torque is higher if you correlate it to Dry Torque.

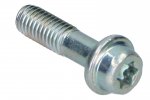
Another IMPORTANT clue that this bolt Part# 7791B321AA needs to be Torqued BEYOND other M8 bolts is the fact that Ducati chose a TORX head instead of the regular hex socket, as you can see from the picture of the exact bolt below.
I cannot recall any other M8 bolts with a TORX head in my bike besides these 4 subframe bolts. Even the rear set bolts with M8 only have the regular hex socket, and these hex socket types only tighten to around 25Nm.
TORX head designed can handle more torque than hex socket head due to more surface area to transfer the torque.
1702235513170.jpeg

In summary, the more I think about this, and based on Ducati's choice to use a TORX head for these 4 bolts, I believe the Akrapovic Manual might have mistake in assuming it is just M8 bolts where normally it will only be tightened to around 25Nm. To my surprise, the Akrapovic manual doesn't even say anything about using GREASE B.
So, I now strongly believe the correct torque for the 4 bolts holding the subframe should be 35Nm for the lower bolt to the cylinder head and 31Nm to the main frame with GREASE B. The Akrapovic manual is incorrect.

The price of these Part# 7791B321AA M8 TORX head special bolt is only 3.53 euro at 7791B321AA Ducati Spezialschraube - KFM-MotorrƤder or $6.62 at Ducati Omaha: 7791B321AA - SCREW, SPECIAL per bolt
So for a total of less than 16 Euro at KFM or less than $27 USD at Ducati Omaha, it's worth it to follow the Ducati Service Manual, replace them with 4 brand new bolts, and torque them to 35Nm and 31Nm with GREASE B whenever you take them out.
 

bp_SFV4

Active member
Oversized chart and pictures aside, I doubt that very much, considering the Akrapovic manual was written by Ducati. It has nothing to do with the bolts or their head, it's what they thread into.

I don't know why you'd think aluminium threads would be stronger than a steel bolt...
 

BMW Alpina

FOUNDING Member & Administrator
Staff member
Oversized chart and pictures aside, I doubt that very much, considering the Akrapovic manual was written by Ducati. It has nothing to do with the bolts or their head, it's what they thread into.

I don't know why you'd think aluminium threads would be stronger than a steel bolt...
I think the main issue is that you think more about threads made of aluminum material, which is, of course, easier to cross-thread and deform compared to steel threads. (this cross-threading usually happens during the early thread engagement (first or maybe second rotation) of the threads).
However, since the thread's main function is to "hold," When there are enough threads engagement without any cross-threading, then the aluminum threads have enough surface area to spread the force so as not to be deformed by the torque force from the mating steel thread of the bolt.

Ducati , in the multi-year version of the service manuals, asks to replace the STEEL bolt, which means the STEEL bolt had been stretched to its limit. (thus need replacement)
If the assumption is that the aluminum threads on the frame/cylinder head are the weak points, then Ducati will tell us to replace the whole frame/cylinder head.
Simply lowering the torque to 24Nm to prevent the aluminum thread from being deformed will be too late because, from the factory, they are already tightened to 35Nm and 31Nm (WET Torque with Grease B)
Once aluminum threads are deformed, they cannot be saved simply by lowering the next tightening torque.


Please note, you can make aluminum parts stronger than steel; they just have to be larger/thicker than the steel counterparts while potentially still lighter.
In this case, the entire steel bolt's main body would stretch first before the aluminum thread deformed. Again, it is a multiple circle/rings of aluminum Threads with very short lips, so the main body of the steel bolt will stretch first before these multiple circles/rings of aluminum thread(S) deform.

The aluminum frame/cylinder head was also stretched, but they were far lower stretch than the main body of the steel bolt since the aluminum frame/cylinder head surrounding area was much larger/stronger mass than the main body of the bolt.
The aluminum frame/cylinder head is basically a super giant aluminum NUT, thus much stronger (much much larger diameter and mass compared to the steel bolt 8mm max diameter).

And yes, you need to pay attention to the design of the head of a bolt. Only if it needs to handle a larger than normal load will Ducati specify a TORX head.
Link: https://en.wikipedia.org/wiki/Torx

Regarding the Ducati service manual vs. the Akrapovic manual, Ducati (the human who typed these manuals) can also make mistakes;
I found some mistakes in the Torque value somewhere in the 2018 service manual. Whoever wrote the Akrapovic manual must have forgotten to check with the Ducati service manual.
Actually, I had a better example:
If you check this 2020 V4 25Ā° Anniversario 916 specific service manual bolt torque table page 42 (screenshot below), you can see Ducati made another mistake (inconsistent) because, on this table, they recommend the 2 subframe bolts going to the cylinder head is torque to only 31Nm even though in the "refitting subframe section" page 749 (that I screenshot on my post above) said to torque to 35Nm.
So, even in the same (and newer) service manual, Ducati made an inconsistency mistake.
1702239932982.png

In the end, which are you going to trust more?
Information from Multi-years of Ducati service manuals to replace the steel bolts or the single Akrapovic service manual to reuse and lower the torque (of previously stretched and stressed old bolts)?
 
Top